


              |  |
 |
 |
 |
 |
 |
 |
 |
 |
 |
 |
EDI Connect User's Guide
CHAPTER 5
A normal EDI Terminal Component may perform satisfactorily on your testing workstation within xCommerce Designer, however, after deploying to a production application server environment, you may discover that the Service encapsulating this component performs slowly under load. This is not unusual and is similar to problems experienced in the earlier days of database systems that supported multiple users. The problem can usually be traced to the time spent on a variety of steps needed in a typical Terminal session transaction. Ignoring the actual execution of the transaction itself, these steps include:
navigation through a menu system to point where the transaction can be launched
signing the user off and closing the connection when the transaction is finished.
While it may seem small for an individual transaction, this one to one relationship of a EDI Terminal component to the session overhead becomes problematic under heavy transaction loads typical of many WEB sites and/or application server environments. xCommerce minimizes the repetitive session overhead by providing two special objects: a Connection Resource type called a EDI Logon Connection and the EDI Logon Component.
When you install the EDI Terminal Enterprise Enabler, three types of Connection Resources are added to the Connection creation wizard: an EDI Connection, an EDI Connection and a EDI Logon Connection (henceforth a Logon Connection). The EDI connections are true connections and, when used by a EDI Terminal component, can establish a session with a host system.
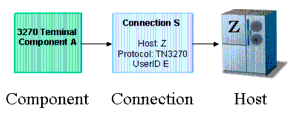
The EDI Logon Connection, however, is different. It defines a pool of available User Ids and uses a EDI Logon Component (henceforth a Logon Component) to execute connection related actions for each User Id. It is the Logon Component that actually establishes connections using either a EDI or Connection. The Logon Component will be discussed later, but it is important to note that a Logon Connection and Logon Component must be used together to establish connection pools.

Normally, when a EDI Terminal component activates a connection defined using a single User ID and password, that connection's User ID is unavailable to another instance of the component or a different component that uses the same connection definition.

The Logon Connection provides performance benefits by making additional User IDs available to establish new connections eliminating the serial wait time for other components to finish, and by reusing a connection when possible to avoid session overhead.

In the diagram above, notice that each active EDI Terminal Component has its own User ID, its own instance of the Logon Component and its own instance of the Connection Resource. Also notice that the execution of the multiple EDI Terminal Components that would otherwise use the same Connection Resource and cause repetitive serial logon overhead, can instead reuse a User ID/Logon Component/Connection instance provided by a single Logon Connection. Finally, note that at Design time, the user only created one Logon Connection object, one Logon Component object, and one Connection object. The Logon Connection takes care of creating individual instances for each User ID at runtime.
The combination of a Logon Connection, its Logon Component, and its Connection are what constitute a Connection Pool. The key factor in deciding when you need to define and deploy additional Connection Pools, is when one or more EDI Terminal Components need to use a different launch screen in the Logon Component.
The Logon Connection is not a true connection object like a EDI Connection Resource, but more descriptively, a pool of User IDs that have a variety of connection management parameters associated with them. One key parameter is the use of a Logon Component for all the User IDs that performs initial Logon tasks and menu navigation to a launch screen.
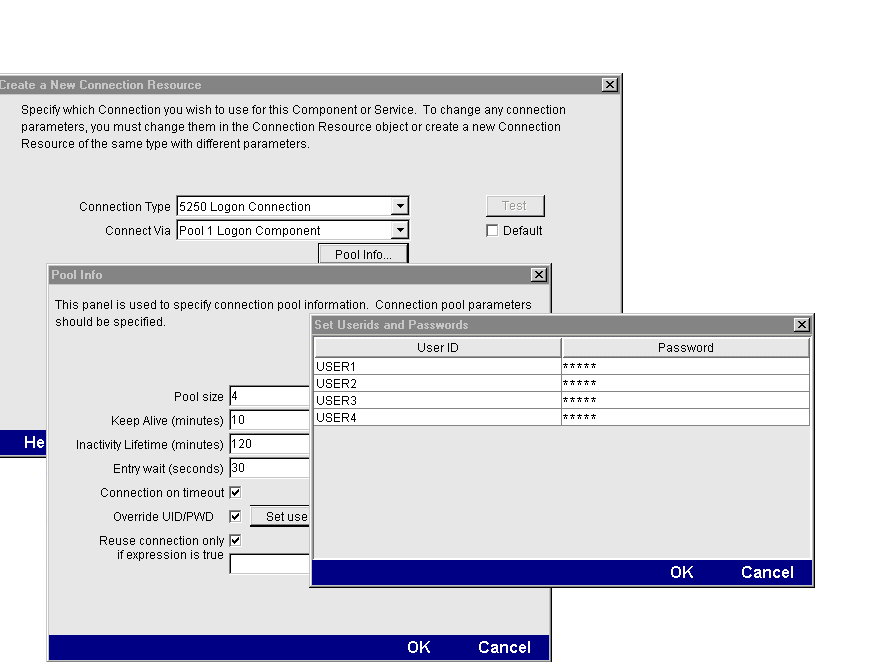
In addition to specifying a Logon Component, the Logon Connection provides the following User ID pool functionality:
allows the specification of multiple User IDs in advance ensuring that clients are able to secure a connection when one is needed
allows the reuse of a User ID/connection once it is established to eliminate repeated user authentications and disconnects
allows a single User ID to use multiple connections if this is supported by the host system
keeps a connection active to prevent host timeouts during inactive periods
set a timeout period to wait for a fully active pool to provide a free connection
specify error handling dependent on the state of the Logon Component used by the Logon Connection
In order for multiple instances of a EDI Terminal component or different EDI Terminal components to use a single Logon Connection, the following conditions must be met:
All the EDI Terminal components must use the same Connection Resource (thereby sharing the EDI Host, Port and data encoding parameters or EDI connection Gateway and Server parameters)
All the EDI Terminal components must have a common launch screen in the host system from which they can begin execution (see "About the EDI Logon Component" below for more detail).
If your host system security supports multiple logins from a single user ID, you may have circumstances where you wish to pool the single User ID. This can be accomplished by performing the following steps:
Specify a User ID/Password in the Connection Resource used by the logon Component
On the Pool Info dialog of the Logon Connection, specify a Pool Size greater than 1
Do NOT check the Override the UID/PWD setting in the Pool Info dialog of the logon Connection.
These steps will cause each pool slot to use the User ID and Password contained in the Connection object and not use and user IDs from the pool.
The Logon Component is a special component whose Action Model is designed to manage a connection that will be used by multiple EDI Terminal components. The Logon Component is in most respects the same as EDI Terminal components except for two key differences:
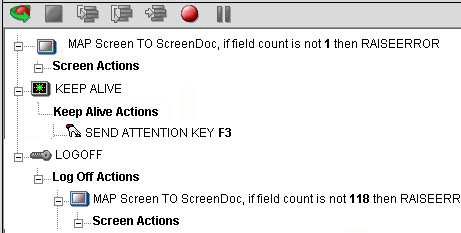
Its Action Model is organized and executed by connection tasks: Logon Actions, KeepAlive Actions and Logoff Actions
A Logon Component is not executed by another component or service but instead by a logon Connection.
A Logon Component must and can only be used in conjunction with a Logon Connection.
The connection tasks of a Logon Component provide three additional performance benefits when used with a Logon Connection.
LOGON actions navigate through the host environment and park at a desired launch screen in the host system when a User ID from the Pool first activates a connection to the host. The EDI Terminal components that subsequently reuse the connection have the performance benefit of already being at the launch screen and won't incur the overhead of navigating to the launch screen as if they had come in under their own new session.
KEEPALIVE actions prevent the host from dropping a connection if it is not used within a standard timeout period.
LOFGOFF actions exit the host environment in a manner you prescribe for all the connections made by User IDs from the pool.
Actions you place in the LOGON group are primarily concerned with signing into the host security screen and then navigating through the host menu system to a launch screen where each EDI Terminal component's Action Model will start. It is important that any EDI Terminal component using a Logon component be able to start execution at the same common screen. Otherwise, the performance gains of avoiding navigation overhead won't be realized and more importantly, the odd EDI terminal component won't work.
Logon Actions are created the same way as in the EDI Terminal Component that does not use a Logon Connection. You use the Record feature to create the actions necessary to enter sign on information such as User ID and Password as well as your initial menu choices to arrive at the launch screen. The other important thing to remember is to use the User IDs and Passwords from the Logon Connection Pool. To do this you need to map the two special system variables called USERID and PASSWORD to the appropriate fields on the screen. By using these two variables, xCommerce will automatically map their values from the next active and free Pool slot.
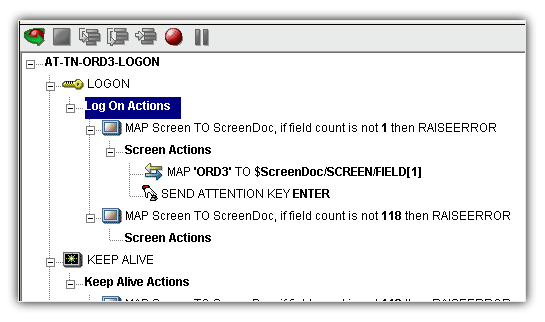
The launch screen must be a common point of execution for all the EDI Terminal Components using the User ID pool provided by a Logon Connection. To get to the launch screen you create Actions as you would in a normal EDI Terminal component. The LOGON actions in a Logon Component are executed only once when a new connection is established.
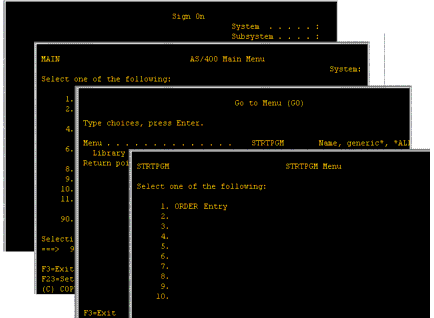
So if a User ID pool of three entries is fully used and reused by the execution of a component 15 times, the overhead of navigating to a menu item that executes the transaction of interest will only occur three times. Likewise, there will only be three Logons to the host because LOGON actions are only executed once - when a new connection is activated (not when it is reused).
The KEEPALIVE heading is where you place actions that will create activity and interact with the host which keeps occurring over the connection used by the Logon Component. KEEPALIVE actions usually involve sending an AID key like <ENTER> to the host. However, if after sending the AID key the screen changes to one different than the launch screen, you must be sure to return the Logon Component to the launch screen in the KEEPALIVE section. Failure to do so will leave the next component at an incorrect screen causing it to fail.
The Pool Info dialog of a Logon Connection is where you control how often the KEEPALIVE actions will execute. If you specify in your Logon Connection pool that you would like to keep a free connection active for 2 minutes, but the host will normally drop a connection after one minute of activity, you can specify keyboard actions to let the host know the connection is still active such as sending an <ENTER>key.
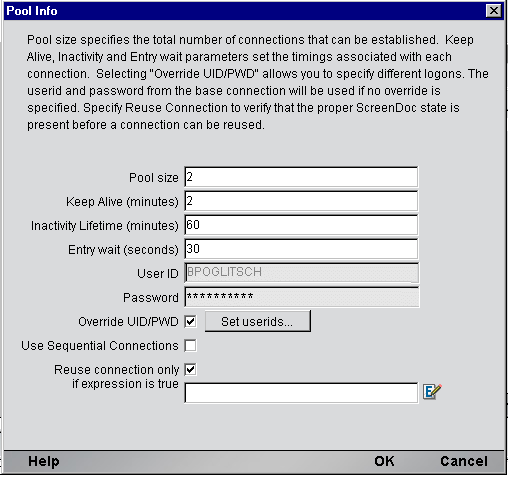
KEEPALIVE actions may be executed multiple times, but after the KeepAlive Time Period defined on the Pool Info dialog of the Logon Connection.
NOTE: The execution of the KEEP ALIVE actions does not cause the Inactivity Lifetime clock to reset in the Logon Connection. Only a EDI Terminal component's execution will reset the Inactivity Lifetime.
Logoff actions essentially navigate the User ID properly out of the host system. Logoff actions execute only once for a connection and only when a connection times out (i.e. the Inactivity Lifetime expires) or the connection is closed via the EDI Server console.
Each time a User ID is activated from the Logon Connection Pool, an instance of the Logon Component is created and associated with that User ID. Then the Logon actions are executed until the desired launch screen is reached. At this point the EDI Terminal component execution begins. When it is finished another EDI Terminal component using the same Logon Connection may begin executing, starting from the same launch screen.
If another component doesn't begin executing, then the connection enters an active but free state defined by the Inactivity Lifetime and KeepAlive settings on the Pool Info dialog of the Logon Connection. IF the Keep Alive period (e.g. 2 minutes) is shorter than the Inactivity Lifetime (e.g. 120 minutes), then when the KeepAlive Period ends, the KeepAlive actions will be executed (preventing a host timeout and dropped connection) and the KeepAlive Period begins anew. The Inactivity Period and KeepAlive Period are defined on the Pool Info dialog of the Logon Connection.
A logon Component's execution lifetime is dependent on the activity of the Logon Connection that uses it. As long as one entry in the Logon Connection pool is active, then one instance of the Logon Component will be in memory (in a live state). A Logon Component will cease execution when the last remaining pool entry expires due to inactivity. The only other way to stop execution of a Logon Component is through the EDI Console on the Server.
When creating a EDI Terminal component, you must first create the Connection object it needs first. Similarly, when creating the object comprising a Connection Pool, you must create the needed objects first, which implies starting at the host and working your way backwards to the EDI Terminal Component that will access the host. A typical sequence of steps for creating a Connection Pool is:
This step is simple. Create a new Connection Resource as described in Chapter 2 of this Guide. Even though you will be using User IDs and Passwords defined in the Logon Connection later, you should still define one in the Connection as well. This will be needed when you define the Logon Component in the next step. Alternatively, you can simply use an existing Connection Resource.
 To create a EDI Logon Component:
From the Designer File menu, select New xObject, then Component, then EDI Logon.
Click Finish and the Logon Component Editor appears.
NOTE: Recording actions follows a series of steps. The cursor must be positioned over LOGON, turn record on, when you are done, turn Record off. Position the cursor to KEEPALIVE, turn Record on, when you are done, turn Record off. Position the cursor to LOGOFF, turn record on, when you are done, turn record off.
Record LOGON Actions for logging into the host and navigating to the launch screen using the same Recording techniques described in Chapter 4 of this Guide.
Edit the LOGON Map actions that enter a User ID and Password to instead use the special USERISD and PASSWORD variables described in the section titled "EDI Specific Expression Builder Extensions" in Chapter 4 of this Guide.
Create the needed SEND Key actions in the KEEPALIVE section of the Action Model (a quick way is to copy an existing SEND key action, Paste it, and then modify the key code sent).
 To create a EDI Logon Connection:
From the Designer File menu, select New xObject, then Resource, then Connection or you can click on the icon. The Header Info panel of the New xObject Wizard appears.
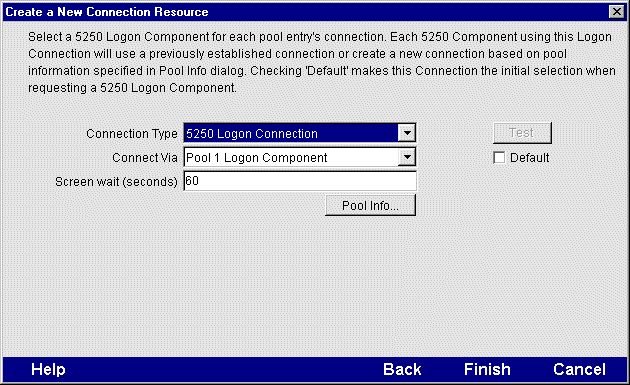
For the Connection Type select "EDI Logon Connection" from the drop down list.
In the Logon Via control, select the Logon Component you just created.
Click on the Pool Info button and the Pool Info dialog appears.
Enter a Pool Size number. This represents the total number of connections you wish to make available in this pool. For each connection, you will be expected to supply a UserID/Password combination later.
Enter a KeepAlive time period. This number represents (in minutes) how often you wish to execute the KEEPALIVE actions in the associated Logon Component whenever the connection is active but free (i.e. not being used by a EDI Terminal component). The number you enter here should be less than the Timeout period defined on the host for an inactive connection.
Enter an Inactivity Lifetime. This number represents (in minutes) how long you wish to keep an active free connection available before closing out the connection and returning it to the inactive portion of the connection pool. Remember, that once the connection is returned to its inactive state in the pool, it will incur the overhead of logging in and navigating host screens when it is re-activated.
Enter an Entry Wait time in seconds. This time represents how long a EDI Terminal component will wait for a free connection when all the pool entries are active and in use. If this time period is reached, an Exception will be thrown to the Application Server.
Checking Override UID/PWD means you wish to specify User ID/Password combinations for use in the connection pool. When checked, this activates the Set USERIDs button. Click on the button to display the Set USERIDs and PASSWORDS dialog.
Enter as many USERID/PASSWORD combinations until you reach the size of the pool you specified and click OK.
You may optionally check the Reuse Connection Only if expression is true control. This control allows you to enter an expression that checks to make sure the launch Screen is still present each time a new EDI Component is about to reuse an active free connection. Under circumstances unrelated to your xCommerce Service, its possible the Launch Screen will be replaced by the host with a different screen. For instance, if there is a system ABEND on the host, the launch screen in the Logon Component may be replaced by a System Message screen. For instructions on how to create this expression, see the section: "Handling System Messages" in Chapter 2 of this Guide.
At this point, you are ready to create a EDI Logon Component that can use the Connection Pool. For the most part, you will build the component as you would a normal EDI Terminal component, the only difference being is the Connection you specify on the New xObject Wizard.
 To create a EDI Terminal Component:
From the Designer File menu, select New xObject, then Component, then EDI Terminal.The Header Info panel of the New xObject Wizard appears.
Select the necessary Input and Output Templates and click Next, and the Connection Info panel appears.
Select the Logon Connection you created and click on Next, and the Component editor appears.
Build the component according to instructions in Chapter 3 of this Guide.
Copyright © 2004 Novell, Inc. All rights reserved. Copyright © 1997, 1998, 1999, 2000, 2001, 2002, 2003 SilverStream Software, LLC. All rights reserved. more ...