16.2 Assigning Roles
The action lets users request role assignments. This action is available to Role Module Administrators, Role Managers, and other authenticated users not specifically assigned to any of the installed system roles.
-
Role Module Administrators can request assignment of users, groups, and containers to roles. The Role Module Administrator has unlimited scope within the directory.
-
Role Managers can request assignment of users, groups, and containers to roles to which they have browse rights.
-
Other authenticated users can request assignment to roles to which they have browse rights.
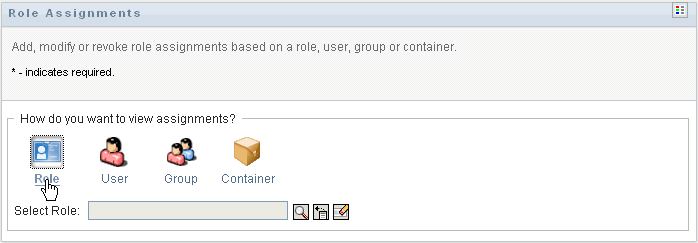
16.2.1 Assigning Users, Groups, and Containers to a Role
To request assignment of one or more users, groups, or containers to a single role:
-
Click in the list of actions.
-
Click the icon under .
-
Select the role to which you want to assign the users, groups, or containers.
Use the or the tool to select the role. For details on using the and tools, see Section 1.4.4, Common User Actions.
The User Application displays the current status of assignments for the selected role.
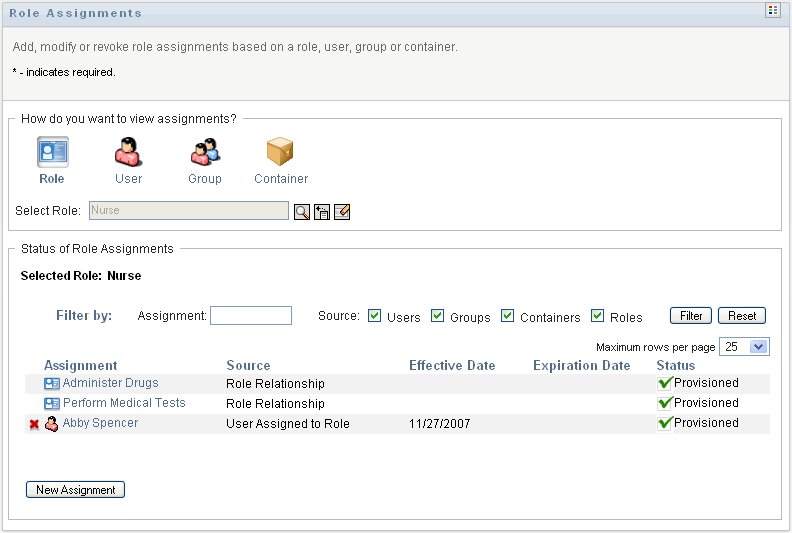
The columns in the assignment list table are described below:
-
The column provides the name of the object assigned to the currently selected role.
-
The column indicates the manner in which the object has been assigned to the role, as described below:
-
The column shows the date when the assignment goes into effect. If no date is displayed, the assignment went into effect immediately after it was requested.
-
The column shows the date when the assignment expires. If no date is displayed, the assignment remains in effect indefinitely.
-
The column shows whether the assignment has been granted:
-
-
You can filter the list of assignments, as follows:
-
To view only those assignments, see Filtering Data for information about what to enter in the box.
-
To view users assignments only, select the box.
-
To view group assignments only, select the box.
-
To view container assignments only, select the box.
-
To view role relationships only, select the box.
-
To apply the filter criteria you’ve specified to the display, click .
-
To clear the currently specified filter criteria, click .
-
-
To set the maximum number of assignments displayed on each page, select a number in the drop-down list.
-
To create a new assignment, click .
Specify the details for the assignment in the group box.
-
In the drop-down, select , , or to indicate what type of object you want to assign to the currently selected role.
-
In the field, specify the users to assign.
NOTE:If you select as the type of assignment, the user interface displays the field. If you select , it displays the field.
-
In the field, type text to describe the reason for the assignment request.
-
In the field, specify the date when you want the assignment to take effect. You can use the Calendar control to select the date.
-
In the field, indicate whether you want the assignment to have an expiration date. If the assignment will remain in effect indefinitely, select . If you want to define an expiration date, select and use the Calendar control to select the date.
-
Click to submit the role assignment request.
NOTE:The action allows you to see roles that are related to the currently selected role, but does not permit you to create role relationships. To do this, you need to use the action.
-
If a separation of duties conflict will occur if a role is assigned to one or more users, the user interface displays the box at the bottom of the page. In this case, you need to provide a business justification for the role assignment.
To provide a justification:
-
Type a description in the field that explains why an exception to the separation of duties constraint is needed in this situation.
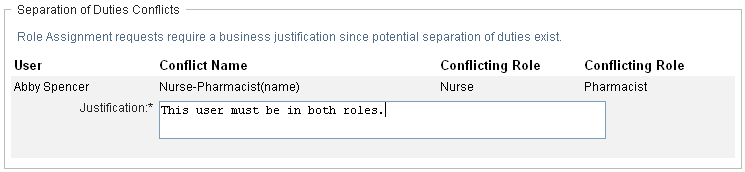
NOTE:You do not need to provide a justification in cases where the new role assignment conflicts with an existing assignment that the user acquired indirectly, either through a role relationship, or by membership in a group or container. If a user is added to a role indirectly, and a potential separation of duties conflict is detected, the User Application allows the new assignment to be added, and records the violation for reporting and audit purposes. If necessary, role administrators can correct the violation by redefining roles.
16.2.2 Assigning Roles to a Single User
To request assignment of one or more roles to a single user:
-
Click in the list of actions.
-
Click the icon under .

-
Select the user to whom you want to assign one or more roles.
Use the or the tool to select the user. For details on using the and tools, see Using the Object Selector Button for Searching.
The User Application displays the current status of assignments for the selected user.
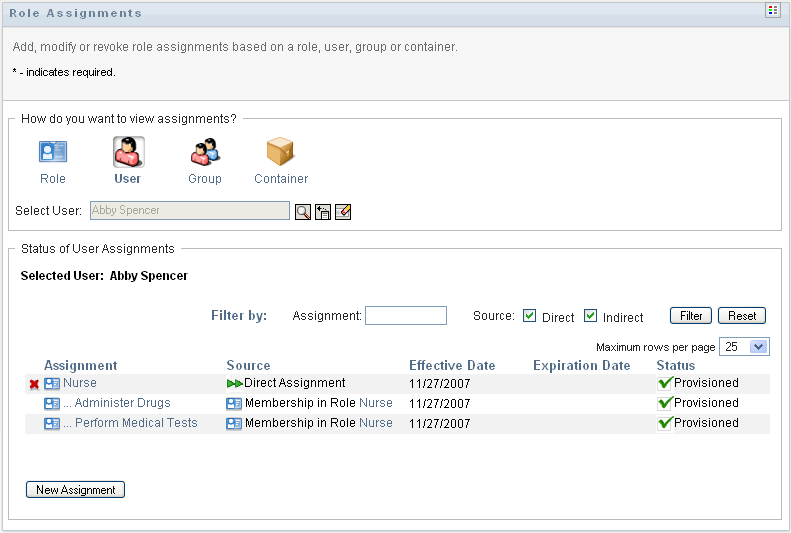
The columns in the assignment list table are described below:
-
The column provides the name of the role assigned to the currently selected user.
-
The column indicates how the role was assigned to the user, as described below:
-
The column shows the date when the assignment goes into effect. If no date is displayed, the assignment went into effect immediately after it was requested.
-
The column shows the date when the assignment expires. If no date is displayed, the assignment remains in effect indefinitely.
-
The column shows whether the assignment has been granted and provisioned:
-
-
You can filter the list of assignments, as follows:
-
To view only those assignments that start with a particular string of characters, see Filtering Data for information about what to type in the box.
-
To view only those assignments that were assigned directly to the user, select the box.
-
To view only those assignments that were assigned indirectly, select the box. Indirect assignments are those assignments that a user receives through a role relationship, or by being a member in a group or container.
-
To apply the filter criteria you’ve specified to the display, click .
-
To clear the currently specified filter criteria, click .
-
-
To set the maximum number of assignments displayed on each page, select a number in the drop-down list.
-
To create a new assignment, click .
Specify the details for the assignment in the group box.
-
In the field, specify the roles to assign.
-
In the field, type text to describe the reason for the assignment request.
-
In the field, specify the date when you want the assignment to take effect. You can use the Calendar control to select the date.
-
In the field, indicate whether you want the assignment to have an expiration date. If the assignment will remain in effect indefinitely, select . If you want to define an expiration date, select and use the Calendar control to select the date.
-
Click to submit the role assignment request.
-
If a separation of duties conflict will occur if a role is assigned to the currently selected user, the user interface displays the box at the bottom of the page. In this case, you need to provide a business justification for the role assignment.
To provide a justification:
-
Type a description in the field that explains why an exception to the separation of duties constraint is needed in this situation.
Indirect role assignments and SoD conflicts You do not need to provide a justification in cases where the new role assignment conflicts with an existing assignment that the user acquired indirectly, either through a role relationship, or by membership in a group or container. If a user is added to a role indirectly, and a potential separation of duties conflict is detected, the User Application allows the new assignment to be added, and records the violation for reporting and audit purposes. If necessary, role administrators can correct the violation by redefining roles.
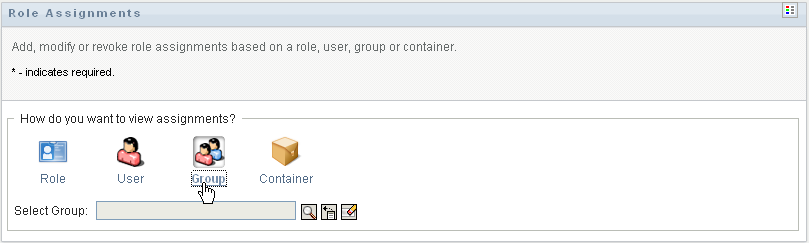
16.2.3 Assigning Roles to a Single Group
To request assignment of one or more roles to a single group:
-
Click in the list of actions.
-
Click the icon under .
-
Select the group to which you want to assign one or more roles.
Use the or the tool to select the group. For details on using the and tools, see Using the Object Selector Button for Searching.
The User Application displays the current status of assignments for the selected group.
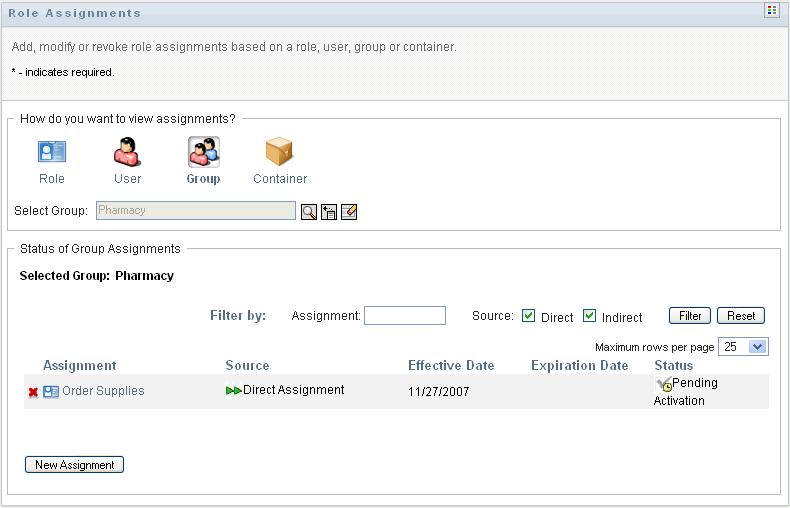
The columns in the assignment list table are described below:
-
The column provides the name of the role assigned to the currently selected group.
-
The column indicates how the role was assigned to the group, as described below:
-
The column shows the date when the assignment goes into effect. If no date is displayed, the assignment went into effect immediately after it was requested.
-
The column shows the date when the assignment expires. If no date is displayed, the assignment remains in effect indefinitely.
-
The column shows whether the assignment has been granted and provisioned:
-
-
You can filter the list of assignments, as follows:
-
To view only those assignments that start with a particular string of characters, see Filtering Data, for information about what to enter in the box.
-
To view only those assignments that were assigned directly to the group, select the box.
-
To view only those assignments that were assigned indirectly, select the box. Indirect assignments are those assignments that a group receives through a role relationship.
-
To apply the filter criteria you’ve specified to the display, click .
-
To clear the currently specified filter criteria, click .
-
-
To set the maximum number of assignments displayed on each page, select a number in the drop-down list.
-
To create a new assignment, click .
Specify the details for the assignment in the group box.
-
In the field, specify the roles to assign.
-
In the field, type text to describe the reason for the assignment request.
-
In the field, specify the date when you want the assignment to take effect. You can use the Calendar control to select the date.
-
In the field, indicate whether you want the assignment to have an expiration date. If the assignment will remain in effect indefinitely, select . If you want to define an expiration date, select and use the Calendar control to select the date.
-
Click to submit the role assignment request.
-
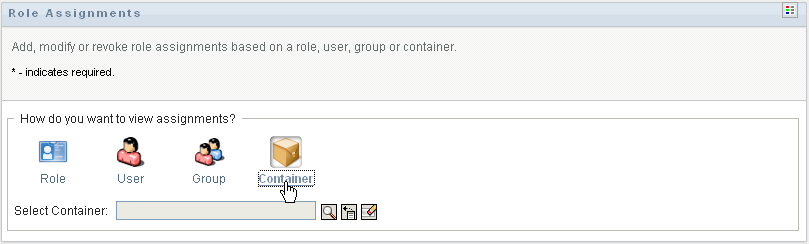
16.2.4 Assigning Roles to a Single Container
To request assignment of one or more roles to a single container:
-
Click in the list of actions.
-
Click the icon under .
-
Select the container to which you want to assign one or more roles.
Use the or the tool to select the container. For details on using the and tools, see Using the Object Selector Button for Searching.
The User Application displays the current status of assignments for the selected container.
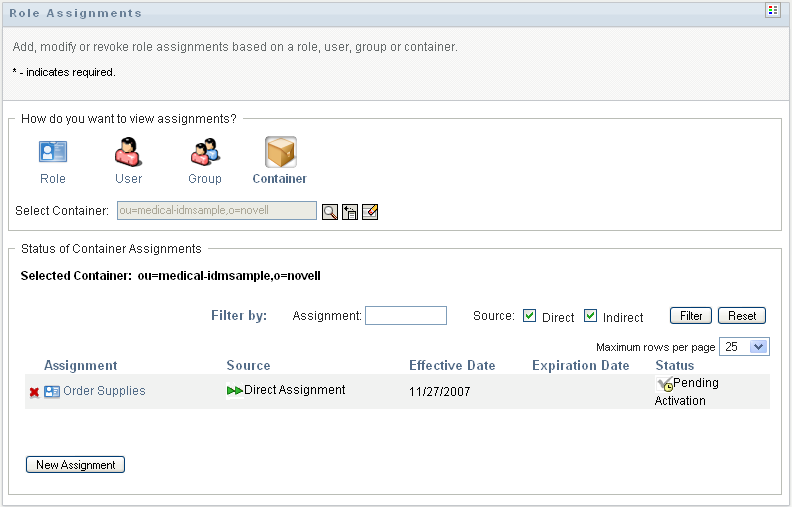
The columns in the assignment list table are described below:
-
The column provides the name of the role assigned to the currently selected container.
-
The column indicates how the role was assigned to the container, as described below:
-
The column shows the date when the assignment goes into effect. If no date is displayed, the assignment went into effect immediately after it was requested.
-
The column shows the date when the assignment expires. If no date is displayed, the assignment remains in effect indefinitely.
-
The column shows whether the assignment has been granted and provisioned:
-
-
You can filter the list of assignments, as follows:
-
To view only those assignments that start with a particular string of characters, see Filtering Data for information about what to enter in the box.
-
To view only those assignments that were assigned directly to the container, select the box.
-
To view only those assignments that were assigned indirectly, select the box. Indirect assignments are those assignments that a container receives through a role relationship.
-
To apply the filter criteria you’ve specified to the display, click .
-
To clear the currently specified filter criteria, click .
-
-
To set the maximum number of assignments displayed on each page, select a number in the drop-down list.
-
To create a new assignment, click .
Specify the details for the assignment in the group box.
-
In the field, specify the roles to assign.
-
In the field, type text to describe the reason for the assignment request.
-
In the field, specify the date when you want the assignment to take effect. You can use the Calendar control to select the date.
-
In the field, indicate whether you want the assignment to have an expiration date. If the assignment will remain in effect indefinitely, select . If you want to define an expiration date, select and use the Calendar control to select the date.
-
To propagate this role assignment to users in all subcontainers, select .
-
Click to submit the role assignment request.
-