
  |
Most of your work will be done in the Project Window, where you can drag and drop NT User and Group objects into NDS containers, and NT folders and volumes into any volume or folder in the destination NDS tree.
The Project Window is a place to model different migration scenarios before you begin the actual migration without affecting your NT domain or your destination NDS tree. All of the planning in the Project Window is done off-line, meaning that items moved and created in the Project Window are not actually moved or created until you begin the migration.
HINT: For information on shared NT folders that end with a dollar sign ($), click anywhere on your Windows desktop, press F1, click the Index tab, and then enter $shares in the keyword text field.
The Project Window and the Using the Project Window dialog box appear once you have created the migration project.
The following figure is an example of the Using the Project Window dialog box that appears on top of the Project Window.
Figure 4
Using the Project Window Dialog Box
The three basic steps outlined in this dialog box should be performed for each migration project. Once you are familiar with the tasks that you will be performing, click Close to access the Project Window and begin modeling your migration project.
Review the following tips to help you organize your migration project and use the Project Window more effectively.
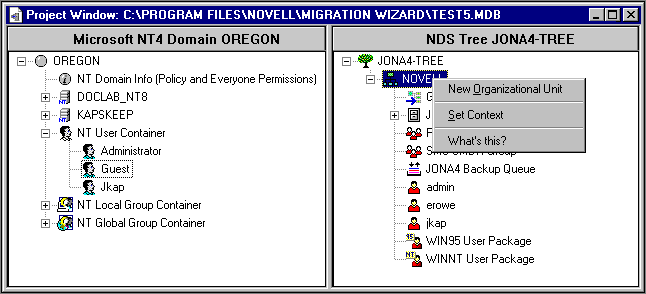
Creating a New NDS Organizational Unit or Folder---To create a new NDS Organizational Unit (OU), right-click the parent NDS Organizational Unit or folder and then click New Organizational Unit or New Folder. The following figure is an example of this task in the Project Window.
Figure 5
Right-clicking Organizational Units in the Project Window
You can create new NDS OUs in the NDS tree and then migrate your NT information to those OUs. This keeps the NT information organized and in one place in the NDS tree. You can also choose to migrate the NT data to existing OUs; just remember that you can always create a new OU in the NDS tree if you need to.
If you add new containers or names to the destination tree, the names you choose must adhere to the following NDS naming conventions:
Setting the Context---To set the context, right-click an NDS Organizational Unit and then click Set Context.
When you set the context, you can designate what part of the NDS tree will appear in the right side of the Project Window. This is useful if you have a large NDS tree with many objects.
Setting the context at a specific container will eliminate the need to scroll down or collapse objects in your NDS tree. Once the context is set, this container will appear as the top object in the right side of the Project Window.
Viewing a Description of the Objects in the Project Window---To see a short description of what an icon represents in the Project Window, right-click an NDS object and then click What's This?
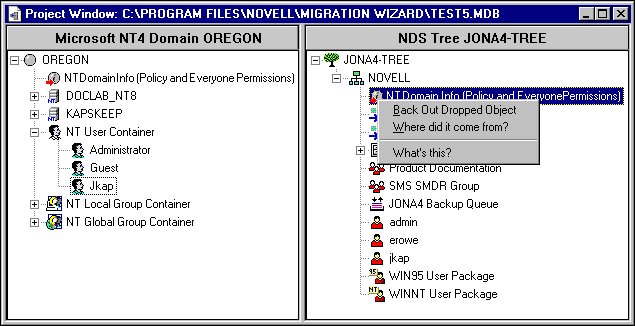
Backing Out a Dropped Object---To return a dropped object to its original position, right-click a dropped NT object in the NT domain or the destination NDS tree and then click Back Out Dropped Object.
The following screen is an example of how a dropped object appears in the NDS tree, along with the right-click menu.
Figure 6
Right-clicking Objects in the Project Window
Finding Out Where a Dropped NT Object Came From---To find out where a dropped object was located in the NT domain, right-click an NT object and then click Where Did It Come From? When dragging and dropping a large number of objects, this will help you remember where a dropped object was previously located in the NT domain.
Once you feel comfortable with where you have dropped your NT folders, users, and groups in the NDS tree, verify your migration project to resolve any potential problems before migrating your NT data.
Continue with the next section, "Verify Your Migration Project."
  |