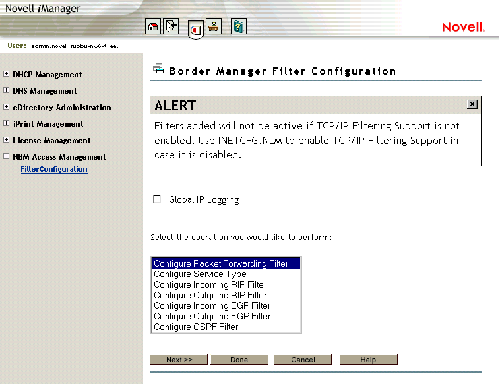
Configuration Menu

Novell® BorderManager® 3.7 comes with a Packet Filtering Configuration Task based on Novell iManager for configuring TCP/IP filters. The Novell BorderManager Access Management Role and Packet Filtering Configuration Task is automatically plugged into into Novell iManager during Novell BorderManager 3.7 installation.
For an upgrade, ensure that all filters have been migrated to Novell eDirectoryTM. This can be done by loading FILTSRV MIGRATE on the server console.
Make sure that Novell iManager is up and working on the NetWare® 6 server.
To log in to Novell iManager:
In Internet Explorer > go to https://ipaddress:2200 or use https://DNS:2200.
Log in to Novell iManager to use the Packet Filtering Configuration Task.
When you log in to Novell iManager, you can see the role of NBM Access Management on the left panel. Click NBM Access Management to see the Filter Configuration task.
Click the Filter Configuration task to see the NBM Server Selection option.
Select the Novell BorderManager 3.7 server.
To set up the Packet Filtering Configuration Task, refer to Using Novell iManager for Filter Configuration in the Novell BorderManager 3.7 Installation Guide
To ensure that the configured filters are active, check to see that you have enabled filter support using INETCFG.
After you have reached the filter configuration task, the following seven types of configuration can be seen:
Figure 1
Configuration Menu
The global logging status for all filter types can be enabled or disabled from the configuration menu.
Select any one of these for configuration:
Configuring Packet Forwarding Filter---TCP/IP Packet Forwarding Filters allow the router to selectively filter packets based on their packet type, source, and destination.
Configuring Service Type---Service Type includes the System and User defined packet types used for configuring Packet Forwarding filters.
RIP Filter---Routing Information Protocol filters are used to control the propagation of routing information by this router. They provide a low level of security by hiding the existence of specific IP networks from other routers. There are two types of routing filters: Incoming and Outgoing. Incoming RIP filters restrict the acceptance of routing information from the adjacent routers. Outgoing RIP filters restrict the routing information advertised by the router to its adjacent routers.
EGP Filter---The routes that the router may share with the EGP peers are defined with EGP filters. There are two types of EGP filters: Incoming and Outgoing. Incoming EGP filters restrict what routes can be accepted from an EGP peer. Outgoing EGP filters restrict what routes learned from RIP, OSPF, or static routes can be propagated to EGP peers.
Configuring OSPF Filter---The router can use OSPF to exchange routing information within its Autonomous System. OSPF External Route Filters define the route and the source of the source of the route that will be propagated into the OSPF domain.
Select an operation from the list and click Next to continue.
Click Done if you want to save changes to IP logging and exit Filter Configuration.
Click Cancel to exit Filter Configuration.
The next three sections contain information about configuring filter types: