3.1 Configuring Authentication for the ESP-Enabled Novell SSL VPN
If you installed the ESP-enabled Novell SSL VPN, then an Embedded Service Provider component was installed along with the SSL VPN server during the installation. You must now configure the Embedded Service Provider in order to establish a trust relationship between the Identity Server and the Embedded Service Provider.
NOTE:If you have installed the Traditional SSL VPN, refer to Section 3.2, Accelerating the Traditional Novell SSL VPN.
-
In the Administration Console, click > > .
The Server configuration page is displayed.
-
Select from the section.

-
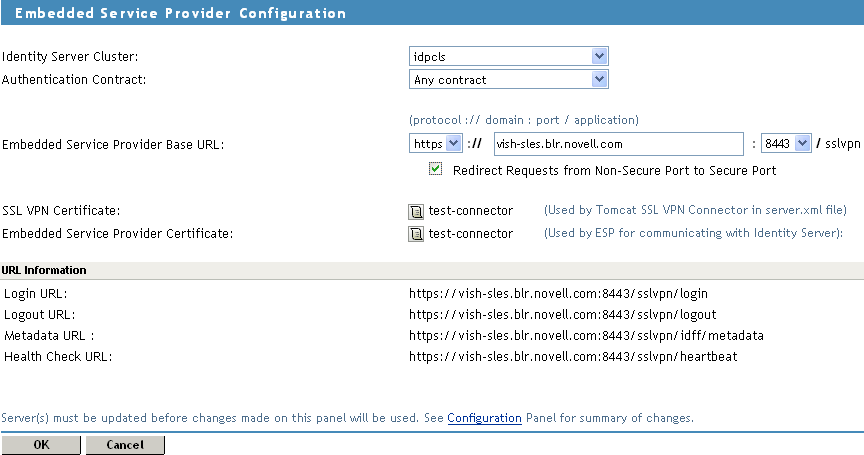
Fill in the following fields:
Identity Server Cluster: Specifies the Identity Server cluster that you want the SSL VPN to trust for authentication. Select the configuration you have assigned to the Identity Server.
Authentication Contract: Specifies the type of contract, which determines the information a user must supply for authentication. By default, you can select from the following authentication contracts:
-
Any Contract: If the user has authenticated, this option allows any contract defined for the Identity Server to be valid, or if the user has not authenticated, it prompts the user to authenticate using the default contract assigned to the Identity Server configuration.
-
Name/Password - Basic: Specifies basic authentication over HTTP, using a standard login pop-up provided by the Web browser.
-
Name/Password - Form: Specifies a form-based authentication over HTTP, using the Access Manager login form.
-
Secure Name/Password - Basic: Specifies basic authentication over HTTPS, using a standard login pop-up provided by the Web browser.
-
Secure Name/Password - Form: Specifies a form-based authentication over HTTPS, using the Access Manager login form.
Embedded Service Provider Base URL: The application path for the Embedded Service Provider. This URL has the following constituents:
-
Protocol: Specifies the communication protocol. Specify HTTPS in order to run securely in SSL mode. Use HTTP only if you do not require security.
-
Domain: The DNS name used to access the SSL VPN server. Using an IP address is not recommended.
-
Port: Specifies the port values for the protocol. The port is 80 or 8080 for HTTP or 443 or 8443 for HTTPS. If you want to use port 80 or 433, select the port here, then select the option. Selecting 80 for HTTP and 443 for HTTPS implies that the port needs to be translated.
-
Application: Specifies the SSL VPN server application path.
Redirect Requests from Non-Secure Port to Secure Port: Specify this option to redirect the browsers to the secure port in order to establish an SSL connection. If this option is not selected, browsers that connect to the non-secure port are denied service.
SSL VPN Certificate: Configure a certificate for SSL.This certificate is used when SSL VPN communicates with the SSL VPN server.
You can click the icon to select the default test-connector certificate created for SSL VPN. The subject name of this certificate should match the DNS name of the SSL VPN server. For more information, see the Section 3.6, Configuring Certificate Settings.
Embedded Service Provider Certificate: Configure a certificate for the Embedded Service Provider to communicate with the Identity Server. You can click the icon to select a certificate. Make sure that the subject name of this certificate matches the DNS name of the SSL VPN server. For more information, see Section 3.6, Configuring Certificate Settings.
NOTE:Before you proceed with the configuration, verify if SSL VPN certificates are imported into the trust store. To verify, log in to the Administration Console, select , click the down arrow for the trusted root that you are interested in. Make sure that two SSL VPN trust stores are displayed. If they do not exist, you must manually push the certificates to the trust store.
The following URLs are displayed when the Published DNS name is populated:
-
Login URL: Displays the URL that you need to use for logging users in to the protected resources.
-
Logout URL: Displays the URL that you need to use for logging users out of protected resources.
-
Metadata URL: Displays the location of the metadata.
-
Health Check URL: Displays the location of the health check.
-
-
Restart the Tomcat server when prompted.
-
To save your modifications, click then click on the Configuration page.
-
Click on the Identity Server Configuration page.
-
(Optional) Proceed with Section 3.3, Configuring the IP Address, Port, and Network Address Translation (NAT), if you have not already configured the SSL VPN server details.