12.8 Adding Advertising Protocols for NSS Pool Cluster Resources
Shared NSS pools support three advertising protocols: NCP (default, required), Novell AFP, and Novell CIFS. You can add Novell AFP or Novell CIFS as advertising protocols for an existing pool cluster resource.
You must install Novell CIFS or Novell AFP on all the servers where you want to fail over the pool resource, but you set up the advertising protocol only once on the pool cluster resource. Before you begin, ensure that the pool is cluster migrated back to the server where it was originally created.
-
Log in to iManager as an administrator user.
-
Offline the cluster resource that you want to modify.
For information, see Section 9.5, Onlining and Offlining (Loading and Unloading) Cluster Resources from a Cluster Node.
-
In , select , then go the Volumes and Pools pages to verify that the volumes are not mounted and the pool is deactive.
-
In , select , click , then browse to locate and select the Cluster object of the cluster you want to manage.
-
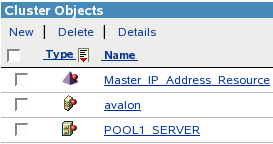
On the Cluster Options page, use one of the following methods to open the Cluster Pool Properties page for the pool cluster resource that you want to manage:
-
Select the check box next to the pool cluster resource, then click .
-
Click the link for the pool cluster resource.

-
-
On the Cluster Pool Properties page, click the tab.
-
If you are enabling the resource for Novell AFP, select the check box, then click .
-
If you are enabling the resource for Novell CIFS, do the following:
-
On the Protocols page, select the check box and view the , then click .
A default name (up to 15 characters) is suggested for the CIFS Virtual Server Name when you first add the advertising protocol.
After you have applied this setting, the CIFS share is created with the name you specified. If you later want to modify the CIFS Virtual Server Name, you must use the CIFS plug-in for iManager to manage the CIFS share name of an existing share. For information, see
Setting CIFS General Server Parameters
in the OES 2 SP3: Novell CIFS for Linux Administration Guide. -
If the server is OES 2 SP1 or SP2 Linux, run the cifsPool.py script to modify the load and unload scripts. This step is not required in OES 2 SP3 and later.
IMPORTANT:In OES 2 SP1 and SP2 Linux, the Novell CIFS commands are not automatically added to the load and unload scripts for the NSS pool resource when you add Novell CIFS as an advertising protocol on an existing cluster-enabled pool. You must run the cifsPool.py script to add commands for Novell CIFS.
You can download the cifsPool.py script file as a patch Novell Downloads Web site.
This issue has been resolved in OES 2 SP3.
At a terminal console prompt, log in as the root user, then enter
python cifsPool.py pool_resource_DN cifs_servername ldaps://ldap_server_ip:636 admin_DN admin_password
For example, enter
python cifsPool.py cn=CLUS1_POOL1_SERVER,cn=clus1,o=company CIFS_POOL ldaps://10.10.10.1:636 cn=admin,o=company pa$$w0rD
where the values are:
Parameter
Sample Value
pool_resource_DN
cn=CLUS1_POOL1_SERVER,cn=clus1,o=company
NOTE:The cluster container is stored in eDirectory as a CN and not an OU.
cifs_servername (up to 15 characters)
CIFS_POOL1
ldap_server_ip
10.10.10.1
admin_DN
cn=admin,o=company
admin_password
pa$$w0rD
-
-
Online the cluster resource.
For information, see Section 9.5, Onlining and Offlining (Loading and Unloading) Cluster Resources from a Cluster Node.