10.7 Scheduling cron Jobs to Run on the Server
Rather than entering commands on the command line to run a cron job at a specific time, you can use a form on the Schedule Task page to schedule cron jobs—that is, to execute commands or scripts (groups of commands) automatically at a specified time/date—that you want to run at this server. Any cron job is valid.
Scheduling a task creates a cron job and stores it in the /etc/cron.d directory. The command is specified to run with the name of whatever user name you are logged in with when you add the command. The user name must have the necessary permissions to perform the command you add.
IMPORTANT:When you set up cron commands, ensure that you log into Novell Remote Manager as the root user, or with a user name that has the necessary permissions to execute the command.
If no mail service is configured, you might find the output of your commands in the local mailbox directory as a plain text file. By default, this is /var/spool/mail/root.
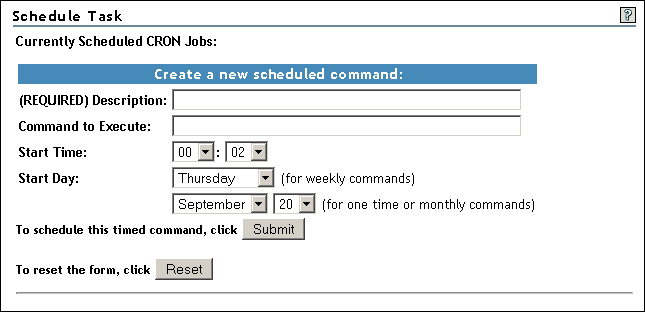
Figure 10-7 Schedule Task Page for Scheduling Cron Jobs

To create a new scheduled command:
-
Complete the required information on the Schedule Task page.
Field
Information to Provide
Enter a brief description of the command you want to run.
64 character limit
Example:
Send message to log out daily at 10 p.m.
This description is displayed as the name of the scheduled job in the list.
Type the command exactly as you would at a command line.
All cron job entry types are valid except for lists and step values.
Type the time you want the command to run.
If you want to run the command once a week, specify the day of the week, then place an asterisk * in the and fields.
If you want to run the command only once or monthly, specify a and setting, then place an asterisk * in the field.
If you want to run the command monthly, specify a Day setting, then place an asterisk * in the and fields.
If you do not want to specify a value for a field, place an asterisk * in the field.
-
Click .
After you schedule a job, it is displayed at the top of the page under the heading. Jobs that your create manually also display in the list.
To change the schedule of a job that you have already scheduled:
-
Click the link for the job you want to change.
-
Change the schedule.
-
Click .
To delete the schedule of a job that you have already scheduled:
-
Click the link for the job you want to delete.
-
Click .
To return the settings in the fields to the default settings of the current day and time, click .