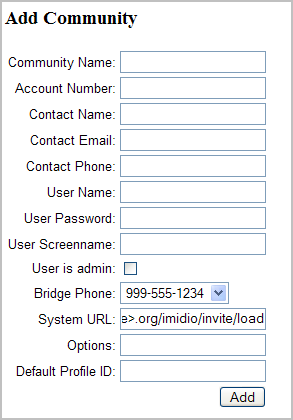
3.2 Adding Communities
A default System Community is created when you install the software. This System Community contains the Super Administrator username and password.
NOTE:A second community is automatically created to accommodate LDAP synchronization.
To Add a Community:
-
From the tab, click to display the form.

-
In the field, type a community name.
The name of the community should be descriptive, and should only contain ASCII characters.
-
(Optional) In the field, type an account number.
You can create an optional account number that you use for billing/cost center purposes. The field is alphanumeric.
-
In the field, type the name of the individual who is the primary contact for this community.
-
In the field, type the e-mail address of the primary contact.
-
In the field, type the phone number for the primary contact.
-
In the field, type the name of the community administrator for the community (the user who creates the other users in the community via the Conferencing Client console). Enter the full name of the community administrator (for example, Bob Smith).
-
In the field, type a password for the community administrator.
-
In the field, type a screen name for the community administrator.
This is the screen name that other Conferencing users see for the community administrator when they access their Conferencing clients.
-
Select the option to indicate that the user is a community administrator. Do not select this option if the first user in this community should not have administrative access.
-
Select the phone number of the voice bridge for this community from the drop-down list.
-
In the field, type the assigned system URL for community meeting invitations.
-
The field is currently reserved and should be left blank.
-
The is also a reserved field and should be left blank.
-
-
After you have entered the new community data, click to create the community.
By default, when communities are defined, they are enabled. An enabled community is available for users to log into.