Using the Server Policy for Imaging

The ZENworks Server Policy Package has several settings for helping to customize your ZENworks Imaging environment. The server's Imaging policy can assign static IP addresses to re-imaged workstations, and assign Windows networking parameters such as Workgroup name or the prefix for the unique workstation name.

Although most elements of the Imaging policy are helpful and benign, be careful of the Image Selection Criteria. This looks the same as the Image Selection Criteria we used within the Workstation Policy Package, but it has one key difference: when enabled, the server-based Image Selection policy enforces its rules on every unregistered workstation that connects to the server. In this case, "unregistered workstations" includes workstations that have been imported into the directory but do not have the ZENworks Imaging Service client agent installed.

This can be devastating if you have PXE enabled on unregistered workstations and a server policy that forces a re-image on loosely-defined criteria. Therefore, as a rule, never enable the server Image Selection Criteria on a production network segment unless you fully understand exactly what you are doing.

The server-based Image Selection Criteria is the perfect tool for your workstation build lab, which of course should be on its own isolated segment. Using the Server policy, you could hook up a number of workstations, and set a server policy to invoke a multicast session, a complex scripted image, or various combined image types.

Use the following steps to set up the server policy for imaging:

  1. In n ConsoleOne, browse to the .Policies.IST.Corp.DA container.

  2. Right-click the Server Package object > click Properties. (This object was created in Automatic Workstation Import .

  3. In the Properties of Server Package window, enable the Workstation Imaging Policy check box > click Properties.

  4. In the Properties of Server Package:Imaging Server Policy window, double-click the Image-safe Data tab > select Windows Networking.
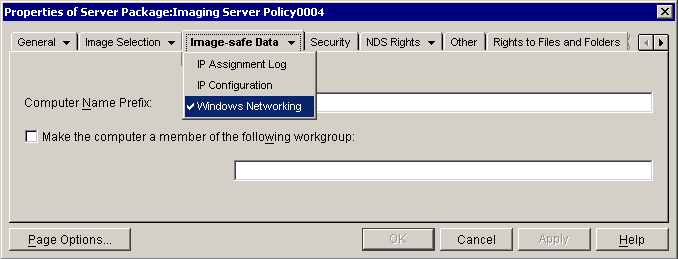

    Screen shot of the Properties page of the Server Package: Imaging Server Policy. The Image Safe Data tab is selected and the Windows Networking option is highlighted.

  5. On the Image-safe Data - Windows Networking tab, type DA- for the Computer Name Prefix > select the Make the Computer a Member of the Following Workgroup check box > enter WORKGROUP for the workgroup name.
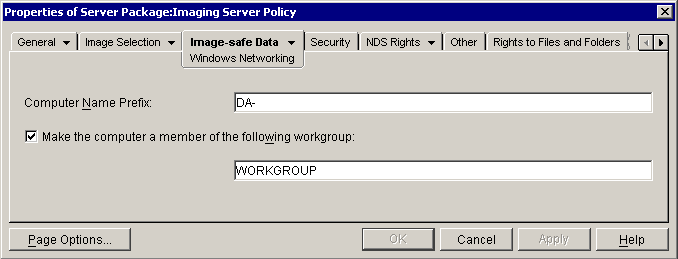

    Screen shot of the Properties page of the Server Package: Imaging Server Policy. The Image Safe Data tab is selected and the Windows Networking subpage is open.

    The settings you have made will now only affect workstations that don't already have their ZISD information. Workstations with ZISD information will keep their workstation NETBIOS name and workstation object ID.

  6. Click the Image Selection tab > click Add.

  7. In the New Image Selection Rule window, browse to select the Scripted Windows 2000 Pro image from the Images.IST.Corp.DA container > set the When the Following Conditions are Met parameters to Hard Drive Size > 0 > click OK.
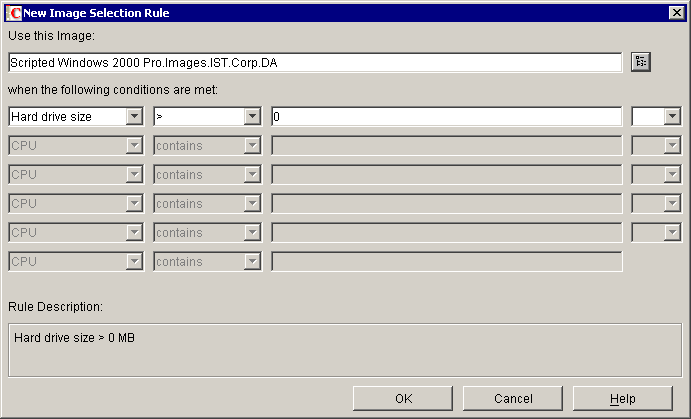

    Screen shot of the New Image Selection Rule dialog box. The Scripted WIndows 2000 Pro: Images.IST.Corp.DA image is displayed in the Use This Image field. The Hard Drive size is set to greater than 0.

    WARNING:  These rules will cause all ZENworks Imaging-enabled workstations served by your Lab Scope segment to re-image at their next reboot. Proceed with extreme caution!

  8. Click OK > OK to save all the changes to your Server Package.

  9. Reboot the ZENworks Imaging-enabled workstation that you want to re-image. Allow the workstation to complete its re-imaging process.

    NOTE:  Because we have set up an Image Selection Rule in the Server Package, we do not need to set the workstation object to re-image. This will happen automatically for workstations, imported or not.

  10. After the workstation re-images, log as Admin.DA and inspect the system.

  11. Start ConsoleOne from your workstation.

  12. Remove the image selection criteria from the Server Package's Workstation Imaging policy.
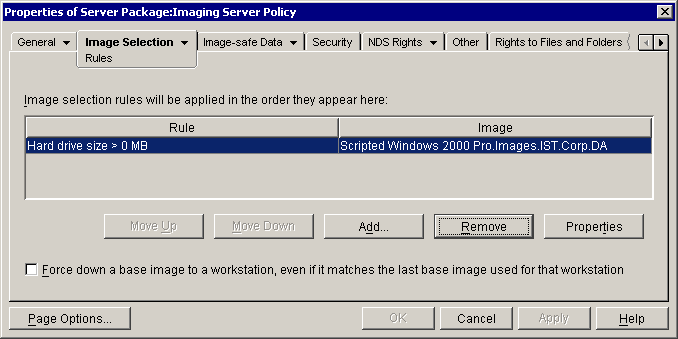

    Screen shot of the Properties page of the Server Package: Imaging Server Policy. The Image Selection tab is selected and the Rules page is open. The Scripted Windows 2000 Pro Images.IST.Corp.DA image is highlighted and the accessibility focus is on the Remove button.

    NOTE:  By removing all image selection criteria from the server policy, you eliminate additional boot time for PXE-enabled workstations. When criteria exist in the server policy, PXE must boot the imaging engine in order to read the rules, even if the rules effectively exclude the specific workstation that is booting. This only applies to the server policy, and indicates yet another reason why the Imaging Server Policy's Image Selection Rules should be used only on isolated, special-use segments.


Troubleshooting

If your workstation does not re-image from the server policy and you want it to, it may be because the workstation has been registered by the ZENworks Imaging Service, and therefore is protected as a managed workstation. That means you'll need to clear the ZENworks Image Safe Data on the hard disk. A fast way to do this is to create a DOS bootable floppy, put ZISCLEAR.EXE on it, and run ZISCLEAR.EXE from a DOS boot. ZISCLEAR can be obtained from the Novell Support Web site.