5.0 Branding a Folder or Workspace
Branding a folder or workspace is a good way to make the folder or workspace more unique and identifiable. When you brand a folder or workspace, the brand is applied to all sub-workspaces and sub-folders. However, folder and workspace owners in lower-level folders and workspaces can override the higher-level brand settings by adding a workspace brand of their own. For example, the Global Workspaces folder can be branded with the company logo and slogan, while a team workspace at a lower level in the workspace tree can be branded with a logo for the product that the team is responsible for. Members of that team can then override the team brand by branding individual folders within the team workspace that they are responsible for.
Novell Vibe OnPrem administrators can disable this functionality when they create a site-wide brand, as discussed in Creating a Site-Wide Brand
in the Novell Vibe OnPrem 3.1 Administration Guide.
If you are unable to brand a folder or workspace as discussed in this section, contact your Vibe administrator.
To brand a folder or workspace:
-
Navigate to the folder or workspace where you want to create the brand.
-
Click > if you are branding a workspace.
or
Click > if you are branding a folder.
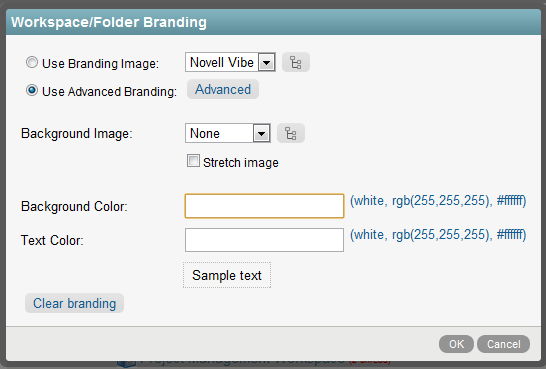
The Workspace/Folder Branding dialog box is displayed.

-
Specify the following information to create your desired brand:
Use Branding Image: Select this option if you want to use the drop-down list to select an existing image, or click the icon
 to browse to an image on your computer’s file system.
Use Advanced Branding: Select this option, then click if you want to create a brand that includes advanced features, such as linking to another Vibe page or displaying a YouTube video.
You can add a YouTube video in your branding section by clicking the icon
 .
.
For more information about displaying YouTube videos in Vibe, see
Displaying YouTube Videos in a Folder Entry
in the Novell Vibe OnPrem 3.1 User Guide.For more information about linking to another Vibe page, see
Linking to a Folder or Folder Entry
in the Novell Vibe OnPrem 3.1 User Guide.If you add a URL to the advanced branding, the URL cannot contain the url_created_by_teaming parameter. If this parameter does exist, delete it before saving your brand.
Background Image: Click the icon
 to browse to an image on your computer’s file system. If you are branding a team workspace, you can use the provided drop-down list to select an image that is already attached to the workspace. (For information on how to attach an image to a team workspace, see
 Modifying a Workspace
in the Novell Vibe OnPrem 3.1 User Guide.)This background image is displayed behind your regular branding.
Stretch Image: Stretches the image to occupy the entire branding area.
If you stretch your background image, the image overrides any background color that you have set.
Background Color: Adds a background color that occupies the entire branding area. To change the background color, click the color name to the right of this field, select the new color, then click .
If you added a background image and stretched the image, the background color is not displayed.
Text Color: Changes the text color of the workspace name in the upper right corner of the branding area. To change the text color, click the color name to the right of this field, select the new color, then click .
Clear branding: Clears all your current branding selections.
-
Click .
The folder or workspace now displays the brand that you created.