Unpartitioned Free Space
When NSS claims ownership of unpartitioned free space, it creates an NSS partition on each device. (An NSS partition is identified as type 0x69.)
NOTE: IBM* partitions defined on hard disks can only contain four partitions. An NSS partition is considered a different operating system type than a NetWare partition. If a disk already contains four partitions, NSS cannot acquire any free space on that disk because it cannot have its own partition. If the number of partition areas exceeds four, an error message appears.
NSS can use up to 100 percent of available free space inside a NetWare volume. Once NSS takes free space out of a NetWare volume and owns it, the traditional NetWare file system recognizes the NSS-owned space as a file. NSS takes the free space in 2 GB segments or less, depending on how much space is available in the NetWare volume. NetWare then acknowledges the reduced amount of free space available in the NetWare volume. With the NSS-owned space, NSS creates an NSS volume within the NetWare volume. Both volumes must be mounted to use the NSS volume. NOTE: NSS cannot use free space in a NetWare partition unless the space is inside an existing NetWare volume.
WARNING: If you delete the NetWare volume, the NSS volume is also deleted.
Once NSS has claimed ownership of free space and created a managed object, you can create NSS volumes and/or storage groups. NSS gives you three ways to create NSS volumes:
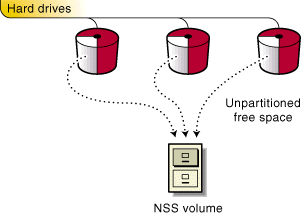
All available NSS space can be configured automatically from a pool as a single NSS volume. This option is available during NetWare 5 installation, or any time afterwards. Only unpartitioned free space is used to create a single NSS Volume. Figure 1
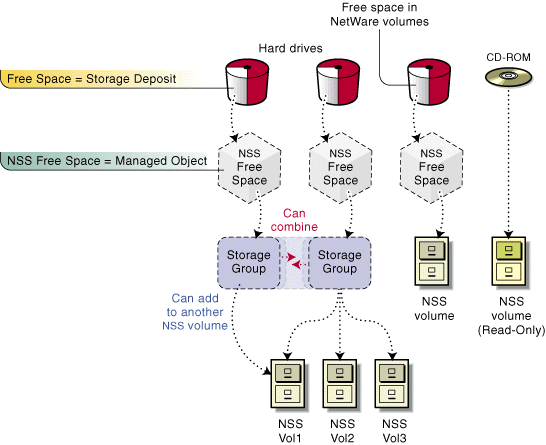
Available NSS space can also be manually divided into one or more NSS volumes. To do this, you first create NSS storage groups comprised of one or more managed objects. When NSS claims ownership of free space, a list of managed objects is displayed. The managed objects are the NSS partitions or NetWare volumes with available NSS space. A storage group is created by selecting the managed object that you want for the storage group. One or more NSS volumes can be created out of a storage group. Figure 2
You can customize your storage groups and NSS volumes: you can merge two storage groups together, or you can add a storage group to the end of an NSS volume to increase the volume's size. When NSS recognizes free space on the devices attached to your server, it also recognizes CD-ROMs and creates a Read-Only NSS volume for that CD-ROM. In NetWare 5, this is done automatically when the CD-ROM NLM is loaded. This volume is not added to NDS® however. When the DOSFAT.NSS module is loaded, DOS FAT partitions can be recognized as NSS Volumes. This means you can perform tasks such as use DOS commands, change DOS attributes, use NetWare utilities such as the MAP command, access to DOS FAT partitions from Java, and access local partitions. See Other Volumes That NSS Creates for more information on NSS volumes that are created. When you create NSS volumes, you are setting up access to NSS data. Based on your choices, the following general steps explains how to prepare and set up an NSS volume. Use the NWCONFIG utility to set up new NSS volumes. See Configure NSS Using NWCONFIG for information. NOTE: The following general steps only apply if you are using the NWCONFIG utility. (This example creates one storage group and two NSS volumes.) You can also use the NSS Administration menus to configure or reconfigure NSS. To add or reconfigure other NSS volumes, see Configure NSS Storage Groups and Volumes.
NOTE: CD-ROMs are not added to NDS automatically. Use NWCONFIG to add them.
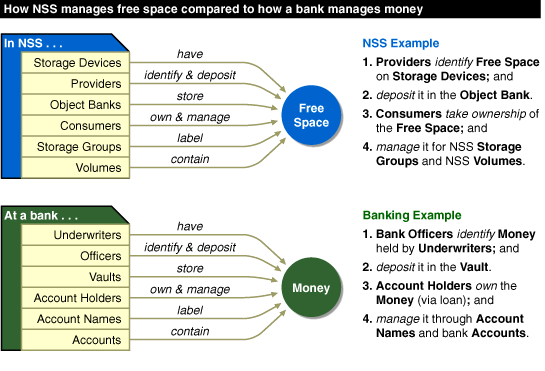
If you have only one storage group, NSS automatically uses that storage group for the NSS volumes you are creating. If more than one storage group is created, you must choose from a list of storage groups. The following illustration shows a real-world comparison of what happens in the creation of NSS storage groups and NSS volumes. Compare the storage group and NSS volume creation process with a banking process as follows:Free Space Inside a NetWare Volume
NSS Volumes and NSS Storage Groups
Automatically Creating a Single NSS Volume
Creating One NSS Volume
Manually Creating NSS Volumes
Creating Multiple NSS Volumes
Mounting CD-ROMs as NSS Volumes
Mounting DOS FAT Partitions as NSS Volumes
How NSS Sets Up Volumes
A Concept of NSS Configuration
