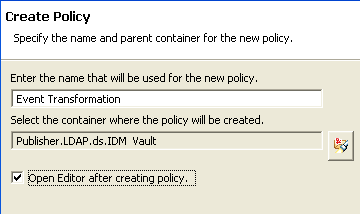
2.2 Policy Builder Tasks in Designer
This section contains instructions on performing common tasks in the Policy Builder:
- Section 2.2.1, Opening Policy Builder
- Section 2.2.2, Creating a Policy
- Section 2.2.3, Creating a Rule
- Section 2.2.4, Creating an Argument
- Section 2.2.5, Modifying a Policy
- Section 2.2.6, Using Predefined Rules
- Section 2.2.7, Testing Policies with the Policy Simulator
- Section 2.2.8, Editing the DirXML Script
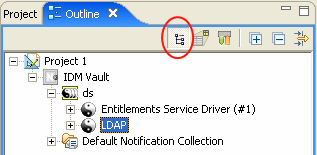
2.2.1 Opening Policy Builder
There are two different ways the Policy Builder can be opened. It can be opened from the Model Outline view or from the Policy Flow view.
Model Outline View
-
Open a project in Designer.
-
Select the Outline Tab > select the Show Model Outline icon.
-
Double-click a policy listed in the Model Outline view.
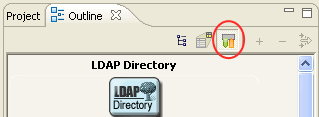
Policy Flow View
-
Open a project in Designer.
-
Select the Outline Tab > select the Policy Flow icon.
-
Click on a policy (for example, the Command policy) in the Policy Flow view.
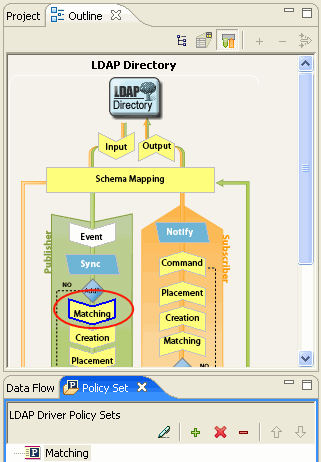
The policy is listed in the Policy Set in the lower-left corner.
Use any of the following methods to launch the Policy Builder:
- Double click the Command Policy object
in the Policy Flow, select the policy, then click .
- Double-click a policy in the Policy Set.
- Right-click the policy in the Policy Set, then .
- Select the policy in the Policy Set, then click the icon.
To see all of the information in the Policy Builder window, without scrolling double-click the policy tab so the Policy Builder fills the entire window. To minimize the window, double-click the policy tab.
2.2.2 Creating a Policy
Policies are created in through the following two tools:
Policy Set
The Policy Set contains a toolbar and a list of policies.
The policy list displays all the policies contained in the selected policy set. During a transformation, the policies within the list are executed from top to bottom. The toolbar contains buttons and a drop-down menu that you can use to manage policies displayed in the list. Managing of policies includes editing, adding, deleting, renaming, and changing the processing order of the policies.
Policy Set Toolbar
The Policy Set displays a copy of the policy. The buttons on the toolbar are enabled or disabled depending upon what item you have selected. The different icons are described below.
Table 2-1 Policy Set Toolbar


Keyboard Support
You can move through the Policy Set with keystrokes as well as use the mouse. Below is listed the supported keystrokes.
Table 2-2 Keyboard Support
Add Policy Wizard
The Add Policy Wizard enables you to do the following tasks:
To launch the Add Policy Wizard:
-
Select a driver in the Outline view.
-
Select a Set item in the Policy Set, then in the toolbar.
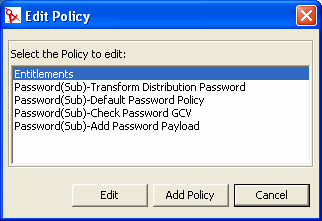
Creating a Policy
-
In the Add Policy Wizard, select , then click .
-
Provide a policy name.
-
Accept the default container, or browse to and select the Driver, Publisher, or Subscriber object where you want the policy to be created.
This decision depends on how you want to organize the policies. By default, policies are placed under the container object that is selected in the Outline view when the Add Policy Wizard is launched. For example, if you move to a Publisher object in the Outline view and then add a policy to a policy set, the policy defaults to the Publisher container. You can change this setting if you want to create policies in a different container. For example, you can set up a policy library under a dummy driver, put all of the common policies under this driver, and then simply reference the policies from the other drivers. That way, the policy is common. If you need to change a policy, you need to do it only once. If a policy is not reused by multiple drivers, you typically create that policy under the driver or channel that is using it.
-
Select the type of policy you want to implement. The policy type defaults to . You can select or , if you don’t want to use DirXML Script.
-
Click .
If the Schema Mapping policy set is selected, then an additional option is available for Schema Mapping. The new policy appears in the expanded Set item.
You can also add a policy by right-clicking a Set item in the Policy Set.
-
Right-click a Set item (for example, Input Transformation Set).
-
Select .
-
Select how to implement the policy.
-
Name the policy.
-
Select .
-
Click .
Copying a Policy
-
In the Add Policy Wizard, select , then click .
-
Name the policy.
-
Accept the default container, or browse to and select the Driver, Publisher or Subscriber object where you want the policy to be created.
-
Browse to and select the policy you want to copy, then click .
-
Click to make a copy of the selected policy.
Linking to a Policy
-
In the Add Policy Wizard, select , then click .
-
Launch the Modeler browser by selecting the Browse button.
-
Browse to and select the Policy object you want to link into the policy set, then click . Linking a policy into a policy set doesn’t create a new Policy object. Instead, it adds a reference to an existing policy. This reference can be to any existing policy within the current Identity Vault. It doesn’t need to be contained within the current Driver object, but the policy type must be valid for the policy set that it is being linked to. For example, you can’t link a Schema Mapping policy into an Input Policy Set.
NOTE:Linking a policy into a policy set is not permitted when viewing all policies.
-
Click to link to the selected policy.
Renaming a Policy
-
In the Outline View, select the policy you want to rename.
-
Right-click and select .
-
Change the name of the policy in the field.
-
Click .
2.2.3 Creating a Rule
Rules are created from condition groups, conditions, and actions. A rule is defined as a set of conditions that must be met before a defined action occurs.
Rules can be created in three different ways:
Creating a New Rule
When you create a rule, you create condition groups, conditions, and actions.
Creating a Rule
-
From the Policy Builder toolbar, select .
You can also right-click and click > .
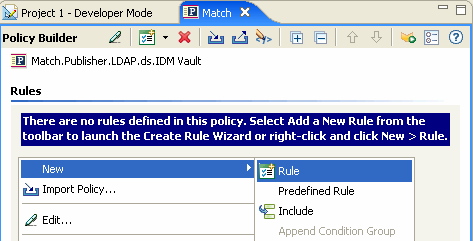
Either option launches the Create Rule Wizard.
-
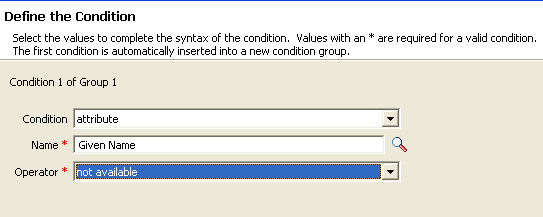
Specify the name of the rule, then click .

-
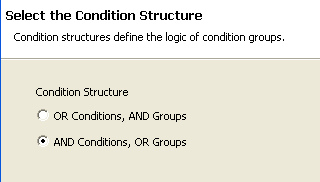
Select the , then click .
-
Select the condition you want, specify the appropriate information, then click .
-
(Optional) You can define an additional condition or condition group at this point. For this example, there is only one condition.
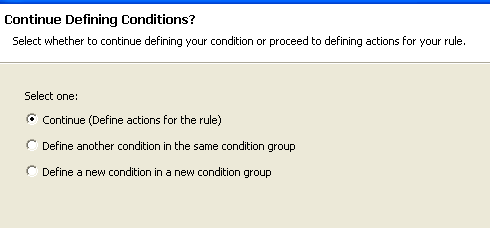
-
When you are finished defining conditions, select , then click .
-
Select the action that you want, then click .
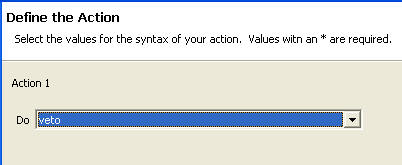
-
(Optional) You can define additional actions at this point. For this example, there is only one action.

-
When you are finished defining actions, select , then click .
-
The summary screen displays the rule that you are creating. Click to complete the creation of the rule.
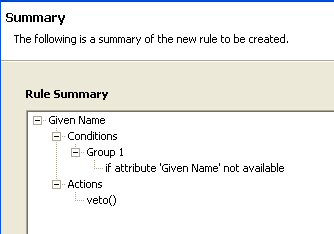
You can expand or collapse the view of the rule by clicking on the plus/minus sign.

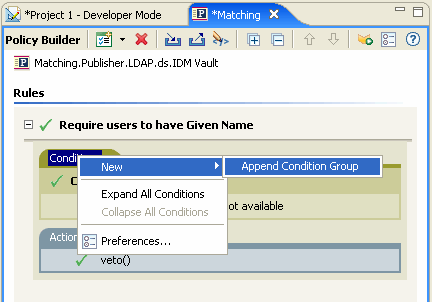
Creating Condition Groups
Right-click the tab or right-click the name of the Conditional group, then click .
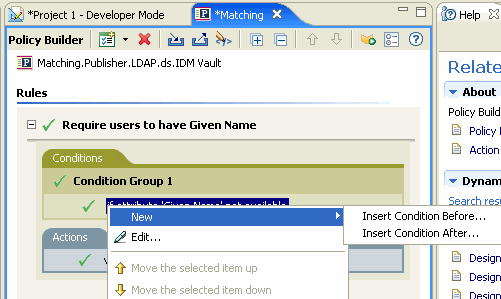
Creating a Condition
Right-click the condition, then click or .
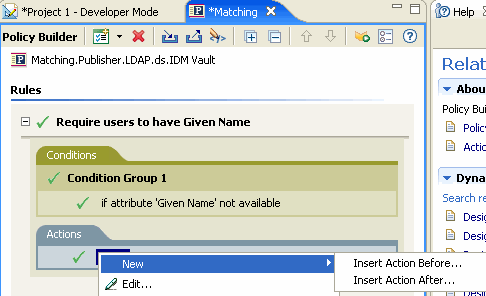
Creating an Action
Right-click the action, then click or.
Using Predefined Rules
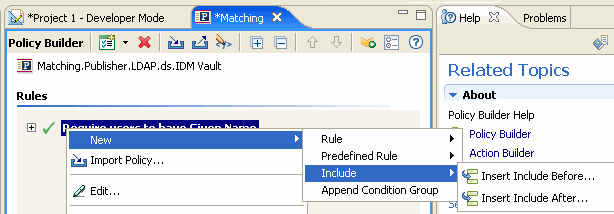
Designer includes some predefined rules. You can import and use these rules as well as create your own rules. Right-click in the Policy Builder, then select > > or see Using Predefined Rules for more information.

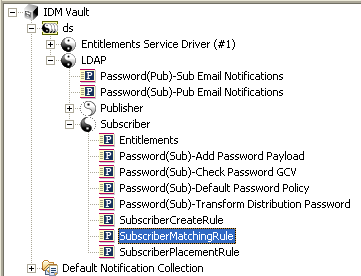
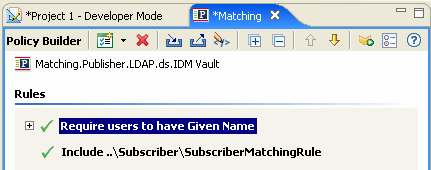
Including a Rule
Designer allows you to include the rules from another policy.
-
Right-click, then click > .
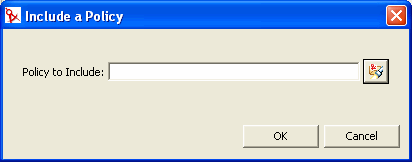
-
Select the browse icon, browse to the policy you want to include, then click .
-
The field is now populated with the path to the policy. Click .
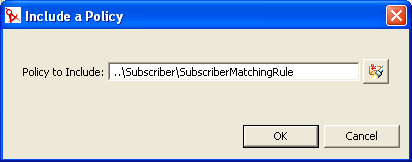
There is now a link to the original policy. You cannot edit the policy in this location. Access the original policy to make changes.
Importing a Policy From an XML File
-
In the Policy Builder, right-click and select Import Policy or select the Import Policy icon from the toolbar.
-
Select one of the two options:
-
Click the browse icon and select the file that contains the DirXML® Script, then click .
-
Click .
2.2.4 Creating an Argument
The Argument Builder provides a dynamic graphical interface that enables you to construct complex argument expressions for use within the Policy Builder. To access the Argument Builder, see Argument Builder.
Arguments are dynamically used by actions and are derived from tokens that are expanded at run time.
Tokens are broken up into two classifications: nouns and verbs. Noun tokens expand to values that are derived from the current operation, the source or destination data stores, or some external source. Verb tokens modify the concatenated results of other tokens that are subordinate to them.
To define an expression, select one or more nouns tokens (values, objects, variables, etc.), and combine then with verb tokens (substring, escape, uppercase, and lowercase) to construct arguments. Multiple tokens are combined to construct complex arguments.
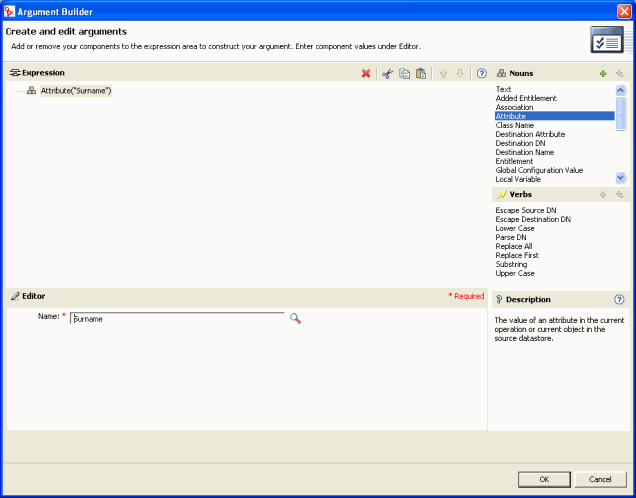
For example, if you want the argument set to an attribute value, you select the attribute token, then select the attribute name:
Figure 2-1 Argument Builder
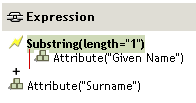
If you only want a portion of an attribute, you can combine the attribute token with the substring token:
Figure 2-2 Expression
After you add a token, you can edit its fields in the editor.
See Noun Tokens and Verb Tokens for a detailed reference on tokens available in the Argument Builder.
Although you define most arguments using the Argument Builder, there are several more builders that are used by the Condition Editor and Action Editor in the Policy Builder. Each builder can recursively call anyone of the builders in the following list:
The information below describes how to access each Builder.
Argument Actions Builder
The Argument Actions Builder enables you to set or edit the actions subordinate to a For Each action or an Implement Entitlement action.
In the following example the add destination attribute value action is performed for each Group entitlement that is being added in the current operation.
Figure 2-3 For Each Action
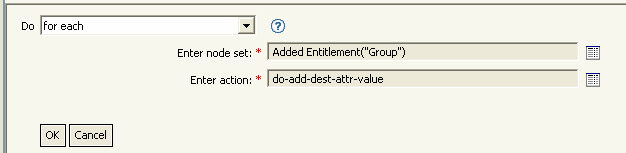
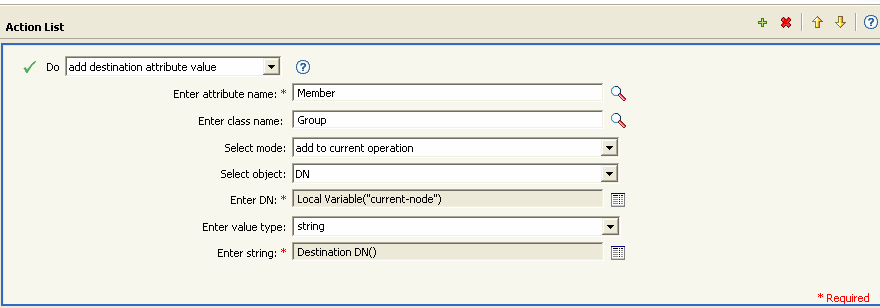
To define the action of the add destination attribute value, click the icon that launches the Argument Actions Builder. In the Argument Actions Builder, you define the desired action. In the following example, the member attribute is added to the destination object for each added Group entitlement.
Figure 2-4 Argument Action Builder
Argument Builder
Launch the Argument Builder from the following actions by
clicking the Edit Arguments icon.
- Add Association
- Add Destination Attribute Value
- Add Destination Object
- Add Source Attribute Value
- Append XML Text
- Clear Destination Attribute Value When the selected object is DN or Association.
- Clear Source Attribute Value When the selected object is DN or Association.
- Delete Destination Object When the selected object is DN or Association.
- Delete Source Object When the select object is DN or Association.
- Find Matching Object
- For Each
- Move Destination Object
- Move Source Object
- Reformat Operation Attribute
- Remove Association
- Remove Destination Attribute Value
- Remove Source Attribute Value
- Rename Destination Object When the selected object is DN or Association and Enter String.
- Rename Source Object When the selected object is DN or Association and Enter String.
- Set Destination Attribute Value When the selected object is DN or Association and Enter Value Type is not structured.
- Set Destination Password
- Set Local Variable
- Set Operation Association
- Set Operation Class Name
- Set Operation Destination DN
- Set Operation Property
- Set Operation Source DN
- Set Operation Template DN
- Set Source Attribute Value
- Set Source Password
- Set XML Attribute
- Status
- Trace Message
Match Attribute Builder
The Match Attribute Builder enables you to select attributes and values used by the Find Matching Object action to determine if a matching object exists in a data store.
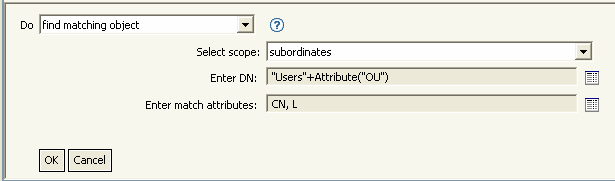
For example, if you wanted to match users based on a common name and a location, you would select the following condition:
Figure 2-5 Find Matching Object Action
You then click the Edit Arguments icon next
to the Enter Match Attributes field to launch the Match Attribute
Builder interface:
Figure 2-6 Match Attribute Builder
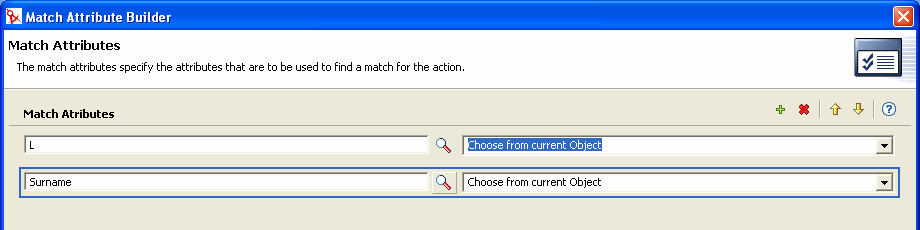
Select the icon to browse to and select the attributes you want to match. In this example they are L and Surname.
The second column allows you to match the current value stored in the attribute by selecting . You can match against another value by selecting . You can create any value you want to match. Select the value type, and the appropriate builder is available through the field.
Action Argument Component Builder
Launch the Action Argument Component Builder by selecting the following actions when the Enter Value Type selection is the Structured selection.
Figure 2-7 Add Destination Attribute Value Action
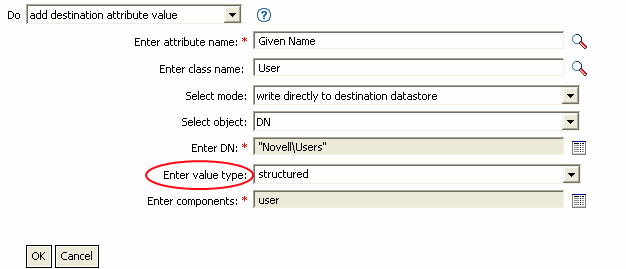
Figure 2-8 Action Argument Component Builder

Argument Value List Builder
The Argument Value List Builder enables you to construct default argument values for the Set Default Attribute Value action.
For example, if you want to set a default location of Unknown, you select the following action:
Figure 2-9 Set Default Attribute Value Action

You then click the icon next to the Enter Values field to launch the Argument Value List Builder interface, and construct an argument similar to the following:
Figure 2-10 Argument Value List Builder

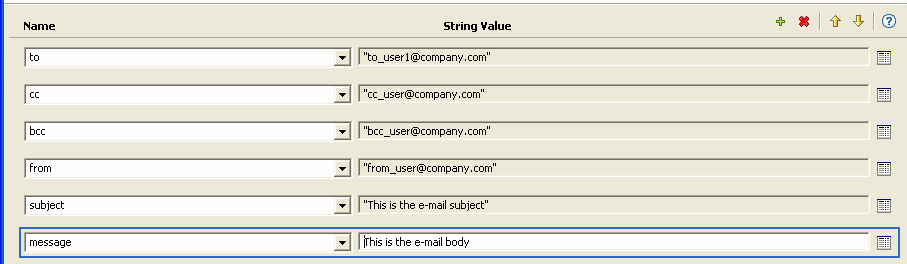
Named String Builder
The Named String Builder enables you to construct name/value pairs for use in certain actions, such as Generate Event, Send Email, and Send Email From Template.
For a Generate Event action, the named strings correspond to the custom value fields you can provide with an event:
Figure 2-11 Named String Builder

For a Send Mail action, the named strings correspond to the elements of the e-mail:
Figure 2-12 E-mail Elements in the Send Mail Action
A complete list of possible values is contained in the help file corresponding to the action that launches the Named String Builder.
Condition Argument Component Builder
Launch the Condition Argument Component Builder by clicking
the Edit Arguments Icon.
In order to see the icon, you must select the Structured selection for Mode with the following conditions:
Figure 2-13 Structured Mode for the Condition
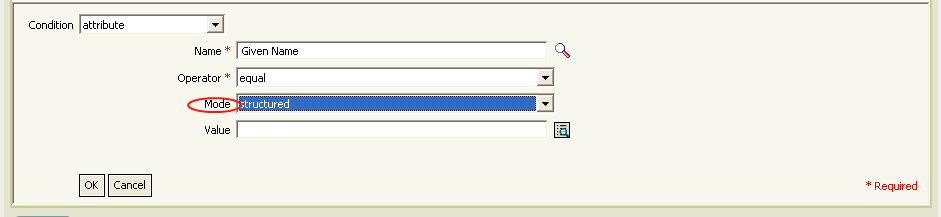
Figure 2-14 Condition Argument Component Builder

Pattern String Builder
Launch the Pattern String Builder from the Argument Builder Editor when the Unique Name token is selected. The Argument Builder Editor pane shows a Pattern field that launches the Pattern String Builder.
Figure 2-15 Unique Name Token in the Argument Builder
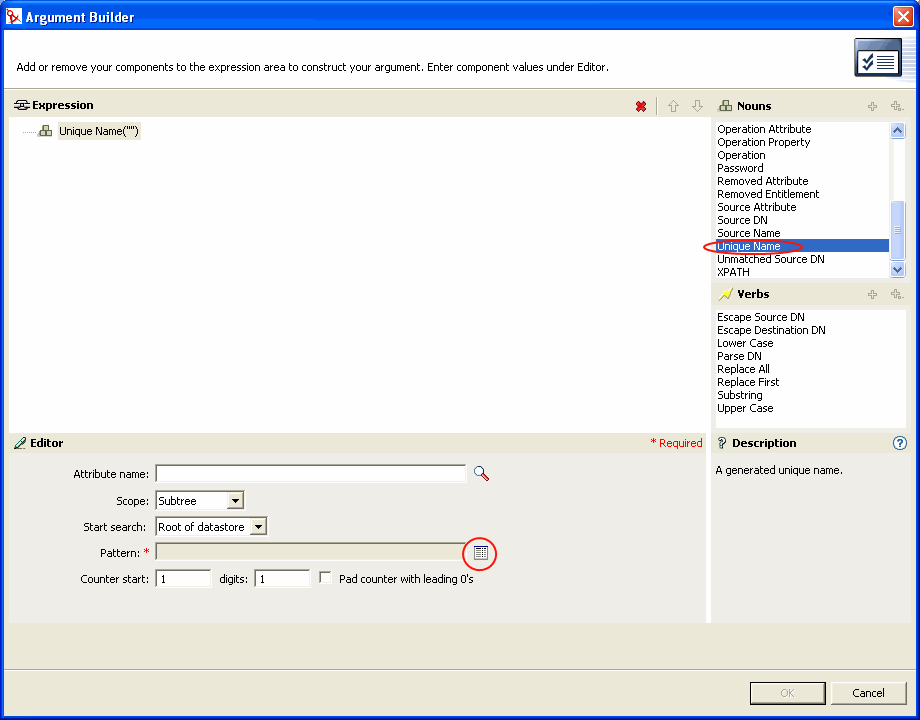
Figure 2-16 Pattern String Builder

2.2.5 Modifying a Policy
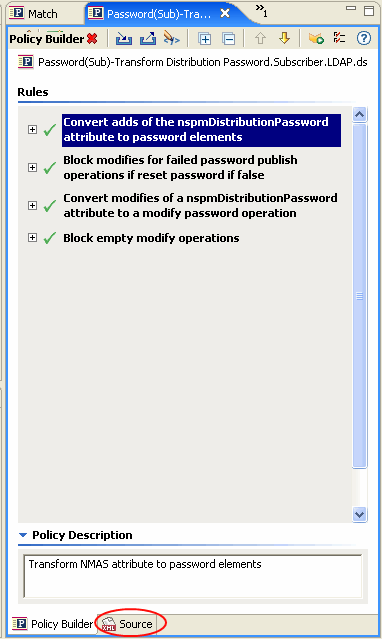
The Policy Builder allows you to create and edit policies. You can drag and drop rules, conditions and actions. For additional operations, access the Policy Builder toolbar. To display a context menu, right-click an item.
Figure 2-17 Policy Builder Context Menu and Toolbar
Actions and Menu Items in the Policy Builder
The table contains a list of the different actions and menu items that are possible in the Policy Builder.
The table contains a list of the different actions and menu items that are possible in the Policy Builder.
Table 2-3 Policy Builder Actions and Menu Items
 icon.
icon. icon.
icon.Policy Description
The Policy Description field provides a place to add notes about the functionality of the policy.
KeyBoard Support
You can move through the Policy Builder with keystrokes as well as use the mouse. Below is listed the supported keystrokes.
Table 2-4 Keyboard Support in the Policy Builder
Saving Your Work
Do one of the following:
- From the Main menu, click > (or Save All).
- Close the editor by clicking the in the editor’s tab.
- Select from the Main Menu’s file menu.
2.2.6 Using Predefined Rules
Designer includes twenty predefined rules. You can import and use these rules as well as create your own rules. These rules include common tasks that administrators use. You need to provide information specific to your environment to customize the rules.
- Command Transformation - Create Departmental Container - Part 1 and Part 2
- Command Transformation - Publisher Delete to Disable
- Creation - Require Attributes
- Creation - Publisher - Use Template
- Creation - Set Default Attribute Value
- Creation - Set Default Password
- Event Transformation - Scope Filtering - Include Subtrees
- Event Transformation - Scope Filtering - Exclude Subtrees
- Input or Output Transformation - Reformat Telephone Number from (nnn) nnn-nnnn to nnn-nnn-nnnn
- Input or Output Transformation - Reformat Telephone Number from nnn-nnn-nnnn to (nnn) nnn-nnnn
- Matching - Publisher Mirrored
- Matching - Subscriber Mirrored - LDAP Format
- Matching - By Attribute Value
- Placement - Publisher Mirrored
- Placement - Subscriber Mirrored - LDAP Format
- Placement - Publisher Flat
- Placement - Subscriber Flat - LDAP Format
- Placement - Publisher By Dept
- Placement - Subscriber By Dept - LDAP Format
To access the predefined rules: right-click in the Policy Builder, then click > .
Figure 2-18 Predefined Rules
Command Transformation - Create Departmental Container - Part 1 and Part 2
Creates a department container in the destination data store, if one does not exist. Implement the rule on the Subscriber Command Transformation policy or Publisher Command Transformation policy in the driver.
There are two steps involved in using the predefined rules: creating a policy in the Command Transformation policy set, and importing the predefined rule. If you already have a Command Transformation policy that you want to add this rule to, skip to Importing the Predefined Rule.
Creating a Policy
-
From the Outline view or the Policy Flow view, select the Publisher or Subscriber channel.
-
Select the Command Transformation policy set in the Policy Set, then click
 to create a new policy.
 -
Click , then click .
-
Name the policy.
-
Use the location that is populated to place the policy in the driver.

-
Select , then click .
-
Select for the type of policy, then click .
-
A file conflict window appears with the message “” Click . The Policy Builder is launched and the new Command Transformation policy is saved.
Importing the Predefined Rule
-
Right-click in the Policy Builder, then click > .
-
Select , then click .
-
Right-click in Policy Builder and click >.
-
Select , then click .
-
Save the rule by clicking > .
There is no information to change in the rules that are specific to your environment.

IMPORTANT:Make sure that the rules are listed in order. Part 1 must be executed before Part 2.
How the Logic in the Rule Works
The rule is used when the destination location for an object does not exist. Instead of getting a veto because the object cannot be placed, this rule creates the container and places the object in the container.
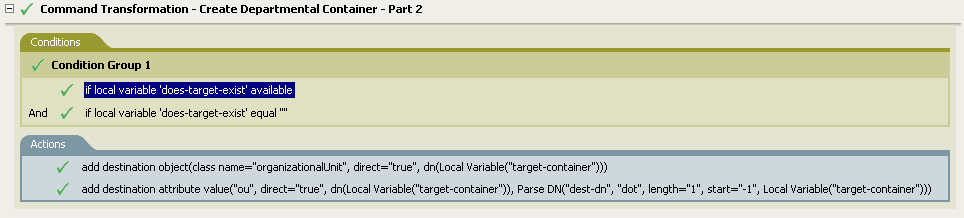
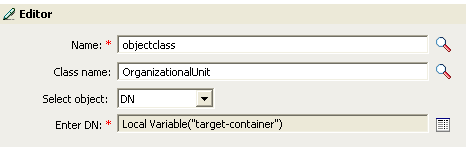
Part 1 looks for any Add operation. When the Add operation occurs, two local variables are set. The first local variable is named target-container. The value of target-container is set to the destination DN. The second local variable is named does-target-exist. The value of does-target-exist is set to the destination attribute value of objectclass. The class is set to OrganizationalUnit. The DN of the OrganizationalUnit is set to the local variable of target-container.
Part 2 checks to see if the local variable does-target-exist is available. It also checks to see if the value of the local variable does-target-exist is set to a blank value. If the value is blank, then an Organizational Unit object is created. The DN of the organizational unit is set to the value of the local variable target-container. It also adds the value for the OU attribute. The value of the OU attribute is set to the name of the new organizational unit, which is obtained by parsing the value of the local variable target-container.
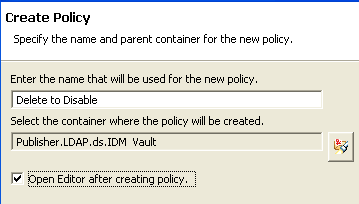
Command Transformation - Publisher Delete to Disable
Transforms a Delete operation for a User object into a Modify operation that disables the target User object in eDirectory. Implement the rule on the Publisher Command Transformation policy in the driver.
There are two steps involved in using the predefined rules: creating a policy in the Command Transformation policy set, and importing the predefined rule. If you already have a Command Transformation policy that you want to add this rule to, skip to Importing the Predefined Rule.
Creating a Policy
-
From the Outline view or the Policy Flow view, select the Publisher channel.
-
Select the Command Transformation policy set in the Policy Set, then click
to create a new policy. -
Click , then click .
-
Name the policy.
-
Use the location that is populated to place the policy in the driver.
-
Select , then click .
-
Select for the type of policy, then click .
-
A file conflict window appears with the message “” Click . The Policy Builder is launched and the new Command Transformation policy is saved.
Importing the Predefined Rule
-
Right-click in the Policy Builder, then click > .
-
Select , then click .
-
Save the rule by clicking > .
There is no information to change in the rule that is specific to your environment.
How the Logic in the Rule Works
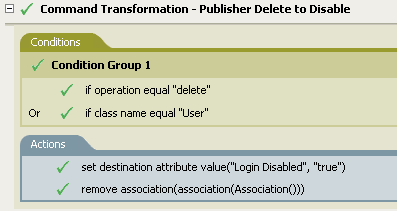
The rule is used when a Delete command is going to be sent to the Identity Vault, usually in response to a Delete event that occurred in the connected system. Instead of the User object being deleted in the Identity Vault, the User object is disabled. When a Delete command is processed for a User object, the destination attribute value of Login Disabled is set to true, the association is removed from the User object, and the Delete command is vetoed. The User object can no longer log in into the Novell® eDirectory™ tree, but the User object was not deleted.
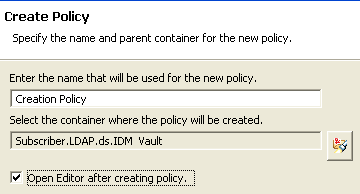
Creation - Require Attributes
Prevents User objects from being created unless the required attributes are populated. Implement the rule on the Subscriber Creation policy or the Publisher Creation policy in the driver.
There are two steps involved in using the predefined rules: creating a policy in the Creation policy set, and importing the predefined rule. If you already have a Creation policy that you want to add this rule to, skip to Importing the Predefined Rule.
Creating a Policy
-
From the Outline view or the Policy Flow view, select the Publisher or Subscriber channel.
-
Select the Creation policy set in the Policy Set, then click
to create a new
policy. -
Click , then click .
-
Name the policy.
-
Use the location that is populated to place the policy in the driver.
-
Select for the type of policy, then click .
-
A file conflict window appears with the message “” Click . The Policy Builder is launched and the new Creation policy is saved.
Importing the Predefined Rule
-
Right-click in the Policy Builder and click > .
-
Select , then click .
-
Edit the action by double-clicking the Actions tab.
-
Delete from the .
-
Browse to the attributes you require for a User object to be created, then click .
-
Click .
-
Save the rule by selecting > .

How the Logic in the Rule Works
The rule is used when your business processes require that a user has specific attributes populated in the source User object before the destination the User object can be created. When a User object is created in the source data store, the rule vetoes the creation of the object in the destination data store unless the required attributes are provided when the User object is created. You can have one or more required attributes.
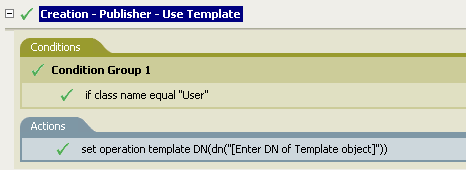
Creation - Publisher - Use Template
Allows for the use of a Novell eDirectory template object during the creation of a User object. Implement the rule on the Publisher Creation policy in the driver.
There are two steps involved in using the predefined rules: creating a policy in the Creation policy set, and importing the predefined rule. If you already have a Creation policy that you want to add this rule to, skip to Importing the Predefined Rule.
Creating a Policy
-
From the Outline view or the Policy Flow view, select the Publisher channel.
-
Select the Creation policy set in the Policy Set, then click
to create a new
policy. -
Click , then click .
-
Name the policy.
-
Use the location that is populated to place the policy in the driver.
-
Select , then click .
-
Select for the type of policy, then click .
-
A file conflict window appears with the message “” Click . The Policy Builder is launched and the new Creation policy is saved.
Importing the Predefined Rule
-
Right-click in the Policy Builder, then click > .
-
Select , then click .
-
Edit the action by double-clicking the Actions tab.
-
Delete from the .
-
Click the
to
launch the Argument Builder. -
Select in the Noun list.
-
Double-click to add it to the argument.
-
In the Editor, click the browse icon, browse to and select the template object, then click .
-
Click .
-
Save the rule by clicking > .
How the Logic in the Rule Works
The rule is used when you want to create a user in the Identity Vault based on a template object. If you have attributes that are the same for users, using the template saves time. You fill in the information in the template object and when the User object is created, Identity Manager uses the attribute values from the template to create the User object.
During the creation of User objects, the rule does the action of the set operation template DN, which instructs the Identity Manager to use the referenced template when creating the object.
Creation - Set Default Attribute Value
Allows you to set default values for attributes that are assigned during the creation of User objects. Implement the rule on the Subscriber Creation policy or Publisher Creation policy in the driver.
There are two steps involved in using the predefined rules: creating a policy in the Creation policy set, and importing the predefined rule. If you already have a Creation policy that you want to add this rule to, skip to Importing the Predefined Rule.
Creating a Policy
-
From the Outline view or the Policy Flow view, select the Publisher or Subscriber channel.
-
Select the Creation policy set in the Policy Set, then click the icon
to create a new
policy. -
Click , then click .
-
Name the policy.
-
Use the location that is populated to place the policy in the driver.
-
Select , then click .
-
Select for the type of policy, then click .
-
A file conflict window appears with the message “” Click . The Policy Builder is launched and the new Creation policy is saved.
Importing the Predefined Rule
-
Right-click in the Policy Builder, then click > .
-
Select , then click .
-
Edit the action by double-clicking the Actions tab.
-
Delete from the .
-
Click the browse icon, then browse to and select the attribute you want to have created.
-
Delete from the .
-
Click the icon
to
launch the Argument Values List Builder. -
Select the type of data you want the value to be.
-
Click the icon
to
launch the Argument Builder. -
Create the value you want the attribute to be through the Argument Builder, then click .
-
Click .
-
Save the rule by clicking > .
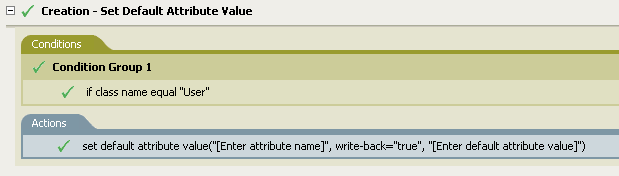
How the Logic in the Rule Works
The rule is used when you want to populate default attribute values when creating a User object. When a User object is created, the rule adds the specified attribute values if and only if the attribute has no values supplied by the source object.
If you want more than one attribute value defined, right-click the action and click > . Select the action, set the default attribute value, and follow the steps above to assign the value to the attribute.
Creation - Set Default Password
During the creation of User objects, it sets a default password for User objects. Implement the rule on the Subscriber Creation policy or Publisher Creation policy in the driver.
There are two steps involved in using the predefined rules: creating a policy in the Creation policy set, and importing the predefined rule. If you already have a Creation policy that you want to add this rule to, skip to Importing the Predefined Rule.
Creating a Policy
-
From the Outline view or the Policy Flow view, select the Publisher or Subscriber channel.
-
Select the Creation policy set in Policy Set, then click
to create a new
policy. -
Click , then click .
-
Name the policy.
-
Use the location that is populated to place the policy in the driver.
-
Select , then click .
-
Select for the type of policy, then click .
-
A file conflict window appears with the message “” Click . The Policy Builder is launched and the new Creation policy is saved.
Importing the Predefined Rule
-
Right-click in the Policy Builder, then click > .
-
Select , then click .
-
Save the rule by clicking > .
There is no information to change in the rule that is specific to your environment.

How the Logic in the Rule Works
The rule is used when you want User objects to be created with a default password. During the creation of a User object, the password that is set for the User object is the Given Name attribute plus the Surname attribute of the User object.
You can change the value of the default password by editing the argument. You can set the password to any other value you want through the Argument Builder.
Event Transformation - Scope Filtering - Include Subtrees
Excludes all events that occur outside of the specific subtrees. Implement the rule on the Subscriber Event Transformation policy or the Publisher Event Transformation policy in the driver.
There are two steps involved in using the predefined rules: creating a policy in the Event Transformation policy set, and importing the predefined rule. If you already have an Event Transformation policy that you want to add this rule to, skip to Importing the Predefined Rule.
Creating a Policy
-
From the Outline view or the Policy Flow view, select the Publisher or Subscriber channel.
-
Select the Event Transformation policy set in the Policy Set, then click
to create a new
policy. -
Click , then click .
-
Name the policy.
-
Use the location that is populated to place the policy in the driver.
-
Select , then click .
-
Select for the type of policy, then click .
-
A file conflict window appears with the message “” Click . The Policy Builder is launched and the new Event Transformation policy is saved.
Importing the Predefined Rule
-
Right-click in the Policy Builder, then select > .
-
Select , then click .
-
Edit the condition by double-clicking the Conditions tab.
-
Delete in the .
-
Click the browse button to browse the Identity Vault for the part of the tree you were you want events to synchronize, then click .
-
Click .
-
Save the rule by click > .
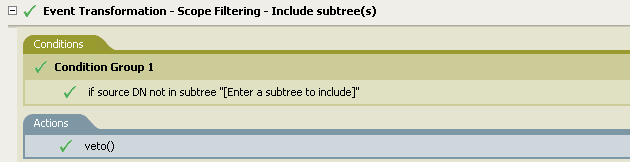
How the Logic in the Rule Works
The rule is used when you only want to synchronize specific subtrees between the Identity vault and the connected system.When an event occurs anywhere but in that specific part of the Identity Vault, it is vetoed. You can add additional subtrees to be synchronized by copying and pasting the If Source DN condition.
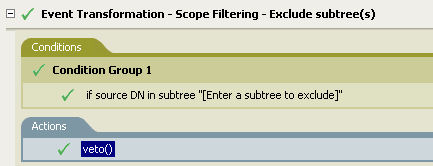
Event Transformation - Scope Filtering - Exclude Subtrees
Excludes all events that occur in a specific subtree. Implement the rule on the Subscriber Event Transformation or the Publisher Event Transformation policy in the driver.
There are two steps involved in using the predefined rules: creating a policy in the Event Transformation policy set, and importing the predefined rule. If you already have an Event Transformation policy that you want to add this rule to, skip to Importing the Predefined Rule.
Creating a Policy
-
From the Outline view or the Policy Flow view, select the Publisher or Subscriber channel.
-
Select the Event Transformation policy set in Policy Set, then click
to create a new
policy. -
Click , then click .
-
Name the policy.
-
Use the location that is populated to place the policy in the driver.
-
Select , then click .
-
Select for the type of policy, then click .
-
A file conflict window appears with the message “” Click . The Policy Builder is launched and the new Event Transformation policy is saved.
Importing the Predefined Rule
-
Right-click in the Policy Builder, then click > .
-
Select , then click .
-
Edit the condition by double-clicking the Conditions tab.
-
Delete in the .
-
Click the browse button to browse the Identity Vault for the part of the tree you want to exclude events from synchronizing, then click .
-
Click .
-
Save the rule by clicking > .
How the Logic in the Rule Works
The rule is used when you want to exclude part of the Identity Vault or connected system from synchronizing. When an event occurs in that specific part of the Identity Vault, it is vetoed. You can add additional subtrees to be excluded by copying and pasting the if source DN condition.
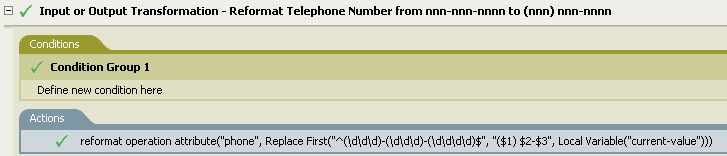
Input or Output Transformation - Reformat Telephone Number from (nnn) nnn-nnnn to nnn-nnn-nnnn
Converts the format of the telephone number. Implement the rule on the Input or Output Transformation policy in the driver. Typically, if this rule is used on an Input Transformation, you would you then use the rule Reformat Telephone Number from nnn-nnn-nnnn to (nnn) nnn-nnnn on the Output Transformation and vice versa to convert the format back and forth.
There are two steps involved in using the predefined rules: creating a policy in the Input or Output Transformation policy set, and importing the predefined rule. If you already have an Input or Output Transformation policy that you want to add this rule to, skip to Importing the Predefined Rule.
Creating a Policy
-
From the Outline view or the Policy Flow view, select the Publisher or Subscriber channel.
-
Select the Input or Output Transformation policy set in the Policy Set, then click
to create a new policy. -
Click , then click .
-
Name the policy.
-
Use the location that is populated to place the policy in the driver.
-
Select , then click .
-
Select for the type of policy, then click .
-
A file conflict window appears with the message “” Click . Policy Builder is launched and the new Input or Output Transformation policy is saved.
Importing the Predefined Rule
-
Right-click in the Policy Builder, then click > .
-
Select , then click .
-
Edit the condition by double-clicking the Conditions tab.
-
Define the condition you want to have occur when the telephone number is reformatted.
-
Click .
-
Save the rule by clicking > .

How the Logic in the Rule Works
The rule is used when you want to reformat the telephone number. It finds all the values for the attribute phone in the current operation that match the pattern (nnn) nnn-nnnn and replaces each with nnn-nnn-nnnn.
Input or Output Transformation - Reformat Telephone Number from nnn-nnn-nnnn to (nnn) nnn-nnnn
Transforms the format of the telephone number. Implement the rule on the Input or Output Transformation policy. Typically, if you use this rule on an Output Transformation, you would use the rule Reformat Telephone Number from (nnn) nnn-nnnn to nnn-nnn-nnnn on the Input Transformation and vice versa to convert the format back and forth.
There are two steps involved in using the predefined rules; creating a policy in the Input or Output Transformation policy set, and importing the predefined rule. If you already have an Input or Output Transformation policy that you want to add this rule to, skip to Importing the Predefined Rule.
Creating a Policy
-
From the Outline view or the Policy Flow view, select the Publisher or Subscriber channel.
-
Select the Input or Output Transformation policy set in the Policy Set, then click
to create a new policy. -
Click , then click .
-
Name the policy.
-
Use the location that is populated to place the policy in the driver.
-
Select , then click .
-
Select for the type of policy, then click .
-
A file conflict window appears with the message “” Click . Policy Builder is launched and the new Input or Output Transformation policy is saved.
Importing the Predefined Rule
-
Right-click in the Policy Builder and click > .
-
Click I, then click .
-
Edit the condition by double-clicking the Conditions tab.
-
Define the condition you want to have occur when the telephone number is reformatted.
-
Click .
-
Save the rule by clicking > .
How the Logic in the Rule Works
The rule is used when you want to reformat the telephone number. It finds all the values for the attribute phone in the current operation that match the pattern (nnn) nnn-nnnn and replaces each with nnn-nnn-nnnn.
Matching - Publisher Mirrored
Finds matches in the Identity Vault for objects in the connected system based on their name and location. Implement the rule on the Publisher Matching policy in the driver.
There are two steps involved in using the predefined rules: creating a policy in the Matching policy set, and importing the predefined rule. If you already have a Matching policy that you want to add this rule to, skip to Importing the Predefined Rule.
Creating a Policy
-
From the Outline view or the Policy Flow view, select the Publisher channel.
-
Select the Matching policy set in the Policy Set, then click
to create a new
policy. -
Click , then click .
-
Name the policy.
-
Use the location that is populated to place the policy in the driver.
-
Select , then click .
-
Select for the type of policy, then click .
-
A file conflict window appears with the message “” Click . The Policy Builder is launched and the new Matching policy is saved.
Importing the Predefined Rule
-
Right-click in the Policy Builder, then click > .
-
Select , then click .
-
Edit the condition by double-clicking the Conditions tab.
-
Delete from the .
-
Browse to and select the container in the source hierarchy where you want the matching to start, then click .
-
Click .
-
Edit the action by double-clicking the Actions tab.
-
Delete from the .
-
Click on the icon
to
launch the Argument Builder. -
Select in the Noun list.
-
Double-click to add it to the argument.
-
In the Editor, click the browse icon and browse to the container in the destination hierarchy where you want the source structure to be matched, then click .
-
Click .
-
Save the rule by clicking > .

How the Logic in the Rule Works
When an Add event occurs on an object in the connected system that is located within the specified source subtree, the rule constructs a DN that represents the same object name and location within the Identity Vault relative to the specified destination subtree. If the destination objects exists and is of the desired object class then it is considered a match. You must supply the DN's of the source (connected system) and destination (Identity Vault) subtrees.
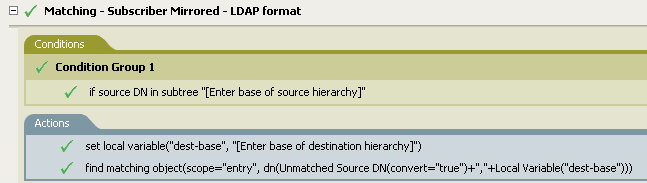
Matching - Subscriber Mirrored - LDAP Format
Finds matches in a connected system that uses LDAP format DN's for objects in the Identity Vault based on their name and location. Implement the rule on the Subscriber Matching policy in the driver.
There are two steps involved in using the predefined rules: creating a policy in the Matching policy set, and importing the predefined rule. If you already have a Matching policy that you want to add this rule to, skip to Importing the Predefined Rule.
Creating a Policy
-
From the Outline view or the Policy Flow view, select the Publisher channel.
-
Select the Matching policy set in the Policy Set, then click
to create a new
policy. -
Click , then click .
-
Name the policy.
-
Use the location that is populated to place the policy in the driver.
-
Select , then click .
-
Select for the type of policy, then click .
-
A file conflict window appears with the message “” Click . The Policy Builder is launched and the new Matching policy is saved.
Importing the Predefined Rule
-
Right-click in the Policy Builder, then click > .
-
Select , then click .
-
Edit the condition by double-clicking the Conditions tab.
-
Delete from the .
-
Browse to and select the container in the source hierarchy where you want the matching to start, then click .
-
Click .
-
Edit the action by double-clicking the Actions tab.
-
Delete from the .
-
Click the icon
to
launch the Argument Builder. -
Select in the Noun list.
-
Double-click to add it to the argument.
-
In the Editor, click the browse icon, browse to and select the container in the destination hierarchy where you want the source structure to be matched, then click .
-
Click .
-
Save the rule by clicking > .
How the Logic in the Rule Works
When an Add event occurs on an object in the Identity Vault that is located within the specified source subtree, the rule constructs a DN that represents the same object name and location within the connected system relative to the specified destination subtree. If the destination objects exists and is of the desired object class then it is considered a match. You must supply the DN's of the source (Identity Vault) and destination (connected system) subtrees. The connected system must use an LDAP formatted DN.
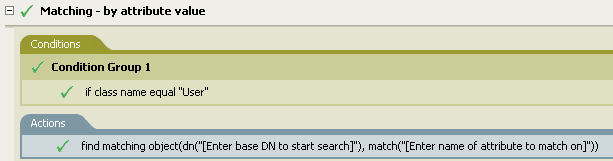
Matching - By Attribute Value
Finds matches for objects by specific attribute values. Implement the rule on the Subscriber Matching policy or the Publisher Matching policy in the driver.
There are two steps involved in using the predefined rules; creating a policy in the Matching policy set, and importing the predefined rule. If you already have a Matching policy that you would like to add this rule to, skip to Importing the Predefined Rule.
Creating a Policy
-
From the Outline view or the Policy Flow view, select the Publisher channel.
-
Select the Matching policy set in the Policy Set, then click
to create a new
policy. -
Click , then click .
-
Name the policy.
-
Use the location that is populated to place the policy in the driver.
-
Select , then click .
-
Select for the type of policy, then click .
-
A file conflict window appears with the message “” Click . The Policy Builder is launched and the new Matching policy is saved.
Importing the Predefined Rule
-
Right-click in the Policy Builder, then click > .
-
Select , then click .
-
Edit the action by double-clicking the Actions tab.
-
Delete from the .
-
Click the
to
launch the Argument Builder. -
Select in the Noun list.
-
Double-click to add it to the argument.
-
In the Editor, click the browse icon, then browse to and select the container where you want the search to start, then click .
-
Delete from the .
-
Click the
to
launch the Match Attributes Builder. -
Click the browse icon and select the attributes you want to match. You can select one or more attributes to match against, then click .
-
Click .
-
Save the rule by clicking > .
How the Logic in the Rule Works
When an Add event occurs on an object in the source data store, rule searches for an object in the destination data store that has the same values for the specified attribute. You must supply the DN of the base of the subtree to search in the connected system and the name of the attribute to match on.
Placement - Publisher Mirrored
Places objects in the Identity Vault by based on the name and location from the connected system. Implement the rule on the Publisher Placement policy in the driver.
There are two steps involved in using the predefined rules: creating a policy in the Placement policy set, and importing the predefined rule. If you already have a Placement policy that you would like to add this rule to, skip to Importing the Predefined Rule.
Creating a Policy
-
From the Outline view or the Policy Flow view, select the Publisher channel.
-
Select the Placement policy set in the Policy Set, then click
to create a new
policy. -
Click , then click .
-
Name the policy.
-
Use the location that is populated to place the policy in the driver.
-
Select , then click .
-
Select for the type of policy, then click .
-
A file conflict window appears with the message “” Click . The Policy Builder is launched and the new Placement policy is saved.
Importing the Predefined Rule
-
Right-click in the Policy Builder, then click > .
-
Select , then click .
-
Edit the condition by double-clicking the Conditions tab.
-
Delete from the .
-
Browse to and select the container in the source hierarchy where you want the object to be acted upon, then click .
-
Edit the action by double-clicking the Actions tab.
-
Delete from the .
-
Click the icon
to
launch the Argument Builder. -
Select in the Noun list.
-
Double-click to add it to the argument.
-
In the Editor, click the browse icon, browse to and select the container in the destination hierarchy where you want the object to be placed, then click .
-
Click .
-
Save the rule by clicking > .

How the Logic in the Rule Works
If the User object resides in the specified source subtree in the connected system, then the object is placed at the same relative name and location within the Identity Vault. You must supply the DN's of the source (connected system) and destination (Identity Vault) subtrees.
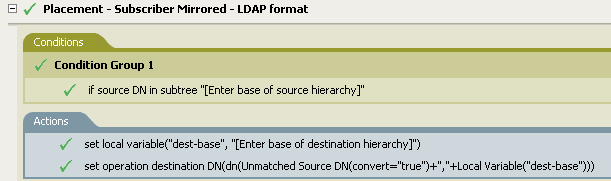
Placement - Subscriber Mirrored - LDAP Format
Places objects in the data store by using the mirrored structure in the Identity Vault from a specified point. Implement the rule on the Placement policy in the driver. You can implement the rule only on the Subscriber channel.
There are two steps involved in using the predefined rules: creating a policy in the Placement policy set, and importing the predefined rule. If you already have a Placement policy that you want to add this rule to, skip to Importing the Predefined Rule.
Creating a Policy
-
From the Outline view or the Policy Flow view, select the Publisher channel.
-
Select the Placement policy set in the Policy Set, then click
to create a new
policy. -
Click , then click.
-
Name the policy.
-
Use the location that is populated to place the policy in the driver.
-
Select , then click .
-
Select for the type of policy, then click .
-
A file conflict window appears with the message “” Click . The Policy Builder is launched and the new Placement policy is saved.
Importing the Predefined Rule
-
Right-click in the Policy Builder, then click > .
-
Select format, then click .
-
Edit the condition by double-clicking the Conditions tab.
-
Delete from the .
-
Browse to the container in the source hierarchy where you want the object to be acted upon, then click .
-
Edit the action by double-clicking the Actions tab.
-
Delete from the .
-
Click the icon
to
launch the Argument Builder. -
Select in the Noun list.
-
Double-click to add it to the argument.
-
In the Editor, click the browse icon and browse to the container in the destination hierarchy where you want the object to be placed, then click .
-
Click .
-
Save the rule by clicking > .
How the Logic in the Rule Works
If the User object resides in the specified source subtree, then the object is placed at the same relative name and location within the Identity Vault. You must supply the DN's of the source (Identity Vault) and destination (connected system) subtrees. The connected system must use an LDAP formatted DN.
Placement - Publisher Flat
Places objects from the data store into one container in the Identity Vault. Implement the rule on the Publisher Placement policy in the driver.
There are two steps involved in using the predefined rules: creating a policy in the Placement policy set, and importing the predefined rule. If you already have a Placement policy that you want to add this rule to, skip to Importing the Predefined Rule.
Creating a Policy
-
From the Outline view or the Policy Flow view, select the Publisher channel.
-
Select the Placement policy set in the Policy Set, then click
to create a new
policy. -
Click , then click .
-
Name the policy.
-
Use the location that is populated to place the policy in the driver.
-
Select , then click .
-
Select for the type of policy, then click .
-
A file conflict window appears with the message “” Click . The Policy Builder is launched and the new Placement policy is saved.
Importing the Predefined Rule
-
Right-click in the Policy Builder, then click > .
-
Select , then click .
-
Edit the action by double-clicking the Actions tab.
-
Delete from the .
-
Click the icon
to
launch the Argument Builder. -
Select in the Noun list.
-
Double-click to add it to the argument.
-
In the Editor, click the browse icon, then browse to and select the destination container were you want all of the User objects to be placed, then click .
-
Click .
-
Save the rule by clicking > .
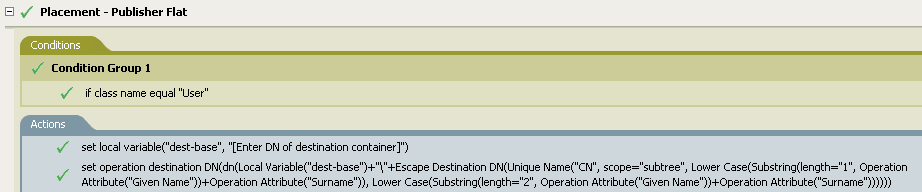
How the Logic in the Rule Works
The rule places all User objects in the destination DN. The rule sets the DN of the destination container as the local variable dest-base. The rule then sets the destination DN to be dest-base\CN attribute. The CN attribute of the User object is the first two letters of the Given Name attribute plus the Surname attribute as lowercase. The rule uses slash format.
Placement - Subscriber Flat - LDAP Format
Places objects from the Identity Vault into one container in the data store. Implement the rule on the Subscriber Placement policy in the driver.
There are two steps involved in using the predefined rules: creating a policy in the Placement policy set, and importing the predefined rule. If you already have a Placement policy that you want to add this rule to, skip to Importing the Predefined Rule.
Creating a Policy
-
From the Outline view or the Policy Flow view, select the Publisher channel.
-
Select the Placement policy set in Policy Set, then click
to create a new
policy. -
Click , then click .
-
Name the policy.
-
Use the location that is populated to place the policy in the driver.
-
Select , then click .
-
Select for the type of policy, then click .
-
A file conflict window appears with the message “” Click . The Policy Builder is launched and the new Placement policy is saved.
Importing the Predefined Rule
-
Right-click in the Policy Builder, then click > .
-
Select , then click .
-
Edit the action by double-clicking the Actions tab.
-
Delete from the .
-
Click the icon
to
launch the Argument Builder. -
Select in the Noun list.
-
Double-click to add it to the argument.
-
In the Editor, add the destination container were you want all of the User objects to be placed. Make sure the container is specified in LDAP format, then click .
-
Click .
-
Save the rule by clicking > .
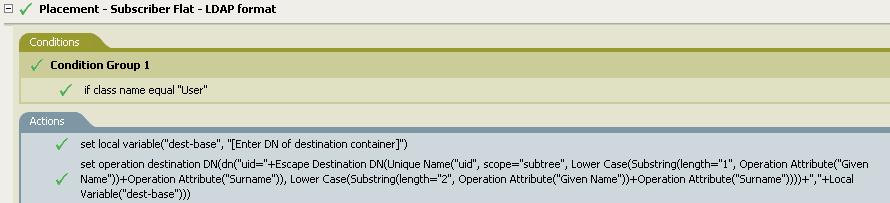
How the Logic in the Rule Works
The rule places all User objects in the destination DN. The rule sets the DN of the destination container as the local variable dest-base. The rule then sets the destination DN to be uid=unique name,dest-base. The uid attribute of the User object is the first two letters of the Given Name attribute plus the Surname attribute as lowercase. The rule uses LDAP format.
Placement - Publisher By Dept
Places objects from one container in the data store into multiple containers in the Identity Vault based on the value of the OU attribute. Implement the rule on the Publisher Placement policy in the driver.
There are two steps involved in using the predefined rules: creating a policy in the Placement policy set, and importing the predefined rule. If you already have a Placement policy that you want to add this rule to, skip to Importing the Predefined Rule.
Creating a Policy
-
From the Outline view or the Policy Flow view, select the Publisher channel.
-
Select the Placement policy set in the Policy Set, then click
to create a new
policy. -
Click , then click .
-
Name the policy.
-
Use the location that is populated to place the policy in the driver.
-
Select , then click .
-
Select for the type of policy, then click .
-
A file conflict window appears with the message “” Click . The Policy Builder is launched and the new Placement policy is saved.
Importing the Predefined Rule
-
Right-click in Policy Builder, then click > .
-
Select , then click .
-
Edit the action by double-clicking the Actions tab.
-
Delete from the .
-
Click the icon
to
launch the Argument Builder. -
Select in the Noun list.
-
Double-click to add it to the argument.
-
In the Editor, click the browse icon, then browse to and select the parent container in the Identity Vault. Make sure all of the department containers are child containers of this DN, then click .
-
Click .
-
Save the rule by clicking > .

How the Logic in the Rule Works
The rule places User objects in proper department containers depending upon what value is stored in the OU attribute. If a User object needs to be placed and has the OU attribute available, then the User object is placed in the dest-base\value of OU attribute\CN attribute.
The dest-base is a local variable. The DN must be the relative root path of the department containers. It can be an organization or an organizational unit. The value stored in the OU attribute must be the name of a child container of the dest-base local variable.
The value of the OU attribute must be the name of the child container. If the OU attribute is not present, this rule is not executed.
The CN attribute of the User object is the first two letters of the Given Name attribute plus the Surname attribute as lowercase. The rule uses slash format.
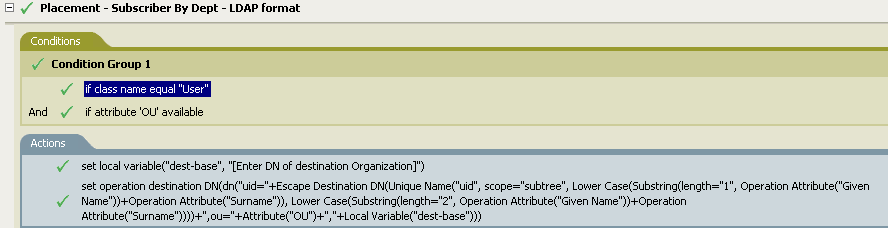
Placement - Subscriber By Dept - LDAP Format
Places objects from one container in the Identity Vault into multiple containers in the data store base on the OU attribute. Implement the rule on the Placement policy in the driver. You can implement the rule only on the Subscriber channel.
There are two steps involved in using the predefined rules: creating a policy in the Placement policy set, and importing the predefined rule. If you already have a Placement policy that you want to add this rule to, skip to Importing the Predefined Rule.
Creating a Policy
-
From the Outline view or the Policy Flow view, select the Publisher channel.
-
Select the Placement policy set in the Policy Set, then click
to create a new
policy. -
Click , then click .
-
Name the policy.
-
Use the location that is populated to place the policy in the driver.
-
Select , then click .
-
Select for the type of policy, then click .
-
A file conflict window appears with the message “” Click . The Policy Builder is launched and the new Placement policy is saved.
Importing the Predefined Rule
-
Right-click in the Policy Builder, then click > .
-
Select , then click .
-
Edit the action by double-clicking the Actions tab.
-
Delete from the .
-
Click the icon
to
launch the Argument Builder. -
Select in the Noun list.
-
Double-click to add it to the argument.
-
In the Editor, add the parent container in the data store. The parent container must be specified in LDAP format. Make sure all of the department containers are child containers of this DN, then click .
-
Click .
-
Save the rule by clicking > .
How the Logic in the Rule Works
The rule places User objects in proper department containers depending upon what value is stored in the OU attribute. If a User object needs to be placed and has the OU attribute available, then the User object is place in the uid=unique name,ou=value of OU attribute,dest-base.
The dest-base is a local variable. The DN must be the relative root path of the department containers. It can be an organization or an organizational unit. The value stored in the OU attribute must be the name of a child container of the dest-base local variable.
The value of the OU attribute must be the name of the child container. If the OU attribute is not present, then this rule is not executed.
The uid attribute of the User object is the first two letters of the Given Name attribute plus the Surname attribute as lowercase. The rule uses LDAP format.
2.2.7 Testing Policies with the Policy Simulator
Designer includes a new tool called the Policy Simulator. It allows you to test policies before deploying them.You can thoroughly test the policies and the drivers without using your existing data in the Identity Vault or the connected system.
For more information about common tasks with the Policy Simulator, see the following sections:
The Policy Simulator requires you to provide input well-formed XML documents for the policy to operate on. Typically the documents that policies operate on use an XML vocabulary called XDS that represents events and commands as they flow through the Metadirectory engine. To learn more about XDS, see eDirectory DTD Commands and Events.
All policies that are implemented in Policy Builder expect an XDS document as input. Most policies implemented in XSLT also expect an XDS document as input, however some policies (such as the initial Input Transformations for the Delimited Text and SOAP drivers) may expect a different XML vocabulary as input.
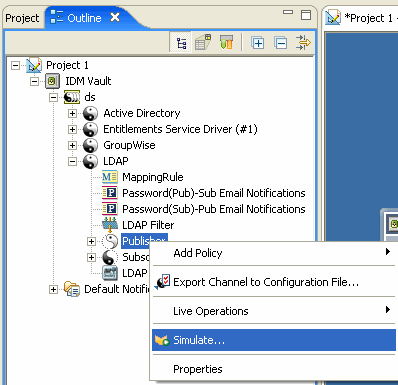
Accessing the Policy Simulator
The Policy Simulator can be accessed in three different ways:
Outline View
-
Click the icon.

-
Right-click the driver, publisher, subscriber, mapping rule, filter, or any policy you want to simulate, then click .
Policy Flow
-
Click the icon.

-
Right-click the input, output, schemaMapping, filter, and any policy set icons you want to simulate, then click .
Editors
You can access the Policy Simulator through the Policy Builder,
the Schema Mapping Editor, or the Filter Editor by selecting the ![]() in
the toolbar of each editor.
in
the toolbar of each editor.
Using the Policy Simulator
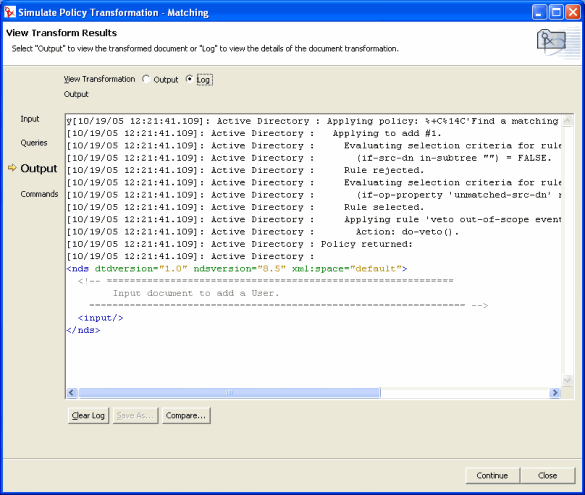
The Policy Simulator allows you to select a point in the driver flow to test the policy with a specific operation. It allows you to edit the input and output documents, while you are testing. If you want to keep the changes, select the Save As icon to save the document as an XML file.
The Policy Simulator gives you a powerful tool to test and edit policies before implementing them in lab or production environments.
To use the Policy Simulator, please follow the steps listed below:
-
From the Policy Set drop-down list, select the place in the driver flow that you want to test the policy. You can select the any of the following items: Publisher Channel, Subscriber Channel, Input, Schema Mapping, Event, Sycn Filter, Matching, Creation, Placement, Command and Notify Filter. If you select a specific policy or rule to test, this option does not appear.
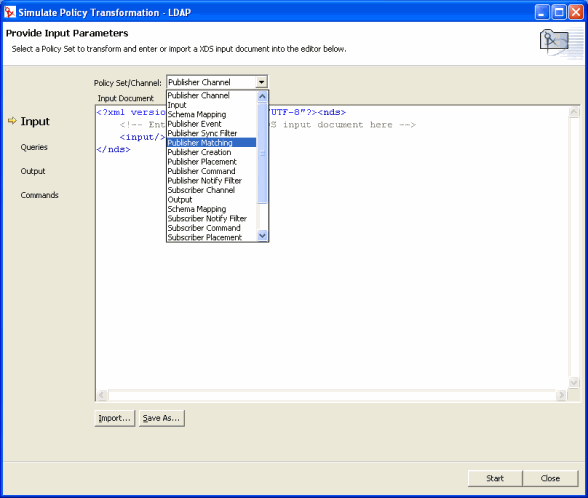
-
Select to display the list of operations you can test the policy with. The operation are Add, Association, Delete Instance, Modify, Move, Query, Rename, and Status.
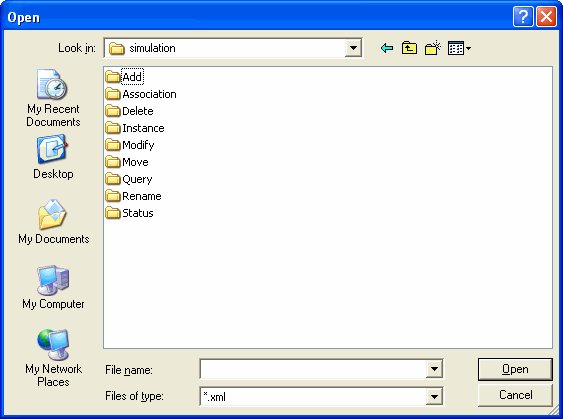
-
Double-click the folder to display the available events. Each event has different files you can select. For example, if you select Add you have three options: Organization.xml, OrganizationalUnit.xml and User.xml. The file indicates the object class for the operation. If you select User.xml, it will be an Add operation for a User object.
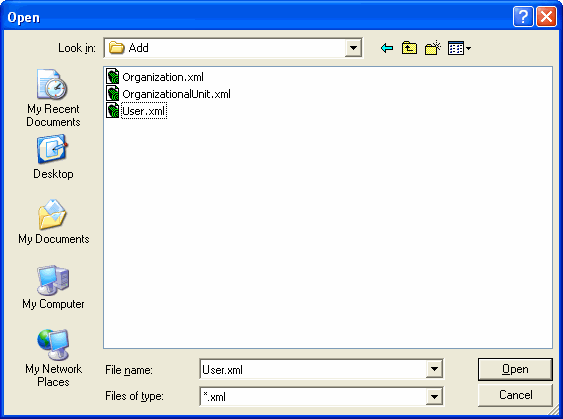
-
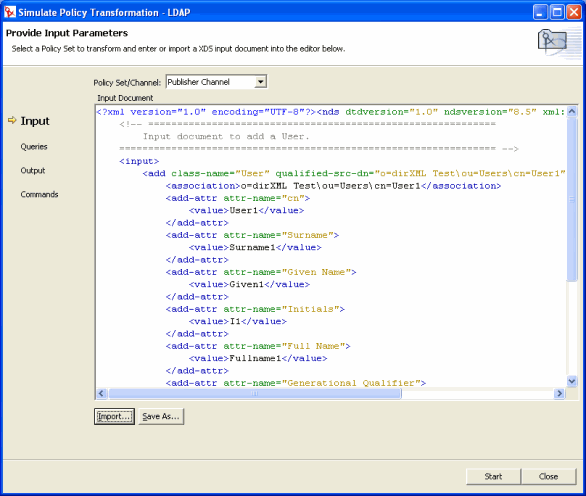
Select a file, then click .
-
The input document is now displayed in the window. Click .
-
If you select , you see a trace log of the policy execution. The information in this window is the same information that you see in DSTRACE.
-
If you select , you see the output document that was generated.

-
When you are finished looking at the results, click to test another event against the policy.
-
Select to compare the output document to the input document. The comparison is displayed in a dialog using the Eclipse text compare editor.

-
When you are finished testing, click and to close the Policy Simulator.
2.2.8 Editing the DirXML Script
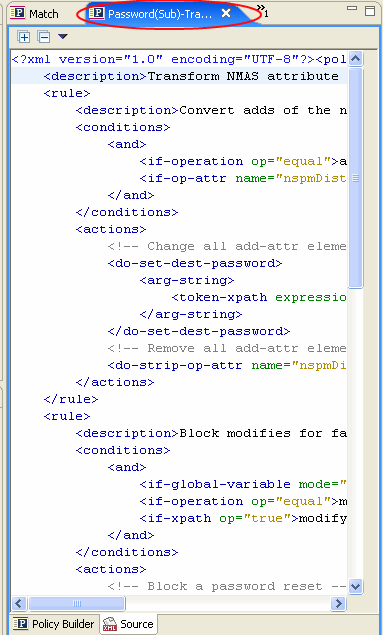
Designer enables you to view and edit the source DirXML Script by using an XML editor or text editor. Designer has a built in XML editor. The Source view also allows you to validate against the document type definition file (DTD). For more information about the DTD see DirXML Driver Developer Kit Documentation.
Edit XML
-
To open the Source view, select Source at the bottom of the Policy Builder.
The DirXML Script is displayed in an XML editor. You can edit the DirXML Script. To see the information without scrolling, double-click the active tab and the current panel expands to fill the entire window. To minimize the view, double-click the active tab.
To select a different XML editor for your Source view:
-
From the Main menu, select > .
-
Select > > .
-
Select from the list under .
-
From the list in Associated Editors, select the editor that you want. If the editor you want isn’t in the list, you might need to click Add, then add it to the list.
-
Click .
-
Close and reopen the Policy Builder.
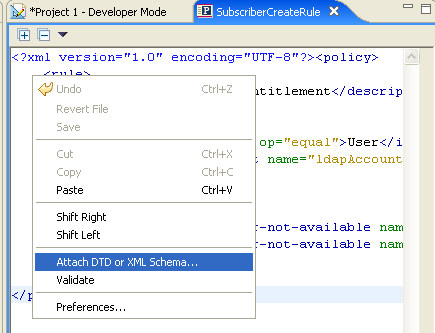
Validate DTD
You can validate any DTD file with Designer. The following examples uses Novell’s DTD. If you validate a policy created with the Policy Builder, use Novell’s DTD file. The DTD file is shipped with Designer. The file is located software\designer\eclipse\plugins\com.novell.soa.xml\resolver_x.x.x\xmlcatalog\dtdcatalog\dirxmlscript.dtd where software is where you have Designer installed.
For the DTD validation to work, the policy must be saved. If you have been working on a policy, make sure it is saved before validating.
-
Select the policy you want to validate the DTD against in the Policy Builder.
-
Click the tab, then right-click in the Source View > or
-
Browse to the DTD file, then click . In this example the file is located at C:\Program Files\Novell\designer\eclipse\plugins\com.novell.soa.xml.resolver_1.0.0\XmlCatalog\DTDCatalog\dirxmlscript.dtd.
-
Right-click in the Source View again, then click .
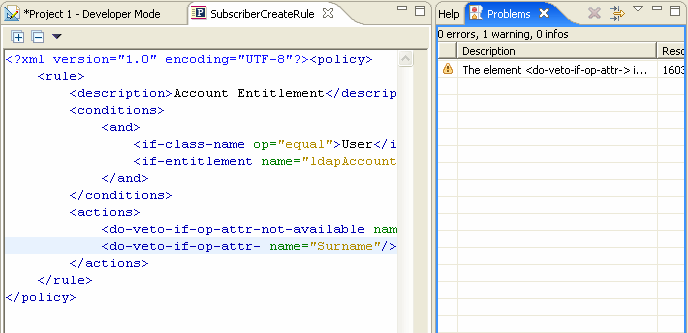
The Problems window opens. If there is no error, nothing is listed in the Problems window. If there is an error, information about the error is listed in the window. It explains why, in what project, and on what line the error occurred. Click the error and Designer high lights the line of code where the problem is. You can fix the problem in the XML editor and save the policy.