4.2 Managing Users
4.2.1 Changing a User’s Application Name (Mobility Pack Only)
When users are added to your Synchronizer system during Mobility Pack installation, users are added using their LDAP user names. If LDAP user names are not the same as GroupWise user IDs in your GroupWise system, you must set application names for users in order to map their LDAP user names to their GroupWise user IDs. This task must be done after the users have been added to your Synchronizer system, but before initial synchronization takes place.
-
In Synchronizer Web Admin, click the connector, then click .

The Manage Users page lists the users that have already been added to the connector.
-
Click each user name in the column, type the GroupWise user ID in the text box, then press Enter.
-
Click , then restart the connector where you modified the users’ application names.
4.2.2 Adding a User to a Connector in Synchronizer Web Admin
During installation of the Mobility Pack or Data Synchronizer, you specified one LDAP user container and added users from that container. If you installed the Mobility Pack, the users you added during installation were automatically added to both the GroupWise Connector and the Mobility Connector. If you installed Data Synchronizer, you add users manually in Synchronizer Web Admin.
After installation, you might have configured Synchronizer Web Admin to search additional LDAP containers for users, as described in Section 3.1.1, Searching Multiple LDAP Contexts for Users and Groups. Now you can add users to a connector from any LDAP container that Synchronizer Web Admin has been configured to search.
Users must be added to at least two connectors in order for data synchronization to take place. The general instructions for adding users are the same for all connectors.
IMPORTANT:If you are adding the user to the GroupWise Connector and the Mobility Connector, add the user to the GroupWise Connector first.
-
In Synchronizer Web Admin, click the connector to add the user to, then click .

The Manage Users page lists the users that have already been added to the connector.
-
Click .

-
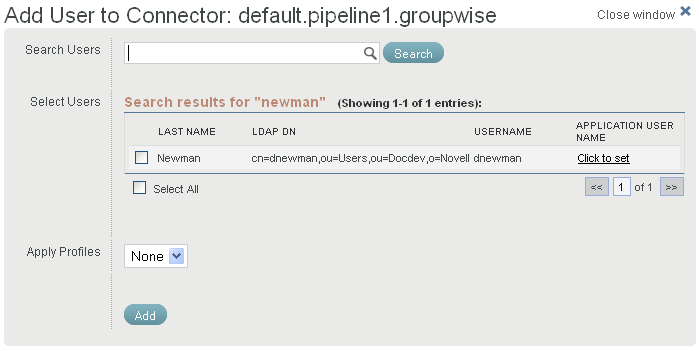
Click to list the users in LDAP containers that Synchronizer Web Admin has been configured to search.
You can configure Synchronizer Web Admin to search additional containers for users, as described in Section 3.1.1, Searching Multiple LDAP Contexts for Users and Groups.
or
In the field, type the first or last name of a specific user, then click .

-
Select the user to add to the connector.
-
(Conditional) If the user’s user name in the application is not the same as the user’s network login, in the column, click , then enter the user’s application user name in the text box.
Synchronizer uses application user names to match up users who have different user names in various synchronized applications.
-
(Conditional) If you want to apply a user profile to the user, select the profile in the drop-down list.
For more information, see Section 4.1, Managing User Profiles.
-
Click to add the user to the connector.
The user is immediately added to the connector.
-
Add the user to additional connectors to meet the user’s data synchronization needs.
For connector-specific information about adding users, see the following sections in each connector’s Installation and Configuration Guide:
4.2.3 Adding a User to a Connector through an LDAP Group
As an alternative to adding users in Synchronizer Web Admin, you can add users to any LDAP groups that have already been added to a connector. Users who are added to LDAP groups are added to the Synchronizer system based on the LDAP Group Membership Polling Rate setting, as described in Section 3.1.3, Adjusting the Synchronizer Web Admin Polling Rate for Groups.
4.2.4 Customizing a User’s Synchronization Settings
By default, all of a user’s available address books are synchronized, along with all of the item types supported for each connector. If necessary, you can limit the amount of data that is synchronized for a user.
-
In Synchronizer Web Admin, click the connector where you want to change user synchronization settings, then click .

-
Click
 to edit the user’s synchronization settings.
The synchronization settings vary depending on the selected connector. They are the same settings that users see when they access the Data Synchronizer User Options page. For connector-specific options, see the Quick Start on the Novell Synchronizer Connectors Documentation Web site for the connector where you are editing user settings.
-
Select and deselect options as needed to customize the user’s data synchronization, then click .
The user’s synchronization settings are immediately changed.
4.2.5 Deleting a User from a Connector
-
Make sure that the connector is running from which you want to delete the user.
-
(Conditional) If the user was added to the connector as an individual user:
-
In Synchronizer Web Admin, click the connector where you want to delete the user, then click .
-
In the list, click
 for the user to delete, then click to confirm the deletion.
-
Repeat the process for each connector where you want to delete the user.
-
-
(Conditional) If the user was added to the connector as a member of an LDAP group, delete the user from the LDAP group in your LDAP directory.
For example, you can use ConsoleOne or iManager to delete the user from the LDAP group in eDirectory.
The user is removed from the group, and therefore from all connectors where that group is assigned, according to the group polling rate, as described in Section 3.1.3, Adjusting the Synchronizer Web Admin Polling Rate for Groups. If you do not want to wait for the polling cycle to pass, you can temporarily set the polling rate to a short period of time or you can restart the connector.