4.4 The Project View
The Designer Project view lists all existing Designer projects. From the Project view, you can quickly find, open, view, navigate, manage, close, and delete any Designer project.
To open the Project view, select the tab in the upper left view of Designer, or if the view is not open, click > > from the main menu.
The Project view provides a standard menu of functions, which are available by right-clicking the tab. Similarly, the Project view provides an icon bar with additional functions.
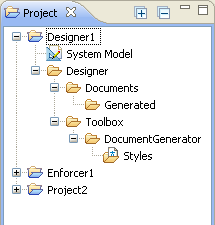
Figure 8-12 shows a typical Project view displaying the icons available in a Designer project.
Figure 4-9 The Project View

Table 8-1 describes the project icons displayed in the Project view.
Table 4-1 Project Icons Displayed in the Project View
|
Icon Name |
Description |
|---|---|
|
or
|
The name of the created project. It is the name of the project stored in the selected workspace directory. Double-clicking the Project name expands and collapses the entries under the project. Right-clicking a project name allows you to do the following:
Projects under a version control server have a different icon
|
|
or
|
Double-clicking the entry puts the project into the Modeler view. You can create or import driver sets, drivers, channels, or policies into the Modeler to modify the project as needed. Then you can deploy the driver set, drivers, channels, or policies into an Identity Manager system. System Models under a version control server have a different icon Right-clicking the System Model allows you to:
|
|
|
Use the Designer > Documents folder for documents that are related to the project. You can also create new folders to organize your projects as needed. The Generated folder under Documents holds your generated documentation files, and the images folder under the Generated folder holds any graphic files that are created when you generate documents. Right-clicking the Documents folder or the Generated folder allows you to:
|
|
|
The Toolbox folder is for special files that ship with Designer. You cannot create new files or folders under this folder. The Styles folder under the Toolbox > DocumentGenerator folder contains the document generation styles. Right-click this folder to create a new style from the context menu that comes up. Right-clicking the Toolbox folder or its subfolders allows you to:
|
|
.
|
Right-clicking the .docgen file entry allows you to:
|
|
Additional File Types
|
Because the Generated and Images folders can contain many different files, you can see different icons displayed, depending on the file extension. Right-clicking these any of these files allows you to:
|