Handling Sensitive Information
Identity Manager Password Synchronization is provided to let you simplify user passwords and reduce help desk costs. One of the new features is bidirectional password synchronization, which lets you share passwords among eDirectory and connected systems in multiple ways, as described in the scenarios in Implementing Password Synchronization.
When you choose to exchange information between connected systems, you should take precautions to make sure the exchange is secure. This is especially true for passwords.
As part of your planning for using Identity Manager and Password Synchronization, you should review the following security suggestions.
- Use SSL
- Secure Access to eDirectory and to Identity Manager objects
- Review the Security Considerations for Password Management Features
- Create Strong Password Policies
- Secure Connected Systems That Participate in Password Synchronization
- Follow Industry Best Practices for Security
- Use Nsure Audit to Track Changes to Sensitive Information
Use SSL
You should enable SSL for all transports, where it is available. SSL should be enabled for communication between the DirXML engine and Remote Loader (see Providing for Secure Data Transfers), and between the DirXML engine or Remote Loader and the connected systems.
If you don't enable SSL, you are sending information such as passwords in the clear.
Secure Access to eDirectory and to Identity Manager objects
Physical Security. Protect access to the physical location of the servers where Novell eDirectory is installed.
Access Rights. Administrative rights are needed to create Identity Manager objects and configure drivers. Monitor and control who has rights to create or modify the following:
- DirXML driver set
- DirXML driver
- Driver configuration objects (filters, style sheets, policies), especially policies that are used for password retrieval or synchronization
- Password Policy objects (and the iManager task for editing them), because they control which passwords are synchronized to each other, and which Password Self-Service options are used
Review the Security Considerations for Password Management Features
- Password Policy objects are publicly readable, to allow applications to check whether passwords are compliant. This means that an unauthenticated user could query eDirectory and find out what Password Policies you have in place. If your Password Policies require users to create strong passwords, this should not pose a risk, as noted in Create Strong Password Policies.
- The Password Hint attribute (nsimHint) is also publicly readable, to allow unauthenticated users who have forgotten a password to access their own hint. Password Hints can be a big help in reducing help desk calls.
For security, Password Hints are checked to make sure they do not contain the user's actual password. However, a user could still create a Password Hint that gives too much information about the password.
To increase security when using Password Hints,
- Allow access to the nsimHint attribute only on the LDAP server used for Password Self-Service.
- Require that users answer Challenge Questions before receiving the Password Hint.
- Remind users to create Password Hints that only they would understand. The Password Change Message in the Password Policy is one way to do that. See Adding Your Own Password Change Message to Password Policies.
If you choose not to use Password Hint at all, make sure you don't use it in any of the Password Policies. To prevent Password Hints from being set, you can go a step further and remove the Hint Setup gadget completely, as described in Disabling Password Hint by Removing the Hint Gadget.
- Challenge Questions are publicly readable, to allow unauthenticated users who have forgotten a password to authenticate another way. Requiring Challenge Questions increases the security of Forgotten Password Self-Service, because a user must prove his or her identity by giving the correct responses before receiving a forgotten password or a Password Hint, or resetting a password.
The intruder lockout setting is enforced for Challenge Questions, so the number of incorrect attempts an intruder could make is limited.
However, a user could create Challenge Questions that hold clues to the password. Remind users to create Challenge Questions and Responses that only they would understand. The Password Change Message in the Password Policy is one way to do that. See Adding Your Own Password Change Message to Password Policies.
- For security, the Forgotten Password actions of "E-mail password to user" and "Allow user to reset password" are available only if you require the user to answer Challenge Questions.
- A security enhancement was added to NMAS 2.3.4 regarding Universal Passwords changed by an administrator. It works basically the same way as the feature previously provided for NDS Password. If an administrator changes a user's password, such as when creating a new user or in response to a help desk call, for security the password is automatically expired if you have enabled the setting to expire passwords in the Password Policy. The setting in the Password Policy is in Advanced Password Rules, named "Number of days before password expires (0-365)." For this particular feature, the number of days is not important, but the setting must be enabled.
Create Strong Password Policies
Using Universal Password and Password Policies allows you to enforce strong password requirements for your users. Use the Advanced Password Rules in Password Policies to follow industry best practices for passwords.
For example, you can require user passwords to comply with rules such as the following:
- Requiring unique passwords. You can prevent users from reusing passwords, and control the number of passwords the system should store in the history list for comparison.
- Requiring a minimum number of characters in password. Requiring longer passwords is one of the best ways to make passwords stronger.
- Requiring a minimum number of numerals in password. Requiring at least one numeric character in a password helps protect against "dictionary attacks," in which intruders try to log in using words in the dictionary.
- Excluding passwords of your choice. You can exclude words that you consider to be security risks, such as the company name or location, or the words test or admin. Although the exclusion list is not meant to import an entire dictionary, the list of words you exclude can be quite long. Just keep in mind that a long list of exclusions makes login slower for your users. A better protection from "dictionary attacks" is probably to require numerals or special characters.
Keep in mind that you can create multiple Password Policies if you have different password requirements in different parts of the tree. You can assign a Password Policy to the whole tree, a partition root container, container, or even an individual user. (To simplify administration, we recommend you assign Password Policies as high up in the tree as possible.)
In addition, you can use intruder lockout. As always, this eDirectory feature lets you specify how many failed login attempts are allowed before an account is locked. This is a setting on the parent container instead of in the Password Policy. See "Managing User Accounts" in the Novell eDirectory 8.7.3 Administration Guide.
Secure Connected Systems That Participate in Password Synchronization
Keep in mind that the connected systems that you are synchronizing data to might store or transport that data in a compromising manner.
Secure the systems to which you exchange passwords. For example LDAP, NIS, and Windows each have security concerns that you must consider before enabling password synchronization with those systems.
Many software vendors provide specific security guidelines that you should follow for their products.
Follow Industry Best Practices for Security
Make sure to follow industry best practices for security measures, such as blocking unused ports on the server.
Use Nsure Audit to Track Changes to Sensitive Information
You can use Nsure Audit to log events that you consider important for security. For information on Nsure Audit, see Logging and Reporting Using Nsure Audit.
For example, you could log password changes for a particular DirXML driver (or driver set) by doing the following:
-
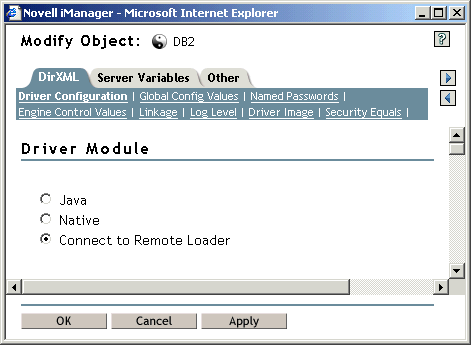
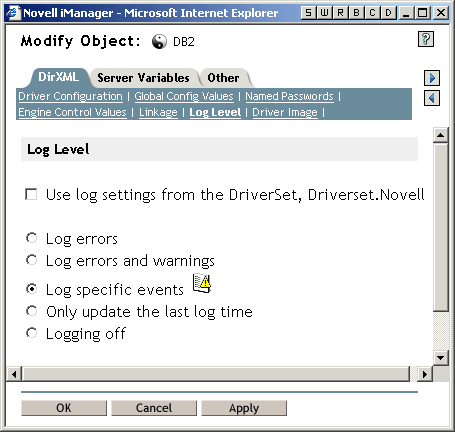
In the properties for a driver (or driver set), on the DirXML tab click Log Level.

-
On the Log Level page that appears, click Log Specific Events.
Note that this is the page where you specify whether the driver has its own settings or uses the settings from the driver set.

-
To select the specific events, click the log events icon
 .
. -
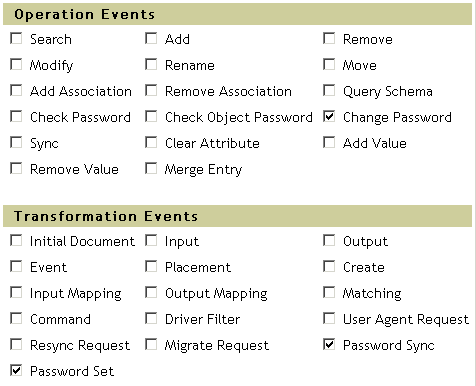
On the Events page that appears, select the following check boxes:
- In Operation Events, Change Password. This item monitors direct changes to the NDS password.
- In Transformation Events, both Password Set and Password Sync. These two items monitor events for the Universal Password and Distribution Password.

-
Click OK on the Events page and on the Log Level page.