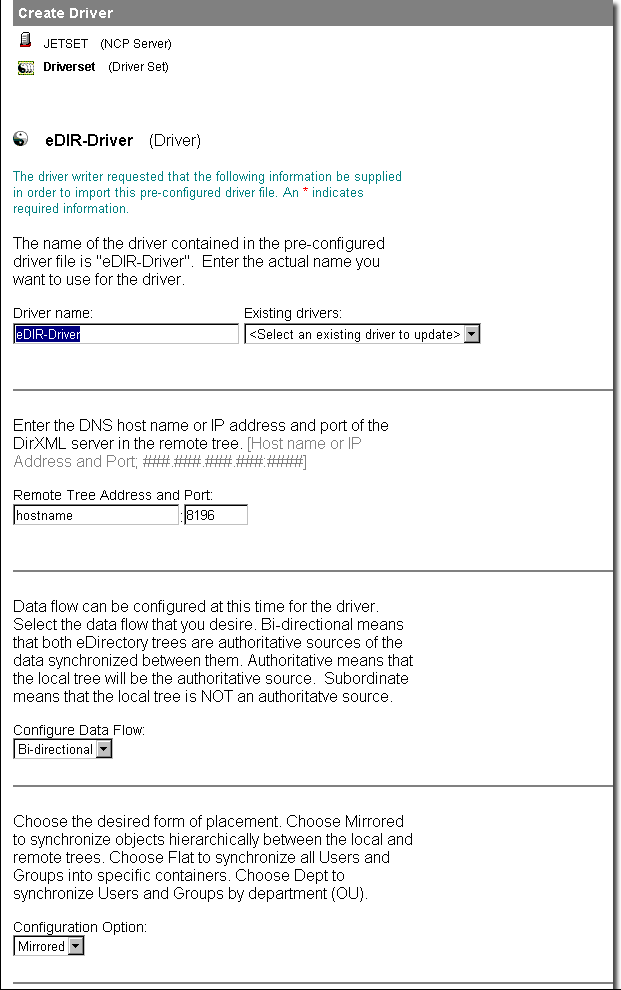
eDirectory Configuration Form

The Novell eDirectoryTM system requires a DirXML driver to be installed and configured on each tree for which you will synchronize data. In Installing the Novell DirXML Starter Pack , you should have installed the first DirXML driver for eDirectory. You will configure that driver later in this chapter.
This section explains how to install and configure the second DirXML driver for eDirectory. The procedures in this section assume a NetWare 5.1 server. Later versions of NetWare could also be used. The steps to launch the DirXML installation program will vary depending on which version of NetWare you are running.
To set up synchronization for the second eDirectory tree, complete each of the following sections:
You can download JVM 1.4.0 from the NetWare section on Novell Software Downloads. The ConsoleOne® DirXML snap-ins require this version.
You can download NICI 2.4 or later from Novell Software Downloads.
You can download eDirectory 8.6.2 or later from Novell Software Downloads.
You can install ConsoleOne 1.3.3 or later and the latest ConsoleOne DirXML snap-ins at the root of the product CD or from Novell Software Downloads.
NOTE: If you are managing DirXML on an eDirectory 8.6.x system, you should use ConsoleOne 1.3.3. There are DClient issues specific to this version of eDirectory.
If you want to manage DirXML using ConsoleOne 1.3.4 and eDirectory 8.6.x, you should install ConsoleOne on a system where eDirectory is not installed.
You'll need to provide a number of system-specific details when you install and configure the DirXML driver for eDirectory. Some of these details can be collected before you complete the following procedures, and others will be defined during the process.
During the configuration process, you will need to provide the container names for placement of synchronized objects. For more information about eDirectory placement options, see Default Driver Settings for eDirectory .
IMPORTANT: The data you supply during configuration is used to build DirXML rules. Often, case is significant to a rule. Mirror case when entering the requested data.
| System | Value |
|
|---|---|---|
Remote Tree Address and Port |
|
|
Remote Base Container If this container does not exist, you must create it before starting the driver. |
|
|
Base Container (If you choose the Flat placement option, you need two base containers: one for users and one for groups. For more information about placement options, see Default Driver Settings for eDirectory .) |
|
Figure 16
eDirectory Configuration Form
At the NetWare 5.1 server, insert the DirXML CD into the CD drive. At the system console, enter CDROM.
Enter NWCONFIG.
Select Product Options > Install a Product Not Listed.
Press F3 (F4 if you're using RCONSOLE), then specify the path to the DirXML NetWare installation files on the DirXML CD, for example, volume_name:nw.
The graphical installation utility will start after a few moments.
Click Next. After the files have finished copying, the DirXML Welcome screen will appear. Click Next to begin the installation.
Read the license agreement; if you agree to the terms, click I Accept.
On the Components page, select the following items, then click Next.
In the Schema Extension page, specify the following:
Select the DirXML Driver for eDirectory, then click Next.
Select the driver configuration (XML files) for eDirectory, then click Next.
Read the Summary page, then click Finish.
The file copy might take a few minutes.
After the installation completes and displays the Installation Complete dialog box, click Close.
Continue with the next section, Configuring the DirXML Driver for eDirectory .
This section explains how to configure the eDirectory driver for the NetWare 5.1 tree (Tree 1). Configuring the eDirectory driver for the NetWare 6.5 tree (Tree 2), along with the drivers for Active Directory and NT, is explained in Configuring the DirXML Drivers .
From your administrative workstation, launch iManager by going to http://serveripaddress/nps/iManager.html.
IMPORTANT: This URL is case sensitive.
Authenticate to the NetWare 5.1 tree.
Click DirXML Management > Create Driver.
Mark In a New Driver Set, then click Next.
Specify a driver set name, browse to the context where you want the driver set object to be created, then browse to the server object representing the server where you installed DirXML.
Leave Create a New Partition checked, then click Next.
Mark Import a Preconfigured Driver from the Server, select eDir-Driver.xml, then click Next.
Using the configuration information you collected earlier, fill in the prompts for information required by the driver.
Click Define Security Equivalence, add Admin, then click OK.
Drivers need rights to read and update data in eDirectory. Assigning a security equivalent is a quick way to provide necessary rights assignments. This option does not provide access to data in the other eDirectory tree.
Click Exclude Administrative Roles, add Admin, click OK, then click Next.
These objects will not be replicated to the other eDirectory tree. We recommend that you add all objects that represent an administrative role (for example, the Admin object) to this list. These objects typically have no function outside of the directory tree that they were created in. Maintaining these objects in only one directory prevents potentially disruptive changes, such as access control or password changes, from causing problems.
Click Finish with Overview.
The eDirectory driver for Tree 1 is prepared to synchronize data. Complete preparation of other participating systems, then proceed to Configuring the DirXML Drivers .