6.8 Configuring a Certificate for Secure Remote Management Sessions
A Dynamic File Services Secure Sockets Layer (SSL) certificate is required to support secure remote sessions between a DynamicFS server and a computer running the Management Console. A self-signed certificate is automatically configured. You can also use the option in the Serviced Controller to create a new self-signed SSL certificate, or to specify your own signed certificate that you have acquired from a certification authority and added to the Local Computer Personal Store.
-
Section 6.8.2, Viewing the Dynamic File Services SSL Certificate
-
Section 6.8.3, Prerequisites for Creating, Modifying, or Unbinding the Certificate
-
Section 6.8.4, Creating a Dynamic File Services Self-Signed Certificate
-
Section 6.8.5, Configuring a Signed Certificate for Dynamic File Services
-
Section 6.8.6, Unbinding a Signed Certificate from Dynamic File Services
6.8.1 Understanding the Certificate
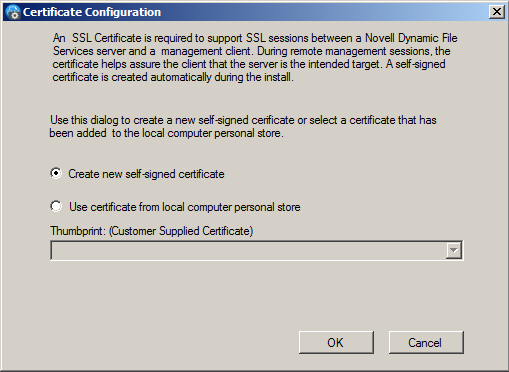
During remote management sessions, a Dynamic File Services SSL certificate is required in order for successful authentication to occur when connecting from the client to the server. The certificate helps assure the client that the server is the intended target. Dynamic File Services supports using self-signed and signed certificates. The remote connection uses standard RSA SHA-1 encryption with a 2048-bit key size.
Self-Signed Certificate
Dynamic File Services automatically creates a self-signed certificate during the install, and provides a Certificate Configuration option where you can create a new self-signed certificate.
The Dynamic File Services installation automatically sets up SSL support by doing the following:
-
Creates a Dynamic File Services self-signed certificate (servername‑DynamicFileServicesSSLCertificate).
-
Stores the certificate in the My personal certificate store on the local machine.
-
Binds the certificate for SSL use to the configured Dynamic File Service port (default 8999).
-
Configures the following Windows Registry keys for Dynamic File Services in the HKEY_LOCAL_MACHINE/Software/Novell/Dynamic File Services/Setup/ folder:
Windows Registry Key
Description
DswSelfSignedCertEnabled
Indicates to the Dynamic File Service whether a signed DynamicFS SSL certificate is in use (value of 0), or if a DynamicFS self-signed SSL certificate is in use (value of 1). Valid values are 0 or 1. The default value is 1.
DswSSLCertThumbprint
Indicates to the Dynamic File Service the current configured certificate. Valid values are a 20-character hex value associated to the certificate. No spaces are permitted. This thumbprint must match the thumbprint of the certificate bound to the configured Dynamic File Service port.
DswSSLEnabled
Indicates to the Dynamic File Service whether SSL is enabled or disabled for the configured Dynamic File Service port. Valid values are 0 (disabled) or 1 (enabled). The default value is 1.
Signed Certificate
Dynamic File Services also supports using a signed certificate that you have acquired from a certification authority and added to the Local Computer Personal Store.
6.8.2 Viewing the Dynamic File Services SSL Certificate
You can view the Dynamic File Services SSL certificate (servername‑DynamicFileServicesSSLCertificate) by using the Certificates snap-in for the Microsoft Management Console (MMC).
-
Log in to the DynamicFS server as an Administrator user or as a user with Administrator privileges.
-
From the menu, click , then type mmc and click to launch the MMC.
-
Add the Certificates snap-in to the MMC console and configure it to manage Computer Account certificates:
-
On the menu, click .
-
Select in the list, click , select as the type of certificate you want to manage, then click or .
-
Click to close the Add/Remove Snap-in dialog box.
The Certificates folder is now added to the MMC console.
-
-
In the Certificates management console, expand the certificate store, then click the folder to see the list of certificates in the store.
-
Right-click servername‑DynamicFileServicesSSLCertificate, then click to open the Certificate dialog box.
You can also view a certificate by double-clicking it.
-
The Certificate dialog box is organized into three tabs:
Tab
Description
Identifies the certificate’s intended use.
Displays the ITU-T X.509 standard fields, extensions, and properties of the certificate.
The certification path to the source where the certificate was issued.
-
Close the MMC console when you are done.
6.8.3 Prerequisites for Creating, Modifying, or Unbinding the Certificate
The Service is automatically restarted to apply changes made to the Dynamic File Services certificate. Before you attempt to create a new self-signed certificate, modify a signed certificate, or unbind a certificate, ensure that you have satisfied all of the requirements for stopping the Service in Prerequisites for Stopping or Restarting the Service.
6.8.4 Creating a Dynamic File Services Self-Signed Certificate
You can use the option to create a new Dynamic File Services self-signed SSL certificate to replace the one created during the install. You might need to do this in the following situations:
-
The current certificate is expiring.
-
You unbind a signed certificate and want to replace it with a self-signed certificate.
IMPORTANT:The Service is automatically restarted to apply certificate changes. Before you begin, ensure that you have met the requirements in Prerequisites for Stopping or Restarting the Service.
To generate a self-signed certificate:
-
Log in to the DynamicFS server as the Administrator user or as a user with Administrator privileges.
-
Ensure that no policy runs are in progress on the server, then stop the Dynamic File Service by right-clicking the icon in the notification area and selecting .
For information, see Section 6.4.3, Stopping the Dynamic File Service.
-
Confirm that the Dynamic File Service is stopped by right-clicking the icon and verifying that the Service option reads .
-
Open the Certificate Configuration dialog box by right-clicking the icon and selecting .
-
In the Certificate Configuration dialog box, select .
-
Click to save and apply your changes.
The Service restarts automatically to apply the changes.
-
If you are prompted to confirm the Service restart, ensure that all users accessing files with the merged view have logged out, then click to continue with the Service restart.
If you click , the certificate is not created.
-
View the message that confirms whether the configuration succeeded or failed, then click to close the message.
-
After a successful configuration, start the Dynamic File Service by right-clicking the icon in the notification area, then selecting .
-
(Optional) Verify that the certificate was successfully bound to a particular port by using the Microsoft Management Console (MMC) to view the certificate as described in Section 6.8.2, Viewing the Dynamic File Services SSL Certificate.
You can also enter one of the following Windows commands in a command prompt console that has administrator privileges. Select > > , right-click , then select .
Windows Server 2008:
netsh http show sslcert
If the certificate was successfully bound to the port, there is an entry for the certificate in the output response from this command.
6.8.5 Configuring a Signed Certificate for Dynamic File Services
You can use the option to replace the DynamicFS self-signed SSL certificate with one that you have obtained from a certification authority. Use this option if your enterprise security policy requires this level of security.
Additional steps are required when using a signed certificate. You must first generate a certificate signing request, import the certificate from the certification authority into the Local Computer Personal store, then assign the signed certificate to Dynamic File Services.
IMPORTANT:The Service is automatically restarted to apply certificate changes. Before you begin, ensure that you have met the requirements in Prerequisites for Stopping or Restarting the Service.
After you have obtained the certificate from the certification authority and imported it into the Local Computer Personal store:
-
Log in to the DynamicFS server as the Administrator user or as a user with Administrator privileges.
-
Ensure that no policy runs are in progress on the server, then stop the Dynamic File Service by right-clicking the icon in the notification area and selecting .
For information, see Section 6.4.3, Stopping the Dynamic File Service.
-
Confirm that the Dynamic File Service is stopped by right-clicking the icon and verifying that the Service option reads .
-
Open the Certificate Configuration dialog box by right-clicking the icon and selecting .
-
In the Certificate Configuration dialog box, select , select a certificate thumbprint from the drop-down list.
-
Click to save and apply your changes.
The Service restarts automatically to apply the changes.
-
If you are prompted to confirm the Service restart, ensure that all users accessing files with the merged view have logged out, then click to continue with the Service restart.
If you click , the certificate change is not done.
-
View the message that confirms whether the configuration succeeded or failed, then click to close the message.
-
After a successful configuration, start the Dynamic File Service by right-clicking the icon in the notification area, then selecting .
-
(Optional) Verify that the certificate was successfully bound to a particular port by using the Microsoft Management Console (MMC) to view the certificate.
You can also enter one of the following Windows commands in a command prompt console that has administrator privileges. Select > > , right-click , then select .
Windows Server 2008:
netsh http show sslcert
If the certificate was successfully bound to the port, there is an entry for the certificate in the output response from this command.
6.8.6 Unbinding a Signed Certificate from Dynamic File Services
You can use the option in the Dynamic File Service Controller to unbind a signed certificate from the Service. You can create a new self-signed certificate or specify another signed certificate to replace the one currently in use.
IMPORTANT:The Service is automatically restarted to apply certificate changes. Before you begin, ensure that you have met the requirements in Prerequisites for Stopping or Restarting the Service.
-
Log in to the DynamicFS server as the Administrator user or as a user with Administrator privileges.
-
Ensure that no policy runs are in progress on the server, then stop the Dynamic File Service by right-clicking the icon in the notification area and selecting .
For information, see Section 6.4.3, Stopping the Dynamic File Service.
-
Confirm that the Dynamic File Service is stopped by right-clicking the icon and verifying that the Service option reads .
-
Open the DynamicFS Certificate Configuration dialog box by right-clicking the icon and selecting .
-
In the DynamicFS Certificate Configuration dialog box, do one of the following:
-
Select .
-
Select , select a different certificate thumbprint from the drop-down list.
-
-
Click to save and apply your changes.
The Service restarts automatically to apply the changes.
-
If you are prompted to confirm the Service restart, ensure that all users accessing files with the merged view have logged out, then click to continue with the Service restart.
If you click , the certificate change is not done.
-
View the message that confirms whether the configuration succeeded or failed, then click to close the message.
-
After a successful configuration, start the Dynamic File Service by right-clicking the icon in the notification area, then selecting .
-
(Optional) Verify that the certificate was successfully bound to a particular port by using the Microsoft Management Console (MMC) to view the certificate.
You can also use one of the following Windows commands in a command prompt console that has administrator privileges. Select > > , right-click , then select .
Windows Vista or Windows Server 2008:
netsh http show sslcert
If the certificate was successfully bound to the port, there will be an entry for the certificate in the output response from this command.
6.8.7 Handling Expiring Certificates
A Dynamic File Services self-signed SSL certificate is valid for five years from its creation date. As the date of expiration for a configured certificate nears, DynamicFS provides a notification message as you log in to the server from the Management Console. To replace the expiring certificate, use the option in the Service Controller to create a new self-signed certificate, or to set up a signed certificate that you have obtained from a certification authority.