
Rules Guide
CHAPTER 3
This chapter describes how to write your own classes for special-purpose conditions and actions. It includes the following topics:
This chapter assumes you are familiar with rules-based applications and using the Rule Editor in exteNd Director. For background information, see How You Use Rules.
Conditions and actions are Java classes used to build rules fired by portlets and other application components. The Rule Editor provides a selection of prebuilt conditions and actions. You can also write custom conditions and actions to meet your application's specific requirements.
Conditions and actions are typically implemented as JavaBeans, with properties you can set in the Rule Editor.
Designing a condition or action involves several decision points.
What logic should be implemented? When designing rule-based logic, consider how conditions and actions will interact with each other and with the application source code. Here are key considerations:
What portlets will fire the rule that contains these conditions and actions?
What data must be passed by the condition to its actions and by actions back to the firing portlet?
Will any of the installed conditions or installed actions meet my requirements? Before you begin your development, you should become familiar with the installed conditions and actions. There may be one that will meet your requirements, or you may want to modify one of the installed versions. For more information, see Installed Conditions and Installed Actions.
What kind of user interface should be rendered by the Rule Editor? By default, the Rule Editor generates a generic property panel as the interface for interacting with conditions and actions you use to build rules. If a condition or action has properties, the property panel provides controls—such as check boxes and text boxes—for choosing or entering required values. You can also specify a custom user interface in your condition and action class, which the Rule Editor then uses to render the property panel. For more information, see Defining properties.
What supporting classes will be needed? Conditions and actions often rely on supporting classes such as:
|
Type of class |
Used for |
|---|---|
|
Custom classes |
Implementing logic not provided in the exteNd Director API |
|
BeanInfo classes |
Providing additional information for the condition or action JavaBean
|
|
Resource bundles |
Localizing static strings that appear in the property panel for your conditions and actions
|
Does the rule need to access runtime values? You can define properties to access session whiteboard values that can be set dynamically at runtime. For more information, see Defining runtime properties.
Conditions and actions each have three methods that define their implementations:
These methods are included in the templates generated by exteNd Director's Condition Wizard and Action Wizard.
 For an overview of the templates and core methods, see About the template methods.

Typically a condition compares property values entered in the Rule Editor and returns a boolean. This logic is coded within the doCondition() method.
The doCondition() method includes an EbiContext object, allowing you to access runtime values.
This example shows code from the installed condition CheckTime, which checks whether the current time of day is within the time range specified for the condition in the Rule Editor:
  // ...
  // JavaBean get/set accessor methods
  	 public int getFrom() {
  	 	 return from;
  	 }

  	 public void setFrom( int from ) {
  	 	 this.from = from;
  	 }

  	 public int getTo() {
  	 	 return to;

  	 public void setTo( int to ) {
      	 this.to = to;
  	 }
  // Check to see if the current time of day is within the specified
  // range.
  public boolean doCondition( com.sssw.re.api.EbiContext context ) throws com.sssw.re.exception.EboConditionException {
  	 	 int hour = new GregorianCalendar().get( Calendar.HOUR_OF_DAY );

      	 if ( from < to ) {
  	 	 	 // Daytime check
  	 	 	 if ( hour >= from ) {
  	 	 	 	 if ( hour <= to ) {
  	 	 	 	 	 return true;
  	 	 	 	 }
  	 	 	 }
  	 	 	 return false;
  	 	 }
  	 	 else {
  	 	 	 // Crossover check
  	 	 	 if ( hour >= to ) {
  	 	 	 	 if ( hour <= from ) {
  	 	 	 	 	 return false;
  	 	 	 	 }
  	 	 	 }
  	 	 	 return true;
  	 	 }

  	 }
  // ...
get/set methods These are JavaBean accessor methods that define two properties for this condition: from a specified time and to a specified time (inclusive). These values are accessed from the property panel in the Rule Editor.
For information, see Defining JavaBeans.
doCondition() This method is the workhorse of condition classes. In this example the property values are compared to the current time, which is obtained from a Java GregorianCalendar object. The code does two checks—for within current day and for crossover times—in each case returning a boolean.
An action returns the result of a rule, based on the return value of one or more conditions. The logic for an action is coded in the doAction() method.
Actions can perform virtually any activity, including accessing a database via SQL, manipulating whiteboard values, returning HTTP and HTML values, performing operations, and controlling user access to objects. Like conditions, actions typically have properties settable in the Rule Editor.
Because actions return the result of a rule, you need to understand how the result is handled by the caller, typically a portlet or JSP page. Here is a summary of the common HTTP response methods you might use to return a value from an action to the portlet that fired the rule:
The following shows code from the installed action ReturnAsHTMLBold. It returns the text entered by the user in bold format:
  public void doAction( com.sssw.re.api.EbiContext context ) throws
     com.sssw.re.exception.EboActionException {
  context.setResponsePhrase( "<b>" + getValue().getValue( context ) + 	 	 "</b>" );
The toString() method provided by the template returns a description of the condition or action that appears in the Rule Editor when a condition or action is selected. Typically, toString() calls the properties' get methods to include property values.
Here is how toString() is implemented in the installed condition CheckTime:
  // Use resource bundle, "caResource" instantiated with Class
  // definition, for string processing.
  public String toString() {
  	 return caResource.getString("the hour is between <b>") +
  	 	 getHours().elementAt( from ) + caResource.getString("</b>
  	 	 and <b>") + getHours().elementAt( to );
  	 }
  // Implement a JPanel using getParameterPanel() using getHours()
  // to get selected property values.

  private Vector getHours() {
  	 	 if ( hours == null ) {
  	 	 	 hours = new Vector();
  	 	 	 hours.addElement( caResource.getString("12 am"));
  	 	 	 hours.addElement( caResource.getString("1 am"));
  	 	 	 hours.addElement( caResource.getString("2 am"));
          // ...
A local method, getHours(), uses a Vector to store property values. The toString() method calls getHours() to display the hours selected in the Rule Editor.
NOTE: In this example, toString() directs processing to a resource bundle that is instantiated with the condition class. This provides support for localization. For more information, see Using resource bundles.
Here is what the result looks like in the Rule Editor:

There are several ways to define properties and property panels for conditions and actions. The Rule subsystem supports Java constructs like JavaBeans and JPanels, and also provides default controls for certain data types and objects and support for using runtime values in properties. You can also follow the implementation of resource bundles and BeanInfo classes used in the installed conditions and actions.
This section provides descriptions and examples of each approach.
Like other JavaBeans, conditions and actions can have properties. By defining properties, you allow conditions and actions to be customized in the Rule Editor for use in a variety of rules.
When you add properties in a custom condition or action, you must follow JavaBeans standards. For each property, define:
A pair of get and set accessor methods
By convention, each method name consists of get or set prepended to the property name starting with an initial capital letter (such as getTime).
The Rule Editor can use these constructs to automatically generate a property panel for the condition or action, based on the data type of the property. For a model implementation, see Example of doCondition().
You can also use a JDK BeanInfo class to enhance the display properties. See Writing a BeanInfo class.
The Rule subsystem provides two string template data types that allow properties in conditions and actions to be set dynamically from runtime values:
EboStringTemplateSingle: single-line text box, rendered as a TextField
EboStringTemplateMulti: multiline text box, rendered as a TextArea
When you define properties using these data types, the Rule Editor lets you specify values for these properties by referencing whiteboard keys. When the rule is fired, the property will be set to the real-time value associated with the whiteboard key.
For information about using the whiteboard, see How You Use Rules.
For each property you want to set dynamically, you need to define a member variable of type EboStringTemplateSingle or EboStringTemplateMulti. The Rule Editor will generate the associated TextField or TextArea, labeled with a string that ends with the caret (^) symbol. This symbol indicates that the property has been defined as a string template that can be set either statically by entering a literal string or dynamically by using the construct !valueOf. With this construct, you specify the value associated with a whiteboard key. Here is the syntax:
!valueOf.whiteboard key
Certain session values, such as userID, are automatically provided. For example: to set the property to the value associated with the whiteboard key UserID, enter !valueOf.UserID.
Resolving the valueOf! expression When you write a condition or action that needs to evaluate a runtime value, use one of these methods to get the value:
This example shows code from the installed action SaveToWhiteBoard. The action saves data to the whiteboard in the specified whiteboard key:
  public boolean resolve;
  	 public com.sssw.re.core.EboStringTemplateSingle data = new
    com.sssw.re.core.EboStringTemplateSingle();
  	 public com.sssw.re.core.EboStringTemplateSingle template = new
    com.sssw.re.core.EboStringTemplateSingle();

  // Set the template value for the whiteboard key that will be used
  // to store the data value.
   	 public void setKeyTemplate( EboStringTemplateSingle detailKey ) {
  	 	 this.template = detailKey;
  	 }
  // Return the template for the whiteboard key.
   	 public EboStringTemplateSingle getKeyTemplate() {
  	 	 return template;
  	 }

  // Return the template for the data.
   	 public EboStringTemplateSingle getData() {
  	 	 return data;
  	 }

  // Set the template value for the data to be saved to the
  // whiteboard.
   	 public void setData( EboStringTemplateSingle data ) {
  	 	 this.data = data;
  	 }

  // Return boolean true if the data value is a templatized string
  // that needs to be resolved, and false if the data value is the
  // value to be saved.
  	 public boolean getResolve() {
  	 	 return resolve;
  	 }

  // Set the value that determines if the data value needs to be
  // resolved.
   	 public void setResolve( boolean resolve ) {
  	 	 this.resolve = resolve;
  	 }

  // Save the data value, or resolved data value if resolved is
  // true, to the whiteboard in the specified whiteboard key.
  public void doAction( com.sssw.re.api.EbiContext context ) throws com.sssw.re.exception.EboActionException {
  	 	 String merged = getKeyTemplate().getValue( context );
  	 	 context.setValue( merged, ( getResolve() ? getData().getValue( context
       ) : getData().getTemplate() ) );
      }
This action defines three properties that appear in the Rule Editor:
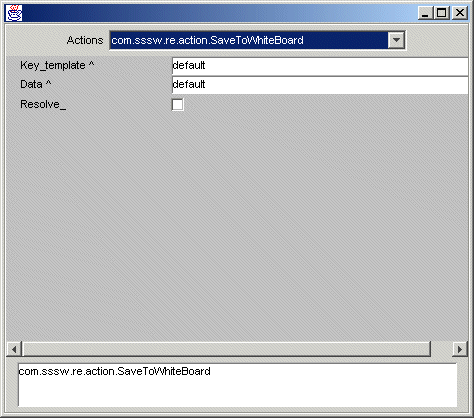
EboStringTemplateSingle The code instantiates two template objects for each template property. The first property (Key-template) will be resolved to get its data representation. The second property (Data) is resolved only if the Resolve control is selected.
doAction() Gets the properties and implements these methods:
|
Method |
Description |
|---|---|
|
getValue() |
The template method that resolves the key value for Key_template |
|
setValue() |
The context method that sets the Key-template value on the whiteboard—and: |
The Rule subsystem supports a set of data types for which it can automatically generate generic property panels. For each supported data type, the Rule Editor renders a preselected GUI control in the property panel. All you need to do is implement JavaBean accessor methods for each property.
Here is a list of the supported data types and the associated controls:
If you prefer to create your own property panel rather than use the generic controls, you can implement the getParameterPanel() method to specify a custom user interface. The Rule Editor requires the custom interface to be defined as a JPanel; it will not create a custom property panel based on any other type of portlet returned by getParameterPanel().
When including the getParameterPanel() method in a condition or action, you must implement a listener interface to allow the controls in the JPanel to respond to user actions.
This is the code that defines the property panel for the installed condition CheckTime:
  // ...
  // Return a custom ui component to be used for editing this
  // condition.
   	 public java.awt.Component getParameterPanel() {
  	 	 JPanel p = new JPanel();
  	 	 p.setLayout( new BoxLayout( p, BoxLayout.X_AXIS ) );
  	 	 p.add( new JLabel( caResource.getString("between the hours
  	 	 	 of") ) );
  	 	 p.add( FROM = new JComboBox( getHours() ) );
  	 	 p.add( new JLabel( caResource.getString("and") ) );
  	 	 p.add( TO = new JComboBox( getHours() ) );
  	 	 FROM.setAlignmentY( JComponent.CENTER_ALIGNMENT );
  	 	 TO.setAlignmentY( JComponent.CENTER_ALIGNMENT );
  	 	 FROM.setSelectedIndex( from );
  	 	 TO.setSelectedIndex( to );
  	 	 FROM.addItemListener( this );
  	 	 TO.addItemListener( this );
  	 	 return p;
  	 }

  // Return a vector of hours for selection in the ui.
   	 private Vector getHours() {
  	 	 if ( hours == null ) {
  	 	 	 hours = new Vector();
  	 	 	 hours.addElement( caResource.getString("12 am"));
  	 	 	 hours.addElement( caResource.getString("1 am"));
  	 	 	 hours.addElement( caResource.getString("2 am"));
          // ...
Here is the custom property panel generated by the code:
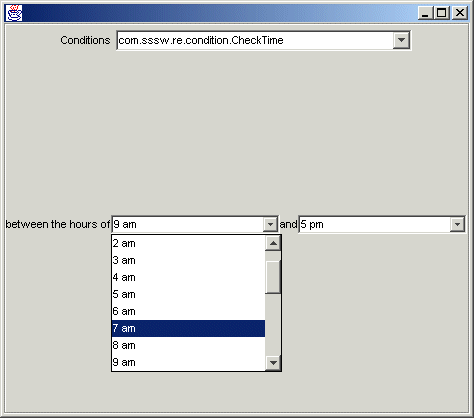
JComboBox implementation The variables TO and FROM are defined as ints. Using a generic panel would result in text fields for each property. Instead, getParameterPanel() instantiates a JPanel and implements a pair of JComboBox controls, providing a dropdown list of time selections in the Rule Editor. The code defines a local method, getHours(), that uses a Vector to fill in the values of the combo boxes.
Resource bundle The code uses a resource bundle caResource to localize the labels for the ComboBox. For information, see Using resource bundles.
You can write a BeanInfo class for any condition and action to specify the appearance of attributes in the property panel. For example, you can use a BeanInfo class for:
Implementing localization for property names and static text strings that appear on the panel for each property
NOTE: Using a BeanInfo class is the recommended way to implement resource bundles for localization. For information about resource bundles, see Using resource bundles.
Like JavaBeans, BeanInfo classes require their associated condition or action classes to specify properties as member variables with associated get and set methods.
Create a Java class in your preferred Java editor. The class must extend EboBeanInfo and implement these code elements:
Name the BeanInfo class by appending BeanInfo to the name of the associated condition or action class.
For example: if your class name is CheckCondition, the BeanInfo class must be named CheckConditionBeanInfo.
For an example of a BeanInfo class, see Example of a BeanInfo class.
Resource bundles are a standard feature of the Java JDK used for localization. You can store any object, string, number, or other data in a resource bundle. To create a resource bundle, you need to create either a Java class that extends ListResourceBundle or a properties file that contains static strings. For each locale you want to support, you provide a separate version of the resource bundle.
You can use resource bundles to implement localization in conditions, actions, and associated BeanInfo classes. Here is a recommended approach:
Create resource bundles for all locales supported by your application.
In your condition, action, or BeanInfo class, declare ResourceBundle objects that reference your resource bundles by calling the EboResourceBundle.getBundle() method. This simplest version of this method takes one argument, the fully qualified name of your resource bundle class.
For example: if your resource bundle is MyBundle.class located in package locales, your declaration should look like this:
static com.sssw.re.util.EboResourceBundle eoCABundle = com.sssw.re.util.EboResourceBundle.getBundle("locales.MyBundle")
Access the data in the resource bundle by calling get methods on the ResourceBundle object.
For example: if your resource bundle contains localized strings, call the getString() method on the ResourceBundle object, passing the key associated with the desired string value.
NOTE: For complete information on creating resource bundles, see the reference documentation for the ResourceBundle, ListResourceBundle, and PropertyResourceBundle classes in the Java standard API documentation. All these classes are in the java.util package.
This is the code that defines the BeanInfo class for the installed condition CheckTime:
  package com.sssw.re.condition;
  import com.sssw.re.core.*;
  import java.beans.*;

  public class CheckTimeBeanInfo extends EboBeanInfo {

  	 // Resource Bundle definition
      static com.sssw.re.util.EboResourceBundle eoCABundle =
        com.sssw.re.util.EboResourceBundle.getBundle( EboConstant.CA_BUNDLE,
          getClass().getClassLoader() );

  	 public Class getClazz() {
  	 	 return com.sssw.re.condition.CheckTime.class;
  	 }

  	 public PropertyDescriptor[] getPropertyDescriptors() {
  	 	 PropertyDescriptor[] pds = new PropertyDescriptor[ 2 ];
  	 	 PropertyDescriptor pd;
  	 	 pd = super.getPropertyDescriptor( "From" );
  	 	 pd.setDisplayName( eoCABundle.getString( "From" ) );
  	 	 pds[ 0 ] = pd;
  	 	 pd = super.getPropertyDescriptor( "To" );
  	 	 pd.setDisplayName( eoCABundle.getString( "To" ) );
  	 	 pds[ 1 ] = pd;
  	 	 return pds;
  	 }

  }
Getting the resource bundle Uses EboResourceBundle.getBundle() to get the name of the resource bundle for the installed conditions and actions stored in CA_BUNDLE and get the class loader.
Defining property descriptors Since the CheckTime condition defines two properties, it requires two property descriptors—as indicated in the array declaration.
Specifying a display name for a property You can use the setDisplayName() method to specify a property name. When the Rule Editor generates the property panel, it uses this display name as the label for the UI control associated with the property. The setDisplayName() method is called on the property descriptor and takes a string argument. This example shows the recommended approach for implementing resource bundles. It uses key values To and From—passing them to the resource bundle so that the Rule Editor displays a localized string.
Copyright © 2004 Novell, Inc. All rights reserved. Copyright © 1997, 1998, 1999, 2000, 2001, 2002, 2003 SilverStream Software, LLC. All rights reserved. more ...
