 To learn about the steps and scenarios for using the wizard when you want a program to access Web Services, see Generating Web Service Consumers.
Utility Tools
CHAPTER 8
This chapter walks you through the basic steps and typical scenarios for using the Web Service Wizard to generate Web Services from a variety of sources. Topics include:
To learn about the steps and scenarios for using the wizard when you want a program to access Web Services, see Generating Web Service Consumers.

You can use the Web Service Wizard of the Novell exteNd Director development environment to develop standard (SOAP-based) Web Services that are implemented as Java remote objects (using RMI). The wizard generates Java source files based on JAX-RPC (Java API for XML-based RPC) and the Novell exteNd Web Services SDK (the JAX-RPC implementation included with Novell exteNd). JAX-RPC is the J2EE specification that provides Web Service support.
The generated files include a servlet to handle access to your Web Service and its methods from HTTP SOAP requests. You can use the generated files as is or modify them when necessary. The advantage of this Java-oriented approach is that you can deal with Web Services using the familiar technologies of RMI and J2EE instead of coding lower-level SOAP APIs.
For an introduction to Web Service concepts, standards, and technologies, see Web Service Basics.
For detailed documentation on the wizard, see Web Service Wizard.
The complete development process involves:

To prepare for using the Web Service Wizard, you:
Set up a WAR project in the exteNd Director development environment.
For each Web Service you generate, the wizard creates a servlet to handle access to that Web Service (from HTTP SOAP requests). As a result, a WAR is required to package your Web Services (one or more per WAR) for deployment to a J2EE server where they will run.
A possible variation is to set up a JAR subproject in your WAR and use that JAR to contain the servlet and other classes for a Web Service. In any case, the servlet mapping will be in the WAR's deployment descriptor (web.xml).
(Note that the approach of using a JAR subproject is not currently supported by the Web Service Wizard when you generate a Web Service from a WSDL file. In this situation, it only supports a WAR project.)
Add these files to the project:
|
Files |
Details |
|---|---|
|
Source files, classes, or archives from which your Web Services are to be generated |
You can generate a Web Service from any one of the following: No matter which one you provide, it should (at minimum) declare the methods you want your generated Web Service to expose. Compile your Java files If you provide any Java files, make sure you compile them in your project before starting the Web Service Wizard (because the wizard works from compiled classes). No overloaded methods Overloaded method names are not allowed in Web Service interfaces (as of WSDL 1.2). If you're generating from: |
|
Archives required by the Web Services SDK:
|
You'll find these JARs in the Novell exteNd tools\compilelib directory. Depending on your J2EE server configuration, you should do one of the following:
|
Edit the classpath of your project so you can compile your Web Service classes once they're generated and edited. You'll need to include:
wssdk.jar and the supporting JARs listed in Step 2 (as appropriate)
j2ee_api_1_n.jar (automatically added when you create a WAR project)
Any application-specific entries (such as an EJB-client JAR file you've provided for a session bean Web Service)
Once you've set up your WAR project, you're ready to use the Web Service Wizard. The wizard produces one Web Service at a time, so you'll need to use it multiple times if you have several to develop.
Each time you launch the wizard, it takes input from you about the kind of Web Service to produce. It then generates a set of source files that together make up the Web Service. Here's a summary of the process:
Select File>New>File to display the New File dialog and go to the Web Services tab.
Launch the Web Service Wizard by doing one of the following:
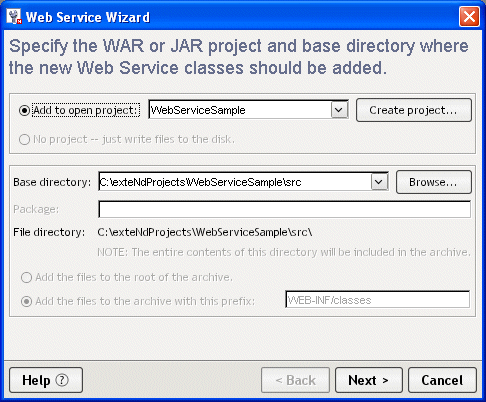
When the wizard prompts you for project location information, specify:
The WAR or JAR project you set up to contain the generated Web Service files (if you're generating from a WSDL file, the wizard currently requires you to specify a WAR project here)
The target directory and package in that project (if you're generating from a Java class, you won't have to fill in some of these settings; the wizard will automatically handle them for you)
If you specify a JAR project to contain the generated Web Service files, the wizard will also ask you for a WAR project to map the Web Service's servlet.
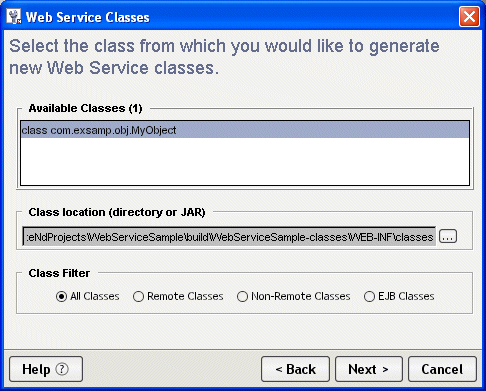
When the wizard prompts you, select the class or WSDL file to generate the Web Service from.
The wizard then asks for additional information based on your selection:
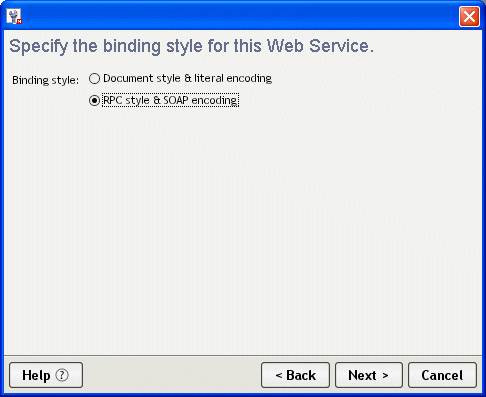
When the wizard prompts you for class-generation and SOAP options, you need to choose and configure the set of source files to generate for your Web Service.
The most important choice is whether to generate skeletons to be tie-based or not. The answer depends on the architectural model you want the implementation of your Web Service to follow. See Choosing an implementation model.
You can choose to generate stubs (which come with a simple client application) for testing your Web Service. When generating from a Java class, you can also request a WSDL file (for publishing the Web Service to a registry) as well as specify the service address (URL) for the Web Service. When generating from a WSDL file, you can override the default service address if necessary.
NOTE: Support for jBrokerTM Web 1.x applications is available via a backward-compatibility option. For more information, see If you choose jBroker Web 1.x compatibility.
Click Finish when you're done specifying options for the Web Service.
When you finish the wizard, it generates everything you've specified for your Web Service and updates other parts of your project with supporting changes:
When generating file names, the Web Service Wizard follows the naming rules specified by JAX-RPC. If you start with a Java class, the resulting file names are based on the name of that class. If you start with WSDL, the resulting file names are based on the definitions in that WSDL.
For simplicity, this documentation uses xxx to represent the portion of a generated Web Service file name that's derived from a class name or WSDL definition.
Under the covers, the Web Service Wizard uses the Web Services SDK compilers when generating the Web Service files listed above. In some cases, these compilers may generate additional code or files to support requirements specific to your application, such as:
For more information, see the Web Services SDK help.
The current version of the Web Services SDK provides a high degree of backward compatibility with earlier versions. However, some changes introduced to support the JAX-RPC standard may require you to modify code when upgrading an application that originated in jBroker Web 1.x. These changes involve the conventions used for:
File names JAX-RPC specifies rules for naming certain Web Service files. In order to follow these rules while keeping all generated names simple and consistent, new name patterns were adopted (for details, see Generated 1.x-compatible files below).
Stub access in client code With JAX-RPC, clients use a Service object to instantiate the stub instead of looking up the stub directly via JNDI.
Although it's recommended that you upgrade to the current Web Services SDK and JAX-RPC conventions, it's not required. By using the jBroker Web 1.x compatibility option in the Web Service Wizard, you can generate Web Service files according to the original jBroker Web conventions for file names and stub access. This enables you to take advantage of all the other improvements in the latest version of the Web Services SDK without altering your existing 1.x applications.
Generated 1.x-compatible files The following table describes the files generated when you use the jBroker Web 1.x compatibility option:
Follow these guidelines when editing the files generated by the Web Service Wizard:
|
Guideline |
Details |
|---|---|
|
File you may need to edit |
|
|
File you must edit |
|
|
Files you should not edit |
It's OK to edit any of the other generated files, but not typically required.
In some cases, completing the implementation of your Web Service may require you to add one or more manually coded files to work with the generated ones. See Creating additional files.
The generated xxxTie.java file includes an init() method you may need to edit.
If you start with a JavaBean or Java class, init() is generated to call the setTarget() method of xxx_ServiceTieSkeleton and pass an instance of xxxDelegate (to delegate to it). If xxxDelegate provides an empty constructor, the generated code uses that constructor to do the instantiation.
But if no implicit or explicit empty constructor is available, you must modify the code to indicate which one to use. You may also want to modify it to use a constructor that expects an argument.
The wizard automatically generates calls to setTarget() for every public constructor of xxxDelegate. Each line is commented out—except the one that uses the empty constructor (if available). Uncomment the line with the constructor you want and make any related changes:
  //super.setTarget( new MyObjectWSDelegate(  java.lang.String arg0) );
  //super.setTarget( new MyObjectWSDelegate(  java.lang.String arg0, java.lang.String arg1) );
  super.setTarget( new MyObjectWSDelegate( ) );
If you start with a Java remote interface or WSDL file, init() is always generated with the setTarget() call commented out. In this case, you must provide a class of your own to instantiate and delegate to:
//super.setTarget(new CONSTRUCT_YOUR_SERVICE_OBJECT_HERE);
If you start with an EJB session bean, you shouldn't need to edit the generated init() method.
Before you can test your Web Service with xxxClient, you must edit the generated xxxClient.java file to call one or more methods of the Web Service. Look for the process() method in this file and you'll find comments listing all of the possible method calls:
  // System.out.println("Test Result = " + remote.getString());
  // System.out.println("Test Result = " + remote.setString(java.lang.String));
  // System.out.println("Test Result = " + remote.sayHello());
Uncomment the method call(s) you want to test and supply appropriate argument values, as needed:
  // System.out.println("Test Result = " + remote.getString());
  System.out.println("Test Result = " + remote.setString(args[0]));
  System.out.println("Test Result = " + remote.sayHello());
For additional changes you may want to make to the generated xxxClient.java file, see Generating Web Service Consumers.
In many scenarios, once the wizard finishes generating, you'll have all of the Java source files you need for your Web Service. But there are cases where you must code additional classes yourself:
To use the Web Service files generated by the wizard, you:
Update the deployment descriptor, if necessary.
When you use the tie model, the wizard automatically updates the WAR project's web.xml file with the appropriate servlet mapping for your Web Service. But with the skeleton model, you must edit web.xml yourself to supply this information.
In the following example, MyService is the servlet class that the developer has coded for the Web Service MyRemote:
  <servlet>
     <servlet-name>MyService</servlet-name>
     <servlet-class>com.exsamp.rem.MyService</servlet-class>
  </servlet>

  <servlet-mapping>
     <servlet-name>MyService</servlet-name>
     <url-pattern>/MyRemote</url-pattern>
  </servlet-mapping>
Another reason to edit web.xml is to enable or disable the browser-based test environment for your Web Service.
For details, see Testing your Web Service from a browser.
Update the project, if necessary.
As the wizard works, it automatically adds files to your project classpath and contents, as needed. But you should also check yourself to make sure the project has everything it requires to compile and run.
For instance, if your Web Service accesses an EJB session bean, the EJB-client JAR file should be on your project's classpath.
For details on setting up the required classpath and contents for your project (including what the Web Services SDK needs), see Preparing to generate.
Build and archive the project.
When you complete this step, you'll have a WAR file containing the Web Service(s) you've generated.
Set up for deployment to your J2EE server.
Prepare the server-specific deployment information required to deploy the WAR to your J2EE server. For example, if you're going to deploy to the Novell exteNd Application Server, create an exteNd deployment plan file.
If you're going to deploy from the exteNd Director development environment, you should also set up a server profile for your J2EE server.
Deploy the WAR to your J2EE server.
When you complete this step, each Web Service in the WAR will be accessible as a servlet that can respond to standard HTTP SOAP requests for your exposed methods.
Test your Web Service(s) running on the J2EE server.
If you've generated, edited, and compiled the xxxClient class for a Web Service, you can use it for a quick test of your method calls. To run xxxClient from the exteNd Director development environment, select Tools>Run Web Service Client Class. The Web Service Wizard Client Runner displays, offering you a list of client classes from the current project to choose from.
You can also run xxxClient from a command line (providing that you include the appropriate directories and archives on your system classpath).
For further details on running xxxClient, see Generating Web Service Consumers.
The Web Services SDK provides a feature to help you test your Web Services from a Web browser. Once you develop and deploy a Web Service, you can browse to the URL for that service to:
Run test forms for each available method; from there you can enter any required parameters, invoke the Web Service, and see the result
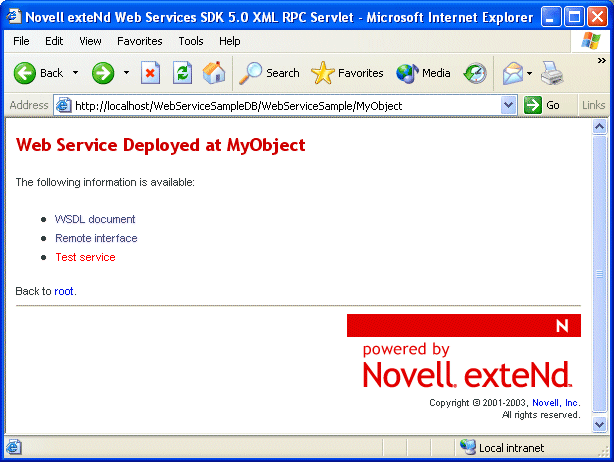
Runtime availability of this testing feature is controlled via an environment entry named wssdk.test.disable in your WAR's deployment descriptor (web.xml). When you create a generic WAR project in the exteNd Director development environment, the New Project Wizard automatically includes wssdk.test.disable in web.xml and sets it to true. To enable the feature, you must set wssdk.test.disable to false before you deploy.
  <env-entry>
     <env-entry-name>wssdk.test.disable</env-entry-name>
     <env-entry-value>false</env-entry-value>
     <env-entry-type>java.lang.Boolean</env-entry-type>
  </env-entry>
There are two basic implementation models you can choose from when developing with the Web Service Wizard. This section explores these choices to help you select the one that's most appropriate for the Web Services you generate:
Here's an overview of the tie model and when to use it:
It's possible (but not as common) to use the tie model when you have only a Java remote interface or WSDL file to provide as input to the Web Service Wizard. In this case, the wizard output leaves the delegation part of the model for you to complete later. You'll then need to code an implementation class and edit the generated tie class to instantiate it and delegate to it.
Here's an overview of the skeleton model and when to use it:
In this scenario, you'll see how the Web Service Wizard can be used to generate a Web Service based on an existing Java class that implements the methods to expose:
Implementation model This scenario illustrates use of the tie model. For an overview of that architecture, see Choosing an implementation model.
The WAR project for this scenario is set up as follows:
WebServiceSample.spf
The archive resulting from this project will be:
WebServiceSample.war
The initial content of this project is:
  WEB-INF
    lib
      wssdk.jar
    classes
      com
        exsamp
          obj
            MyObject.java
    web.xml
The classpath needed for this project is:
  ...\WEB-INF\lib\wssdk.jar
  ...\exteNdn\tools\compilelib\j2ee_api_1_n.jar
Here's the input provided to the Web Service Wizard for this scenario:
MyObject is an existing Java class from which the Web Service is to be generated. It implements the methods to expose. MyObject.java contains the following code (which must be compiled before you start the wizard):
  package com.exsamp.obj;

  public class MyObject {

      private String s;

      public MyObject() {
      }

      public MyObject(String xxx) {
      }

      public MyObject(String xxx, String yyy) {
      }

      public String getString() {
          return s;
      }

      public boolean setString(String s) {
          this.s = s;
          return true;
      }

      public String sayHello() {
          return "Hello there, I am on the server";
      }
  }
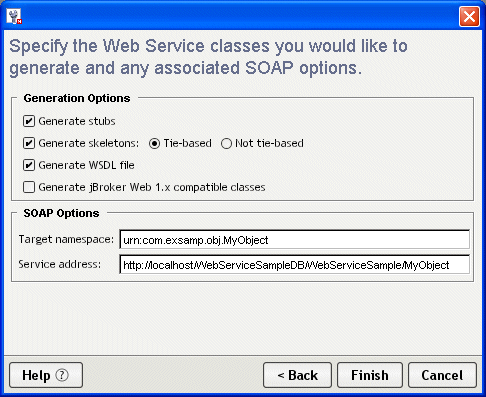
This wizard panel is completed as follows:
This wizard panel is completed as follows:
This wizard panel is completed as follows:

This wizard panel is completed as follows:
This wizard panel is completed as follows:
Based on the input provided for this scenario, the Web Service Wizard generates these files to implement the Web Service:
MyObjectWS.java is the remote interface for the Web Service.
MyObjectWS_ServiceSkeleton.java is the abstract servlet class that handles access to the Web Service.
MyObjectWS_ServiceTieSkeleton.java is an abstract class that extends MyObjectWS_ServiceSkeleton to support the tie model.
MyObjectWSTie.java extends the abstract servlet classes to function as the front end for the Web Service. To process requests (method calls) it receives, this servlet instantiates and delegates to MyObjectWSDelegate.
MyObjectWSDelegate.java instantiates the implementation class (MyObject) and makes the requested method calls against that instance.
MyObjectWS.wsdl describes the Web Service in standard WSDL format (useful when publishing to a registry).
Here's the generated WSDL for this new Web Service:
  <?xml version="1.0" encoding="UTF-8"?>
  <definitions name="MyObjectWSService"
   targetNamespace="urn:com.exsamp.obj.MyObject"
   xmlns="http://schemas.xmlsoap.org/wsdl/"
   xmlns:soap="http://schemas.xmlsoap.org/wsdl/soap/"
   xmlns:soapenc="http://schemas.xmlsoap.org/soap/encoding/"
   xmlns:tns="urn:com.exsamp.obj.MyObject"
   xmlns:wsdl="http://schemas.xmlsoap.org/wsdl/" xmlns:xsd="http://www.w3.org/2001/XMLSchema">
   <types/>
   <message name="setStringRequest">
    <part name="arg0" type="xsd:string"/>
   </message>
   <message name="setStringResponse">
    <part name="result" type="xsd:boolean"/>
   </message>
   <message name="getStringRequest"/>
   <message name="getStringResponse">
    <part name="result" type="xsd:string"/>
   </message>
   <message name="sayHelloRequest"/>
   <message name="sayHelloResponse">
    <part name="result" type="xsd:string"/>
   </message>
   <portType name="MyObjectWS">
    <operation name="setString" parameterOrder="arg0">
     <input message="tns:setStringRequest"/>
     <output message="tns:setStringResponse"/>
    </operation>
    <operation name="getString">
     <input message="tns:getStringRequest"/>
     <output message="tns:getStringResponse"/>
    </operation>
    <operation name="sayHello">
     <input message="tns:sayHelloRequest"/>
     <output message="tns:sayHelloResponse"/>
    </operation>
   </portType>
   <binding name="MyObjectWSBinding" type="tns:MyObjectWS">
    <soap:binding style="rpc" transport="http://schemas.xmlsoap.org/soap/http"/>
    <operation name="setString">
     <soap:operation soapAction="urn:com.exsamp.obj.MyObject/setString"/>
     <input>
      <soap:body
       encodingStyle="http://schemas.xmlsoap.org/soap/encoding/"
       namespace="urn:com.exsamp.obj.MyObject" use="encoded"/>
     </input>
     <output>
      <soap:body
       encodingStyle="http://schemas.xmlsoap.org/soap/encoding/"
       namespace="urn:com.exsamp.obj.MyObject" use="encoded"/>
     </output>
    </operation>
    <operation name="getString">
     <soap:operation soapAction="urn:com.exsamp.obj.MyObject/getString"/>
     <input>
      <soap:body
       encodingStyle="http://schemas.xmlsoap.org/soap/encoding/"
       namespace="urn:com.exsamp.obj.MyObject" use="encoded"/>
     </input>
     <output>
      <soap:body
       encodingStyle="http://schemas.xmlsoap.org/soap/encoding/"
       namespace="urn:com.exsamp.obj.MyObject" use="encoded"/>
     </output>
    </operation>
    <operation name="sayHello">
     <soap:operation soapAction="urn:com.exsamp.obj.MyObject/sayHello"/>
     <input>
      <soap:body
       encodingStyle="http://schemas.xmlsoap.org/soap/encoding/"
       namespace="urn:com.exsamp.obj.MyObject" use="encoded"/>
     </input>
     <output>
      <soap:body
       encodingStyle="http://schemas.xmlsoap.org/soap/encoding/"
       namespace="urn:com.exsamp.obj.MyObject" use="encoded"/>
     </output>
    </operation>
   </binding>
   <service name="MyObjectWSService">
    <port binding="tns:MyObjectWSBinding" name="MyObjectWSPort">
     <soap:address location="http://localhost/WebServiceSampleDB/WebServiceSample/MyObject"/>
    </port>
   </service>
  </definitions>
Based on the input provided for this scenario, the Web Service Wizard generates these files so you can test the Web Service once it's deployed:
MyObjectWSService.java is the service interface that's used in JAX-RPC to help clients obtain the stub for the Web Service.
MyObjectWSServiceImpl.java is the service implementation class that handles instantiation of the stub (MyObjectWSBinding_Stub).
MyObjectWSBinding_Stub.java is used by clients as a proxy for accessing the Web Service. This stub class implements the remote interface (MyObjectWS) to handle the logistics of each method call.
MyObjectWSClient.java is a simple client application that accesses the Web Service by:
The process() method of MyObjectWSClient must be edited to uncomment the Web Service method call to be tested. Here's the change:
  // System.out.println("Test Result = " + remote.getString());
  // System.out.println("Test Result = " + remote.setString(java.lang.String));
  System.out.println("Test Result = " + remote.sayHello());
Because this scenario uses the tie model, the Web Service Wizard automatically updates the web.xml file to declare MyObjectWSTie as the servlet class to handle requests for the MyObject Web Service:
  <?xml version="1.0" encoding="UTF-8"?>
  <!DOCTYPE web-app PUBLIC "-//Sun Microsystems, Inc.//DTD Web Application 2.2//EN"
                           "http://java.sun.com/j2ee/dtds/web-app_2_2.dtd">
  <web-app>
     <servlet>
        <servlet-name>MyObject</servlet-name>
        <servlet-class>com.exsamp.obj.MyObjectWSTie</servlet-class>
     </servlet>
     <servlet-mapping>
        <servlet-name>MyObject</servlet-name>
        <url-pattern>/MyObject</url-pattern>
     </servlet-mapping>

     <env-entry>
        <env-entry-name>wssdk.test.disable</env-entry-name>
        <env-entry-value>true</env-entry-value>
        <env-entry-type>java.lang.Boolean</env-entry-type>
     </env-entry>
  </web-app>
Also note that, in this case, the developer has chosen to disable the Web Services SDK browser-based test environment for this Web Service. Instead, the Web Service will be tested by running the generated MyObjectWSClient application.
For more information on the browser-based test environment, see Testing your Web Service from a browser.
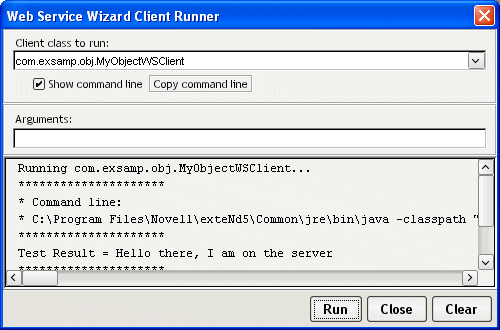
Once this project is built and the WAR file is created and deployed to the J2EE server, the MyObject Web Service is ready for a test run. Here's the result of using the Client Runner in the exteNd Director development environment to execute the MyObjectWSClient application:
Copyright © 2004 Novell, Inc. All rights reserved. Copyright © 1997, 1998, 1999, 2000, 2001, 2002, 2003 SilverStream Software, LLC. All rights reserved. more ...