Utility Tools
CHAPTER 4
This chapter describes the basic facilities that the Novell exteNd Director development environment provides to work with XML and XML-related files. It contains the following topics:
XML (Extensible Markup Language) is a language designed to facilitate the exchange of data between computer systems (which can be of different types) and applications on the Web. XML is a project of the World Wide Web Consortium (W3C). It is a standard, public format.
Unlike HTML, XML is extensible. It is a metalanguage, a language that describes other languages. With XML, you can define customized markup languages to describe any type of document structure. XML can be used to specify the structure of anything from a recipe (which might consist of descriptions, ingredients, preparation steps, and so on) to a Web application (J2EE deployment descriptors are XML documents).
The definition of an XML document is specified by either a DTD (Document Type Definition) or a Schema. DTDs, which are older, specify the structure of an XML document. They specify the names of elements, attributes, and entities that can exist in a conforming XML document. DTDs also specify where the elements can be used, whether they are required, and so on.
Schemas are more recent and more powerful. They can specify the structure as well as the content (data types) allowed in XML documents. Unlike DTDs, Schemas are themselves XML documents.
 The complete XML standard can be found at www.w3.org/XML.
TIP: If you are new to XML, you might want to read the XML FAQ at www.ucc.ie/xml. Among other topics, it describes the differences between Schemas and DTDs.
The exteNd Director development environment provides broad support for working with XML files, including:
You'll learn about these XML facilities in this chapter and in the XSL Editor chapter.
The XML Editor enables you to:
View and edit XML documents in a syntax-colored Source View or a Tree View
Create and modify document elements easily through the editor's context-based code completion and the Schema Guide window
Validate an XML document against a Schema or DTD, and check for well-formedness
Attach and edit a style sheet for an XML document by using the CSS Style Manager

The Source View is a powerful XML source editor. In addition to standard text editing features (including cut-and-paste editing, undo and redo, and searching and replacing text) it supports these specialized features for editing XML files:
Context-sensitive code completion (see Editing an XML document)
Formatting of XML elements (see Modifying text and Changing indentation)
Navigating by XML elements (see Moving the insertion point)
Finding matching tags (see Moving the insertion point)
Bookmarks (see Bookmarks)
Specifying colors to display different types of information (see XML color preferences)
The XML Editor displays the current XML document in Source View if you click the XML Source View tab.
The Tree View has special features designed to help you create valid XML documents quickly and easily based on XML Schemas or DTDs. The Tree View supports:
Context-sensitive editing (see Editing an XML document)
Cut-and-paste editing (see Editing nodes)
Drag and drop (see Editing nodes)
Searching by name, value, XPath, or text (see Searching an XML document)
Finding matching elements (see Navigation and display)
The XML Editor displays the current XML document in Tree View if you click the XML Tree View tab.
You can use these controls to manipulate and navigate the tree:
|
Control |
Description |
|---|---|
|
|
Expand all nodes. You can also do this from the context menu; right-click a node and select View>Expand All. |
|
|
Collapse all nodes. You can also do this from the context menu; right-click a node and select View>Collapse All. |
|
|
Display the Tree Filters dialog to show or hide particular types of nodes in the tree. The default is to show all, but you can selectively show or hide any of the following: You can also do this from the context menu; right-click a node and select View>Filter. |
|
XPath |
You can do either of the following:
The XPath control in the XML Editor's Tree View is a subset of the XPath Navigator described in the chapter on working with scoped paths and XPaths in Developing exteNd Director Applications. See that chapter to learn about XPath expressions and how to use them. |
|
|
Expand node. You can also do this from the context menu; right-click a node and select View>Expand Node. |
|
|
Collapse node. You can also do this from the context menu; right-click a node and select View>Collapse Node. |
Here's an explanation of the icons that display in the tree:
You can create new XML documents or work with existing ones.
To create a blank XML document, deselect Use Wizard and click OK. An empty XML document is created and displayed in the XML Editor.
To use the XML File Wizard, select Use Wizard and click OK. The XML File Wizard displays. Go through the wizard as follows.
Specify a Schema or DTD to associate with the XML file. You can:
Select a Schema URI from the list of Schemas in the XML catalog; the corresponding file name is displayed in the File Name field
Select a public or system identifier from the list of DTDs in the XML catalog; the corresponding file name is displayed in the File Name field
Select a Schema or DTD directly from the file system by clicking the browse (...) button and selecting the file
For more information about the XML catalog, see Maintaining the XML catalog.
If you want the wizard to generate some skeletal contents for your XML file based on the selected Schema or DTD, check the Create XML from XML Schema or DTD option; when you click Next, the wizard will prompt you to choose a root element for the document.
You can use the Schema Guide, or click Close to edit the file manually.
For information about the Schema Guide, see Using the Schema Guide.
In the Open dialog, select the XML file and click Open.
The file extension must be .XML or .TLD (for a tag library descriptor file). The selected file opens in the XML Editor and the XML Editor menu appears on the menu bar.
NOTE: Other kinds of XML files may open in specialized XML editors, such as the XML Catalog Editor or Deployment Descriptor Editor.
Finding Schemas and DTDs If the XML document specifies a Schema or DTD, the editor searches for it when opening the document. If the editor finds the Schema or DTD, it attaches it to the XML document. If the reference is unqualified, the editor first looks in the XML catalog; if the editor doesn't find the Schema or DTD there, it looks in the directory containing the XML document.
If the XML Editor cannot find the referenced Schema or DTD, you receive an error message in the Output Pane and the document is opened without being attached to a Schema or DTD.
For more information, see Associating Schemas and DTDs with XML documents.
NOTE: The window title for an XML document specifies whether the document is attached to a Schema or DTD.
To work with the Schemas and DTDs for your XML documents, you need to know about these topics:
In order to use context-sensitive code completion and to validate an XML document, an XML Schema (.XSD file) or a DTD (.DTD file) must be attached to the document. If the editor doesn't attach a Schema or DTD when opening your XML document, you can use the XML Editor menu to attach one, or you can manually edit the document to specify a Schema or DTD (and then refresh).
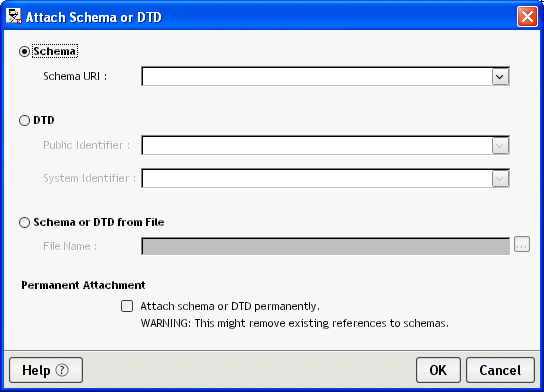
You can attach a Schema or DTD that is in the XML catalog or elsewhere on the file system to an open XML document. You can choose to attach the specified Schema or DTD either temporarily or permanently.
For more information about the XML catalog, see Maintaining the XML catalog.
 To attach a Schema or DTD to an XML document:
Specify a Schema or DTD to associate with the XML document. You can:
Select a Schema URI from the list of Schemas in the XML catalog; the corresponding file name is displayed in the File Name field
Select a public or system identifier from the list of DTDs in the XML catalog; the corresponding file name is displayed in the File Name field
Select a Schema or DTD directly from the file system by clicking the browse (...) button and selecting the file
Set the Permanent Attachment property to make this association either temporary or permanent:
If you uncheck Permanent Attachment, the Schema or DTD association is only for the purpose of context editing and validation in the current XML Editor session. The XML document is not modified.
If you check Permanent Attachment, the XML document is modified to reflect the Schema or DTD association. Note that this may remove existing Schema references.
The Schema or DTD is now attached to your XML document. You can use the XML Editor's context support for editing, and you can validate your document.
Errors Any errors that occur when attaching a Schema or DTD are reported in the Output Pane.
Another way to permanently associate your document with a Schema or DTD is to manually edit the XML and then make the XML Editor aware of the association.
To make a manual association and update the editor:
Edit the open XML document to specify the associated Schema or DTD. For example, to associate the document with a DTD, edit its DOCTYPE statement.
Update the editor to use the association by selecting XML Editor>Refresh Schema Handler.
The XML Editor parses the XML document and updates the DTD or Schema information associated with the document.
Errors Any errors that occur when updating the Schema or DTD information are reported in the Output Pane.
You can detach a Schema or DTD from an open XML document.
Select XML Editor>Detach Schema or DTD.
The Schema or DTD definition is no longer used by the XML Editor. Context editing and validation are no longer provided for the open document.
The Schema or DTD is not permanently detached. The next time you open the XML document, if the document specifies a Schema or DTD that the editor can find, the Schema or DTD will be attached again.
Schemas are more powerful than DTDs and are becoming the standard for defining the structure and allowable content type for XML documents. Also, unlike DTDs, Schemas are themselves XML documents and can be edited and validated in the XML editors.
The exteNd Director development environment provides support for converting DTDs to Schemas. You can:
To convert a DTD on the file system to a Schema:
On the XML tab, select DTD to Schema (in the Advanced section) and click OK.
Specify the DTD to convert. You can click the ellipsis button to browse the file system for the DTD file. The file must have the extension .DTD.
Specify the name of the Schema file to generate. Don't provide a file extension; the file will be given the extension .XSD.
Specify the location to save the Schema file. You can click the ellipsis button to browse the file system.
Specify whether you want the Schema opened in the Schema Editor after it is created.
This converts the DTD to a Schema, stores the Schema in the specified location, and displays the Schema in the Schema Editor (if you specified to open it).
To convert a DTD attached to an open document to a Schema:
Specify the name and location of the Schema. Don't provide a file extension; the file will be given the extension .XSD.
What to do next You can edit the generated Schema file in the Schema Editor and attach it to an XML document for context editing and validation.
The exteNd Director development environment provides a wizard you can use when you need to create a new Schema. When you need to modify a Schema, you can use the Schema Editor (which is simply a more specialized version of the XML Editor).
To create a new Schema using the wizard, make sure Use Wizard is selected then click OK.
(Alternatively, you can deselect Use Wizard to skip the wizard and immediately get an empty, untitled Schema in the Schema Editor.)
When the XML Schema File Wizard displays, specify a name and location for the new Schema file then click Finish.
The wizard creates that file and opens it in the Schema Editor (which includes a Schema Editor menu on the menu bar). You can now start developing your new, empty Schema by using either the Tree View or the Source View.
In the Open dialog, select the Schema (.XSD) file to edit and click Open.
The file opens in the Schema Editor (which includes a Schema Editor menu on the menu bar). You can now manipulate this Schema as needed by using either the Tree View or the Source View.
The XML editors provide context editing functionality to help you work on XML documents. But context editing doesn't always supply all the information you might want. For example:
It doesn't show exactly how a Schema (or DTD) is put together and which elements and attributes are allowable at different locations.
It doesn't indicate whether an element must include a sequence of child elements before it is legal. For example, say element A must have elements B, C, and D as children to be valid. When you insert an instance of A, the standard context support suggests element B as a valid subelement. If B is inserted alone, the document becomes invalid until you have inserted C and D. With the standard context support, you wouldn't know this unless you performed a full validation of the document.
If you're looking for a specific element to insert (for instance, D in the example above), with the standard context support you wouldn't be informed about D unless you had inserted B and C first.
If an element contains illegal children, the standard context support doesn't suggest new elements to insert, so you must perform a full validation to find out where the problem is and then correct it.
The Schema Guide addresses these situations.
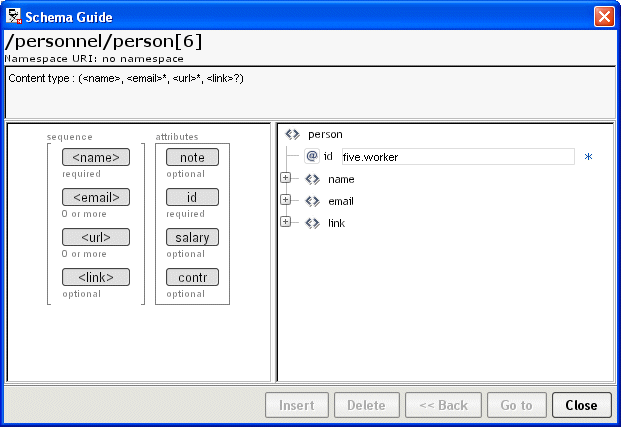
The Schema Guide window consists of four parts:
The top of the window displays the XPath for the selected element, its namespace, documentation for the element's type (if any, taken from comments in the DTD or annotation elements in the Schema), and a textual DTD-like description of the element's allowed contents
For more information about XPaths, see the chapter on working with scoped paths and XPaths in Developing exteNd Director Applications.
The left side contains a graphical representation of the definition of the selected element
The right side contains a tree representation of the actual instance of the selected element, including its attributes and children (but not its children's children)
In the screen shown above, the sixth person element (/personnel/person[6]) was selected when the Schema Guide was invoked.
The left pane shows the element's subelements as well as the Schema model groups they belong to (Choice, Sequence, or All) or the model group declarations (for example, schemaTop).
Choice groups are shown with a horizontal bracket above and below
Sequence groups are shown with a vertical bracket on the left and right
The Schema Guide displays how many instances of each subelement and attribute are allowed (such as 0 or more, required, or optional). Positioning the mouse pointer over an element displays a tool tip describing that element (if there is documentation for it in the Schema or DTD).
The Schema Guide is invoked automatically when you use the XML File Wizard to create an XML document. You can also invoke it when the document is empty and has a Schema attached. In this situation, the Schema Guide lists in the left pane possible root elements. If you are using a DTD, the description in the header will show the suggested root elements (that is, those elements not in the content model of other elements).
The right pane displays the standard Tree View to show the element that was selected when the Schema Guide was invoked, its attributes, and its immediate children.
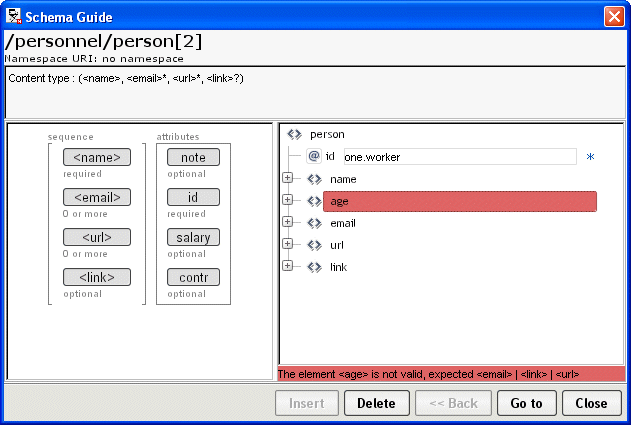
Subelements that are not legal are shown with a red background. If the selected element contains an illegal attribute, the element itself is marked red. Clicking a colored element displays a similarly colored region of text along the bottom of the tree. The text describes the issue in more detail.
In many cases, the Schema Guide can fix validation errors, either by removing illegal elements or attributes, or by moving an element from a wrong namespace into a correct one. In the following example, the Schema Guide is indicating that the age element is invalid in the person element. You can delete the invalid element by clicking Delete.
Namespace errors are treated separately. These errors are common when dealing with Schemas, because Schemas can contain elements from several namespaces and have different rules for whether specific elements or attributes are required to be in a namespace. An element that has the correct local name for validation but whose namespace is incorrect is shown with a yellow background. You can edit the element to specify the correct namespace.
Elements When you select an element in the left pane, the right pane shows where that element can be legally inserted by displaying one or more green nodes in the tree. The following screen shows that an email element can be legally inserted above or below the existing email element.
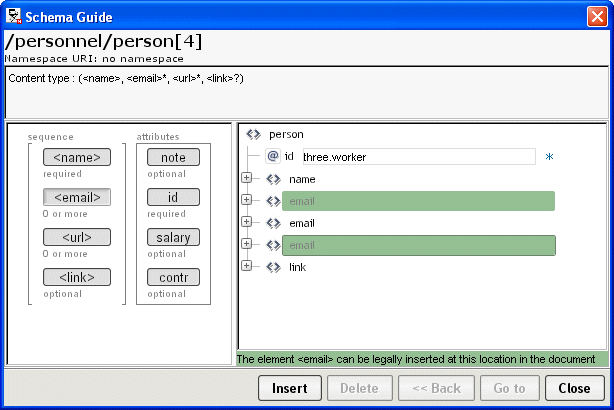
To insert an element, select one of the green nodes in the tree and click Insert. If you don't want to insert the element, simply select another object in the left pane to consider.
If you click an element in the left pane that cannot be legally inserted, you will not see any green nodes in the right pane.
Attributes To add an attribute, select it in the left pane. If it is legal to add, you will see a green node in the right pane. Click Insert and specify the attribute's value.
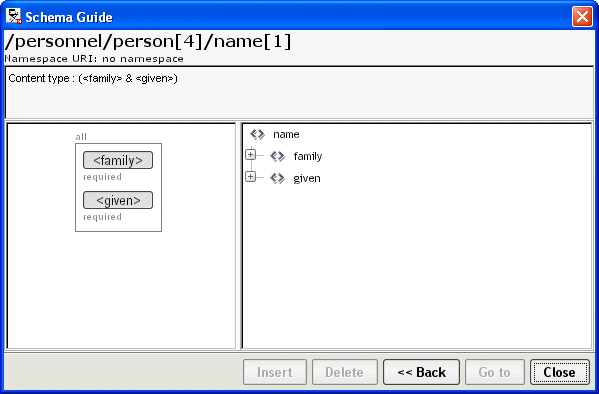
You can navigate the element hierarchy by selecting a subelement in the right pane and clicking Go to. That subelement becomes the selected element and its definition displays in the left pane; the tree structure for the selected instance displays in the right pane. You can work with it the same way you worked with the parent element.
The following screen shows the Schema Guide after you select the person element's name subelement and click Go to.
Click Back to return to working with the parent element.
You can edit an XML document in either Tree View or Source View. This section describes the editing features you can use:
If you have attached a Schema or DTD, you can use the XML Editor's context support. The editor provides context support in both Tree View and Source View to help you edit your XML documents.
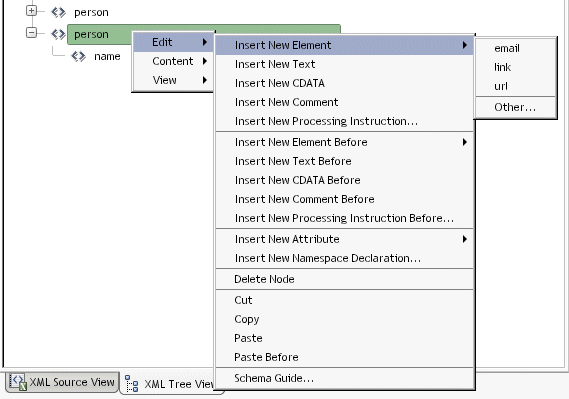
In Tree View, right-click at the appropriate location in the document. In the following illustration, a new person is being added to the document, and the XML Editor detects from the Schema that the next valid element is name.

Once the name has been added, the XML Editor presents the new list of valid elements, according to the Schema.
Similarly, the editor presents valid attributes when you have an element selected.
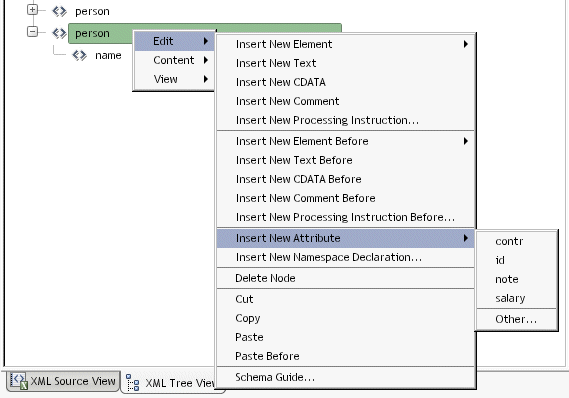
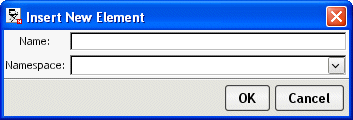
Notice that the editor also provides the choice Other, allowing you to define an entry that does not conform to the Schema. It displays a dialog to fill in:
Using the Schema Guide In addition to using the Tree View's context menu to edit your XML document, you can use the Schema Guide for more comprehensive context support. See Using the Schema Guide.
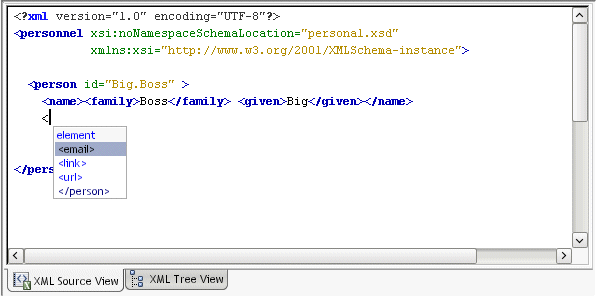
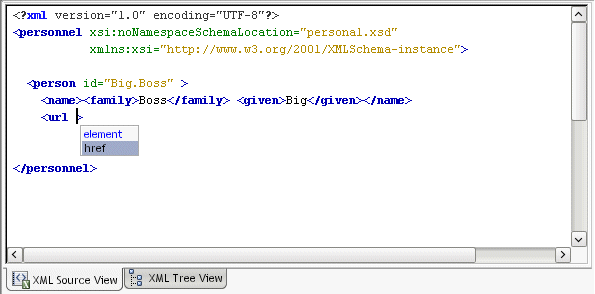
In Source View, after you type < (to start an element tag) or a single space within an element (to define an attribute), the editor displays the valid entries (if there are any). You can select the one you want to insert it. For example:
In the following example, a space is typed in an url element, which displays the valid attribute, href:
To add an element in Tree View:
Right-click and select one of the following:
Edit>Insert New Element to insert an element inside the current element
Edit>Insert New Element Before to insert an element before the current element at the same level
If valid elements can be inferred from the definition of the document, they will be listed; select the one you want. Alternatively, you can add an element yourself by choosing Other.
To add an element in Source View:
Position the insertion point where you want to insert the element.
If valid elements can be inferred from the definition of the document, they will be listed; select the one you want. Alternatively, you can add an element yourself by typing it.
To add an attribute in Tree View:
Right-click and select Edit>Insert New Attribute.
If valid attributes can be inferred from the definition of the document, they will be listed; select the one you want. Alternatively, you can add an attribute yourself by choosing Other.
To add an attribute in Source View:
Position the insertion point inside an element where you want to insert the attribute.
If valid attributes can be inferred from the definition of the document, they will be listed; select the one you want. Alternatively, you can add an attribute yourself by typing it.
To add other nodes in Tree View:
Right-click and select one of the following from the Edit menu:
To add other code in Source View:
To copy, move, or delete nodes in Tree View:
Right-click and select one of the following from the Edit menu:
Cut or Copy to place a node on the clipboard, then Paste to insert it as the last child of a selected node or Paste Before to insert it before a selected node
TIP: Cut and Copy also place contents on the system clipboard, so you can paste a textual representation of the tree contents into other applications. Similarly, you can paste textual XML contents from other applications into Tree View.
In all cases, you will be informed if the edit would result in an invalid document. You can choose whether to continue.
To copy, move, or delete code in Source View:
Reversing changes All editing actions can be undone by selecting Edit>Undo (Ctrl+Z) or redone by selecting Edit>Redo (Ctrl+Y).
As you type in Source View, the editor automatically highlights in red any areas of the document that are not well formed. The Tree View creates well-formed documents by design.
You can also manually validate the document (for conformance to a Schema or DTD) and check it for well-formedness.
To validate an XML document and check for well-formedness:
The editor validates the XML document against the attached Schema or DTD. It also checks the XML document for well-formedness.
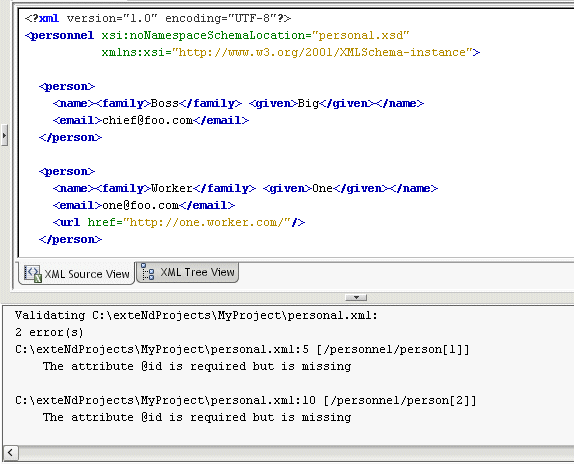
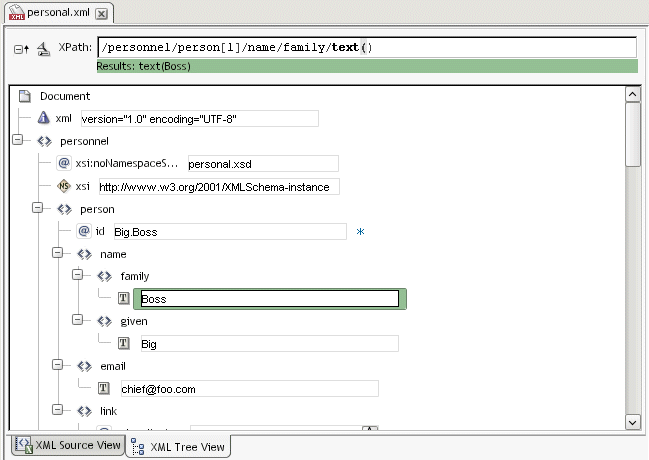
Results The report identifying any validation errors or malformed statements displays in the Output Pane. References to errors are reported as XPaths.
In the example above, the id attribute is reported as missing from the first two person elements. The XPath /personnel/person[1] indicates the first instance of person in the XML document. The XPath /personnel/person[2] indicates the second instance of person.
For more information about XPaths, see the chapter on working with scoped paths and XPaths in Developing exteNd Director Applications.
TIP: You can search for specific XPaths in Tree View. See Searching an XML document.
To check only for well-formedness:
You can search your document in either Source View or Tree View.
In either Source View or Tree View, select Edit>Find or press Ctrl+F.
In Source View, you can perform standard text searches.
In Tree View, you can specify one of the following:
XPath (to learn about XPaths, see the chapter on working with scoped paths and XPaths in Developing exteNd Director Applications)
Text (to search for a string in all attribute values, text nodes, and CDATA nodes)
If there is a match, the first is selected and all occurrences are indicated:
You can style an XML document via CSS (Cascading Style Sheets). The exteNd Director development environment provides a CSS Style Manager you can use to attach and edit a style sheet for your XML document.
Select XML Editor>CSS Styling.
The CSS Style Manager displays.
For details on attaching and editing style sheets with the CSS Style Manager, see CSS Editor.
The exteNd Director development environment provides a built-in XML catalog of widely used Schemas and DTDs. For example, the XML catalog includes the Schemas for XSL, WSDL, and XML Schemas; the Sun J2EE DTDs; and the Novell exteNd Application Server deployment plan DTDs.
When you open an XML document that references a Schema or DTD, if the Schema or DTD is in the XML catalog, the editor associates it with the XML document and enables context editing and validation.
Catalog standard The XML catalog is based on the OASIS XML catalog standard. This standard specifies a format for mapping external identifiers (public and system identifiers) and URI references to other URI references. This makes it possible to map, for example, a URI of a namespace to a local Schema file. The standard specifies that catalogs consist of one or more catalog entry files, each file specifying a set of catalog entries.
For information on the OASIS standard, see www.oasis-open.org/committees/entity/spec.html.
Catalog directories The built-in XML catalog consists of three directories in the Novell exteNd Common\Resources directory:
Catalog entry files There are four built-in catalog entry files:
dtdcatalog.xml, which lists all the preinstalled DTDs in the DTDCatalog directory
schemacatalog.xml, which lists all the preinstalled Schemas in the SchemaCatalog directory
user-dtdcatalog.xml and user-schemacatalog.xml, which are initially empty; you can use them to add entries to the catalog
The two DTD-related catalog entry files both point to DTD files in the DTDCatalog directory (that is, their base directory is ../DTDCatalog). Similarly, the two Schema-related catalog entry files both point to Schemas in the SchemaCatalog directory (so their base directory is ../SchemaCatalog).
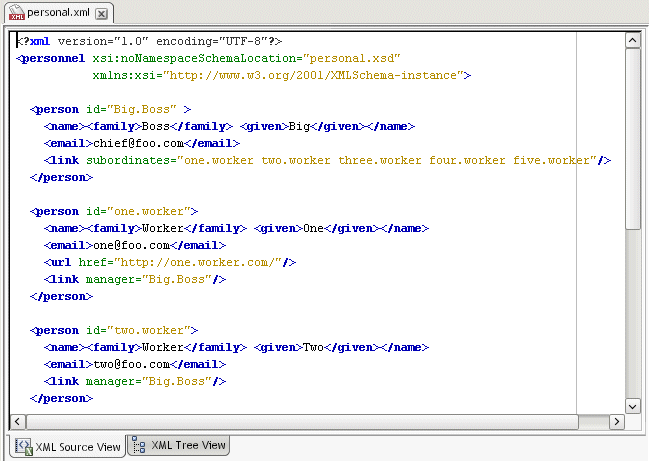
An example Say you are working with the personal.xsd document that contains this declaration:
<xsd:schema xmlns:xsd="http://www.w3.org/2001/XMLSchema">
Because the built-in catalog entry file schemacatalog.xml lists this URI and maps it to XMLSchema.xsd in the SchemaCatalog directory, when you open personal.xsd the editor locates its Schema in the local catalog without having to go out to the Internet for it.
You might have Schemas and/or DTDs that you want to add to the XML catalog so they can be located when you open XML documents that use them. You can add Schemas and DTDs using the existing catalog structure or by extending the structure.
The easiest way to add entries to the XML catalog is by using the existing catalog directory structure.
To add to the XML catalog by using the existing structure:
Add the .DTD or .XSD file to the DTDCatalog directory or SchemaCatalog directory.
Open the corresponding user-editable catalog entry file in the CatalogFiles directory.
Add the catalog entries to the file.
You edit catalog entry files with the XML Catalog Editor, as described in Using the XML Catalog Editor.
You can also add entries to the XML catalog by extending the directory structure—that is, by creating additional directories of Schemas and DTDs and additional catalog entry files.
To add to the XML catalog by extending the directory structure:
Add the .DTD and/or .XSD files you want in the catalog to directories on your file system. You can organize the DTDs and Schemas any way you want, but you will need to create a catalog entry file for each directory containing DTDs or Schemas.
Create catalog entry files for each of the directories by using the XML Catalog File Wizard:
On the XML tab, select XML Catalog file (in the Advanced section) and click OK.
Specify its location. In order to have exteNd Director read the catalog entry file, locate this file in the CatalogFiles directory.
Specify the base URI—that is, the path to the directory containing the DTD or Schema files. It is through this base URI that exteNd Director is able to find the DTDs or Schemas listed in the catalog entry file.
Add entries as described in Using the XML Catalog Editor below.
When you open a catalog entry file, it displays in the XML Catalog Editor. The XML Catalog Editor has three views:
A Tree View and Source View, which are the same as the corresponding views in the core XML Editor
A Catalog View, which presents an interface to the catalog entries
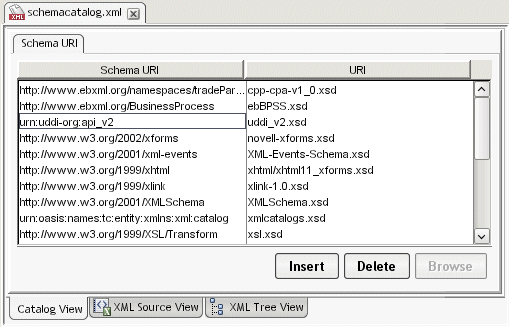
The Catalog View has one or more tabs:
A catalog entry file whose base directory is DTDCatalog has two tabs: Public Identifier and System Identifier
A catalog entry file whose base directory is SchemaCatalog has one tab: Schema URI
A catalog entry file whose base directory is any other directory has three tabs: Schema URI, Public Identifier, and System Identifier
Depending on whether the entry is for a Schema or a DTD, select the appropriate tab and click Insert.
You can also edit and remove entries from the catalog entry file.
CAUTION: Don't delete preexisting DTDs or Schemas from the catalog; the exteNd Director development environment may require them.
Double-click the entry and make the edits you want. If you double-click a resolved URI value, the Browse button is enabled, allowing you to pick another file.
Select the entry and click Delete.
The entry is removed from the catalog entry file (the Schema or DTD itself is unaffected).
Here are the keyboard shortcuts provided in the XML editors.
|
Keys |
Description |
|---|---|
|
Ctrl+F |
Shows Find dialog |
|
F3 |
Navigates to next search result |
|
Alt+Shift+H |
Toggles display of search result icon |
|
Ctrl+Alt+Shift+H |
Clears the search |
|
Keys |
Description |
|---|---|
|
Ctrl+F2 |
Sets or unsets a bookmark at current line |
|
F2 |
Goes to next bookmark |
|
Keys |
Description |
|---|---|
|
Ctrl+B |
Displays dialog for changing the base URI (the path to the directory containing the DTD or Schema files for the catalog entry file) |
Copyright © 2004 Novell, Inc. All rights reserved. Copyright © 1997, 1998, 1999, 2000, 2001, 2002, 2003 SilverStream Software, LLC. All rights reserved. more ...