Workflow Guide
CHAPTER 5
This chapter has general information about how to create workflow processes using the Workflow Modeler. It has these sections:
The Workflow Modeler allows you to create and save an XML document that can be executed by the workflow engine at runtime. Creating a workflow process is a three-step process:
Use the graphing environment of the Workflow Modeler to lay out the logic of your process:
Use the Property Inspector to configure activity and link properties that link the process to the resources of your exteNd Director environment.
Save the process in your project resource set. The Workflow Modeler converts it to a process definition that the workflow engine can execute.
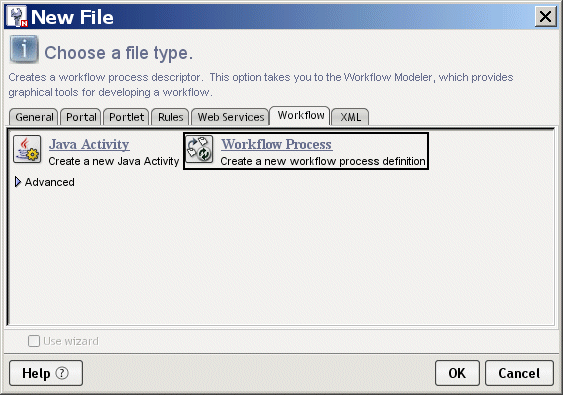
To start the Workflow Modeler you create a new process or open an existing one.
Select Workflow Process and click OK.
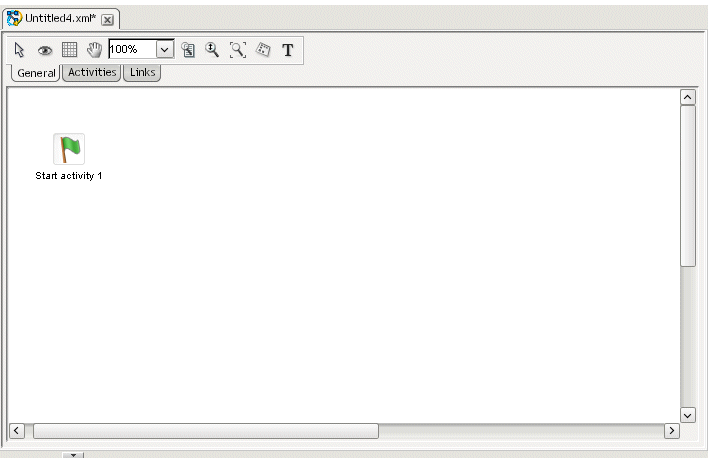
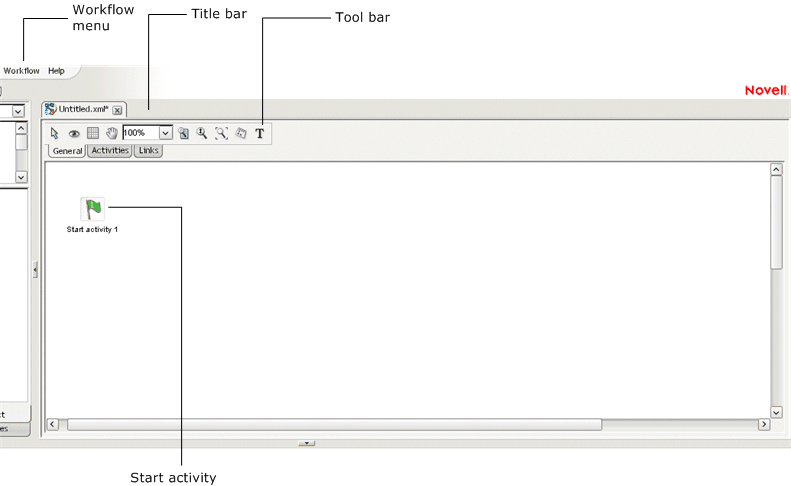
The main window of the Workflow Modeler opens in the editing area. The flag icon represents the Start activity for the process:
Select File>Save from the exteNd Director menu.
If the Workflow Modeler detects any mistakes in the process, a popup message informs you and asks if you would like to save anyway. This validation occurs on all save events. You can address the warnings later.
If this is your first save, the Save As dialog appears.
The contents of the workflow process definitions folder display in your project resource set. Although you can specify another directory, it is recommended that you accept the default.
Navigate to the workflow process in your project resource set.

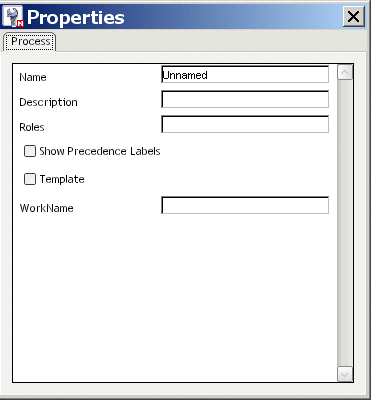
You can access the process property sheet to view current information about the process and set UI properties.
With the cursor in the Modeler window, right-click and select Properties.
Edit or view the process properties:
|
Property |
Description |
|---|---|
|
Name |
The formal name of the process. The default is the name specified for the process descriptor. |
|
Description |
A description of the process intended for the Workflow Modeler user. |
|
Roles |
A semicolon-delimited list of existing security roles that are authorized to start a process and create workitems. For example: authors;developers;managers
|
|
Show Precedence Labels |
Specifies whether precedence labels should be displayed in the workflow graph. When an activity is linked to more than one other activity, the Workflow engine uses precedence to determine which link to follow. Each link has a precedence number associated with it. In cases where more than one link expression might evaluate to true, the engine evaluates the links in precedence order, following the first link that returns true. |
|
Template |
Specifies whether this workflow can be used as a template for the creation of other workflows. |
|
WorkName |
A descriptive name for the Workflow Modeler user. |
Providing more screen space To provide more screen space you can close the Navigation and Output Panes in exteNd Director by clicking the panel view selectors:
Command features Here are the command features of the Workflow Modeler:
With the General tab selected, click the Pan button on the toolbar to change the cursor to pan mode:
Drag the hand cursor on the graph area to scroll the graph in the editing area.
You can also use the horizontal and vertical scroll bars to achieve the same effect.
With the General tab selected, click the Select button on the toolbar:
NOTE: Select mode is the default
To select multiple objects, click empty space and drag the selection rectangle around the group.
An activity represents a workitem in the workflow process. You associate the activity with a workitem and/or business logic by setting properties on the activity icon, or node.
The following is a summary of the activities in the Workflow Modeler. For details about activity properties and usage, click on the appropriate item:
Click anywhere on the graph to place the activity. Click and drag to move.
 To access activity properties:
Right-click and select Properties—or click the Eye icon on the General tab.
Click the appropriate tab in the property sheet.
 The properties are specific for the activity type. For more information, see Workflow activity types.
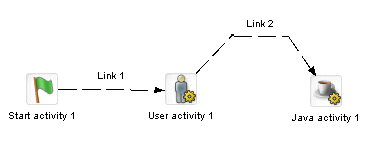
A link is a single logical path from one activity to another activity. Each link represents a potential routing of workitems exiting a single activity. Links are represented by arrows in the Workflow Modeler.
There are two types of links:
Click on an activity and drag from the starting activity to the target activity, then release the mouse button.
See also Drawing a link segment.
Click the Eye icon on the General tab—or right-click and select Properties.
Click the appropriate tab in the property sheet.
Properties are specific for the link type. For more information, see Workflow link types.
A segment is the line between two points of a link. Segments are purely cosmetic. You can use them to enhance the legibility and appearance of the process model:
Release the mouse button at the point where you want to end the segment.
For the final segment, drag to the destination activity and click on it.
Scoped paths allow you to associate data with workflow activities and links. exteNd Director provides a set of predefined scoped paths that you can access using the Scoped Path Navigator.
For background information about scoped paths, see the chapter on working with scoped paths in Developing exteNd Director Applications.
This section describes how to:
Associate scoped paths directly with the primary property for an activity
Copy scoped paths before or after an activity or a link executes in the flow
You can use a scoped path to associate an object with an activity. To do this, you specify a scoped path as the value for the activity's primary property.
Activities you can associate You can do this with any of the following types of activities:
Two procedures Associating a scoped path with an activity requires two procedures:
To associate a scoped path with an activity's primary property:
Select the activity, then right-click and select Properties.
In the Property Inspector, click the tab that has the primary property. This tab typically has the same name as the activity. For example, the Pageflow activity has a Pageflow tab where you can set the primary property.
Click the primary property for the selected activity. For details, see Workflow activity types.
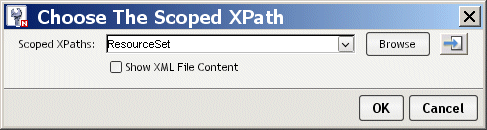
The Choose The Scoped XPath dialog displays showing the default predefined path for this activity type:
The Show XML File Content check box applies to the Browse option. If selected, the XPath Navigator will display the tree contents of the XML file. If not selected the contents will not display. For more information, see To browse to a new path:.
Use one of these methods to specify the path:
Type the path in the text box.
This requires that you know the syntax for the scoped path. For more information, see the section on predefined scoped paths in Developing exteNd Director Applications.
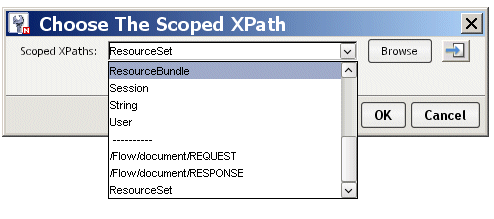
To select another path or a path already defined for this flow:
Select another predefined path from the top of the list, or select a current path (already defined for this flow) from the bottom of the list.
TIP: If you choose a current path that accesses the resource set, you can display the contents of the file by clicking the icon next to the Browse button.
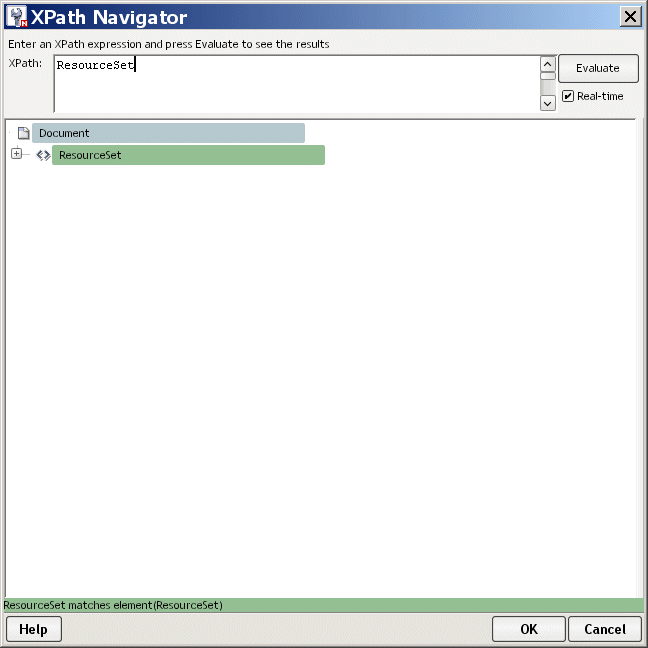
When you click Browse the XPath Navigator displays:
The XPath Navigator is an interactive tool that allows you to specify the path using a tree view (where applicable) and the XPath expression builder. The available options depend on the scoped path you selected.
For more information on using the XPath Navigator, see the section on using the XPath Navigator in Developing exteNd Director Applications.
Editing a scoped path To edit an existing scoped path, repeat the two procedures above (To associate a scoped path with an activity's primary property: and To specify a scoped path:).
With the exception of the Start and Finish activites, you can copy scoped paths before or after the execution of any activity, and copy scoped paths after the execution of a any link.
For design considerations that relate to copying scoped paths, see the section on copying scoped paths in Developing exteNd Director Applications.
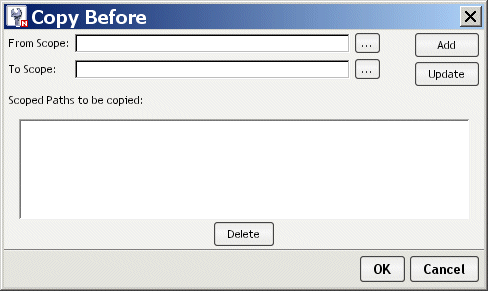
To copy a scoped path before or after an activity:
Select the activity, then right-click and select Properties.
In the Property Inspector click the Copy Scoped XPaths tab.
To copy the scoped path before execution, click the link Edit Scoped XPaths under Copy Before.
To copy the scoped path after execution, click the link Edit Scoped XPaths under Copy After.
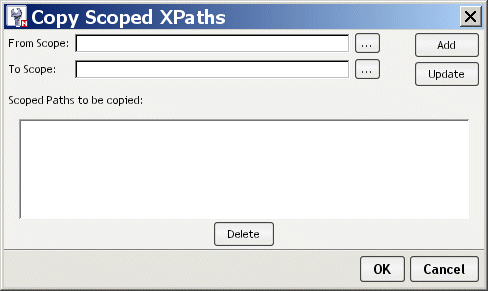
The appropriate Copy dialog (Copy Before or Copy After) displays:
Click the ellipsis for From scope.
The dialog displays the default predefined scope for this activity type. If you want to use another scope, select it from the dropdown list.
To specify the path, use one of the methods described under To specify a scoped path:.
Click the ellipsis for To scope. Repeat the procedure for specifying the From scope.
On the Copy Scope dialog, click Add, then click OK to exit the dialog.
To edit an existing scope, repeat the procedure and click Update instead of Add.
To copy a scoped path after the execution of a link:
In the Property Inspector click the link Edit Scoped XPaths under Copy Scoped XPaths.
Click the ellipsis for From scope
The dialog displays the default predefined scope for this activity type. If you want to use another scope, select it from the dropdown list.
To specify the path, use one of the methods described under To specify a scoped path:.
Click the ellipsis for To scope. Repeat the procedure for specifying the From scope.
On the Copy Scope dialog click Add, then click OK to exit the dialog.
To edit an existing scope, repeat the procedure and click Update instead of Add.
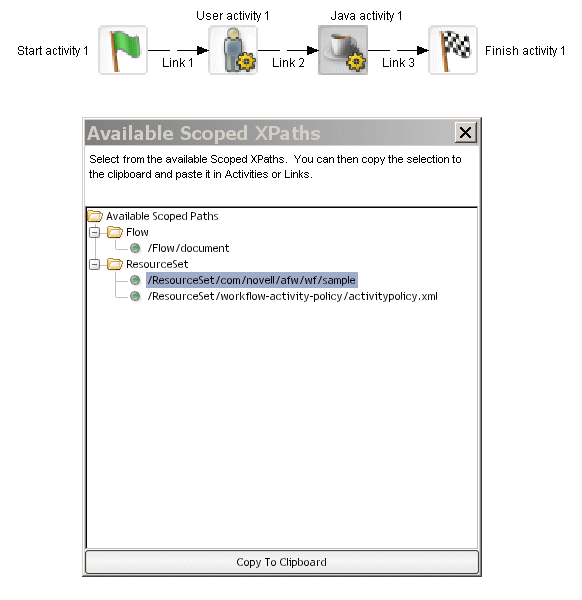
You can view all of the current paths used for a selected object in the flow or for all objects in the flow.
To access current scoped paths for an activity or link:
To access all current paths in the flow:
Click a scoped path. Notice that the objects that use it are highlighted, as shown with the Java activity in this example:
Form the Available Scoped XPaths dialog you can copy a selected path to the clipboard and paste it wherever you want.
To copy a scoped path to the clipboard:
Access the scoped paths using one of the methods described in the preceding section.
Double-click the path or click Copy to Clipboard at the bottom of the dialog.
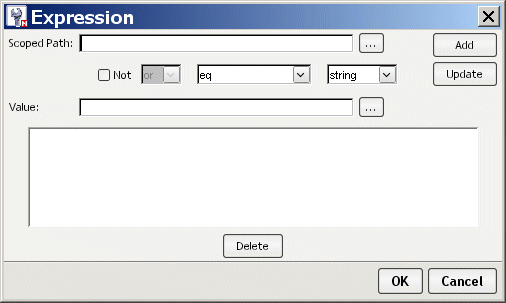
Link expressions let you dynamically route work based on runtime workitem values. The expression builder allows you to test workitem properties in simple or compound expressions that evaluate to true or false. Expressions apply to the Simple link only.
For more information, see Simple link.
Select a Simple link, then right click and select Properties.
In the Property Inspector select Edit Expression.
To specify the path, use one of the methods described under To specify a scoped path:.
In the Value field, specify the value to test against the scoped data.
Select the data type (which must match the scoped data) in the data type dropdown.
Click Add to add the expression to the text area at the bottom.
To add additional clauses to the expression, select the appropriate item from the logical operator dropdown, complete the clause, and click Add for as many clauses as you need.
NOTE: Enable the Not check box to negate the current expression.
You can validate a process at design time whenever you choose. The Workflow Modeler analyzes the process structure and displays any errors encountered. Note that the validation applies to the design-time process structure only.
Labels are separate objects in the graphing environment and have their own property sheets. Labels have two forms: floating and attached.
Floating labels are simply text you place on your workflow graph and have no association with another workflow graph object. Titles, version numbers, notes, and legends are all good uses for floating labels.
Click the location on the graph where you want the label to appear.
Most labels are associated with an activity or link and are called attached labels. By default, activities and links start with a label.
In the Workflow Modeler, right-click an activity icon or link.
An activity or link can have many labels. You can reposition the attached by dragging it to a new location. Note the line that appears as you drag. This line indicates the activity or link the label is attached to.
In the Workflow Modeler, right-click the label and select Properties.
The Property Inspector displays showing the current formatting properties. (If the Property Inspector is already open, just click the label.)
For a description of the UI properties, see Setting object display properties.
Each activity, link, and label has a set of graphical properties associated with it. Select and right-click an element, and the properties of the element are displayed in the Design UI tab in the Property Inspector. The table below describes the graphical properties found on some or all of the elements:
The layout is the arrangement of the activities, links, and labels in your graph. The Workflow Modeler has a sophisticated layout feature that can completely rearrange your graph to maximize readability and minimize space.
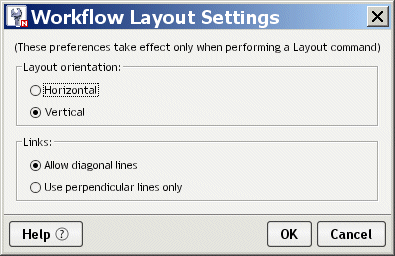
You can specify whether you want the new arrangement to have a horizontal or vertical orientation and whether you want links drawn as diagonal lines or composed of perpendicular segments.
There are two kinds of layout: full layout and incremental layout.
Full layout gives the Workflow Modeler great freedom to move activities, links, and labels around the graph.
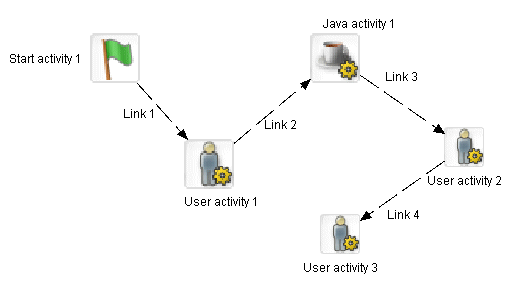
For example, this figure displays a hand-arranged layout:
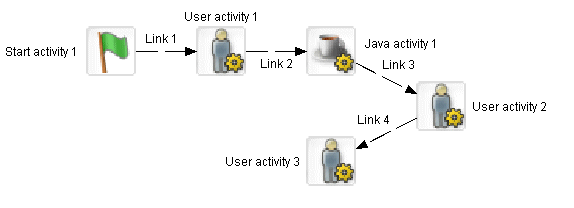
This figure shows the result of applying a full layout to the hand-arranged layout:

Incremental layout attempts to make a graph more attractive and organized but also tries to keep the basic design of your hand-arranged layout.
This figure shows the result of applying an incremental layout to the hand-arranged layout:
To apply an incremental layout:
TIP: Try a layout on your graph and select Edit>Undo to back out of a layout you don't want.
You can set layout preferences for a workflow graph. These preferences let you specify whether you want the new arrangement to have a horizontal or vertical orientation and whether you want link links drawn as diagonal lines or composed of perpendicular segments.
You can undo a layout selection and return to the previous layout.
The Workflow Modeler gives you four ways to zoom:
Select the appropriate icon from the General tab on the toolbar.
Right-click in the Modeler window and select Zoom><option> from the popup window.
The Workflow Modeler includes a drawing grid that works much like the grid in any graphics program:
When the grid is visible, the corners of activity and label objects stick to the intersections of horizontal and vertical grid lines. This makes it much easier to line up objects and use consisting spacing.
When the grid is invisible, objects can be positioned without constraint in one-pixel increments.
Turning the grid on does not reposition existing items to align with the grid.
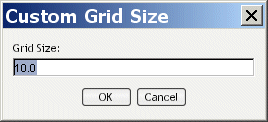
To change the spacing of grid lines (grid size):
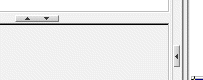
The Bird's Eye View is a popup window that gives you a view of the entire workflow graph to help you find your way around in a large graph. The Bird's Eye View window:
Appears when you click the Bird's Eye View button on the Workflow Modeler toolbar:
Is dismissed by clicking the X button in the upper-right corner
Indicates the area visible in the graph window with a blue outline box
You can use the blue outline box of the Bird's Eye View window to do several useful things:
You can create a custom view of all resource files associated with a workflow. Once you've created the view, you can use display it on the View tab.
TIP: To get to the View tab, you need to first click on the Resources tab in the Navigation Pane.
To create a custom view for a workflow process:
Copyright © 2004 Novell, Inc. All rights reserved. Copyright © 1997, 1998, 1999, 2000, 2001, 2002, 2003 SilverStream Software, LLC. All rights reserved. more ...