10.5 Create an Epoch Data Protection Policy
-
Section 10.5.4, Data Protection through Limited Read/Write Proxy Access
-
Section 10.5.8, Establishing the CouchDB Settings in the Admin Client
-
Section 10.5.10, Execute a Scan for an Epoch Data Protection Policy
-
Section 10.5.11, Execute an Integrity Check for an Epoch Data Protection Policy
-
Section 10.5.12, Recovering Data Using the Data Owner Client
10.5.1 Overview
Epoch Data Protection policies allow File Dynamics customers to maintain nearline archives of High-Value Target (HVT) shares or folders principally stored in a network file system. Administrators known as “Data Owners” can view and access the archive of the HVT as it existed at a selected point in time. In essence, it is a “time machine” for the data and associated permissions on the HVTs.
With Epoch Data Protection, Data Owners can:
-
Quickly recover file data – this may be required as a result of:
-
Ransomware attacks resulting in corrupted files
-
Inadvertently corrupted, deleted, or lost files
-
The need of data in files as the files existed at some point in the past
-
-
Easily recover permissions – this may be necessary because of:
-
Lost or destroyed permissions
-
Inadvertently changed permissions
-
The need to inspect permissions as they existed at some point in the past.
-
10.5.2 Unique Data Protection Capabilities
Epoch Data Protection is not intended to replace an enterprise’s primary backup system. It is meant to be a way to place additional and alternative protections on specific HVTs on your network. These are some of the reasons why a network administrator might look to Epoch Data Protection for data recovery instead of traditional primary backup:
-
More granular view and access to data and security
-
More direct control over the data protection process for HVTs
-
Primary backup system failure
-
Primary Backup media failure
-
Delays in data recovery from the primary backup system
-
Demonstration of increased commitment to data protection for HVTs
10.5.3 General Operation
A network administrator establishes an Epoch Data Protection policy for an HVT. The policy creates, populates, and manages the nearline storage archive and in the process, creates a number of “Epochs,” or representations of the data contents and permissions of the HVT at the time the View was created.
HVTs are archived according to the schedule specifications defined in the Epoch Data Protection policy, or performed on-demand from the Admin Client.
When required, a Data Owner uses the Data Owner Client to access the list of Epochs maintained by the policy and selects one to load. The appearance mimics Windows Explorer in terms of showing the folder tree structure, listing files, and associated metadata.
10.5.4 Data Protection through Limited Read/Write Proxy Access
Epoch Data Protection uses limited read/write proxy access to archive locations. This means that there is no direct user access to archive locations – preventing the potential for infected users to corrupt archived files. Thus, data and their permissions remain protected from ransomware and other malware threats.
An example scenario might best demonstrate this protection. Suppose an organization has an Epoch Data Protection policy that archives files and permissions from HVTs once a day. One of the HVTs is a Customer Account folder. On July 10, someone in Accounts Payable gets an email with the subject: “Invoice” and opens the attached file, introducing a ransomware virus to her computer and the network.
The IT Department quickly locates the ransomware virus and removes it from the workstation and network, but upon examination, sees that there are multiple files in the Customer Account folder that have become renamed and encrypted.
The Data Owner is contacted and asked to recover archives of the encrypted files and their permissions. The Data Owner opens a View or Epoch from July 9, observes through a rendering of the files that they are not corrupted, and schedules a recovery of the files to their original location on the network.
The Engine, Phoenix Agent, and proxies recover the files – and this complete recovery of data and permissions can take only a few minutes.
10.5.5 Prerequisites
Epoch Data Protection requires that you do the following prerequisite tasks:
-
Create a new share as a location for the data store – in other words, the location where the Epochs are stored.
The size must be large enough to store all of the files and folders of your High-Value Targets, along with any files that become updated over time, with considerations for how long you will store Epochs, and the frequency of updates.
-
Set access permissions to the share hosting the data store.
IMPORTANT:A significant benefit of Epoch Data Protection policies is the ability to archive files from High-Value Targets securely on nearline storage. As a best practice, Micro Focus recommends that when you establish the data store (i.e. nearline storage), that you limit access to only the fdproxyrights group and the fdadmins group.
This limited access protects the data store from the potential for malware being introduced through direct access from an infected user.
10.5.6 Epoch Data Protection Components
Epoch Data Protection policies require the following additional components:
-
CouchDB instance
Stores the metadata pertaining to the files from HVTs.
NOTE:If you upgraded from Storage Manager for Active Directory 5.2 and previously installed CouchDB for Work Log reports, you will be able to configure Epoch Data Protection policies by utilizing the existing CouchDB server host.
-
Phoenix Agent
Performs all of the scanning, checks data integrity, does all of the copying and recovery of data.
-
Data Owner Client
Means of presenting Epochs, recovering data, and seeing file renderings.
10.5.7 Installing CouchDB
Procedures for installing CouchDB are included in Installing CouchDB of the File Dynamics 6.5 Installation Guide.
10.5.8 Establishing the CouchDB Settings in the Admin Client
Follow these procedures to establish the CouchDB settings in the Admin Client.
-
In the Admin Client, click the Configuration tab.
-
Click Target-Driven Configuration.
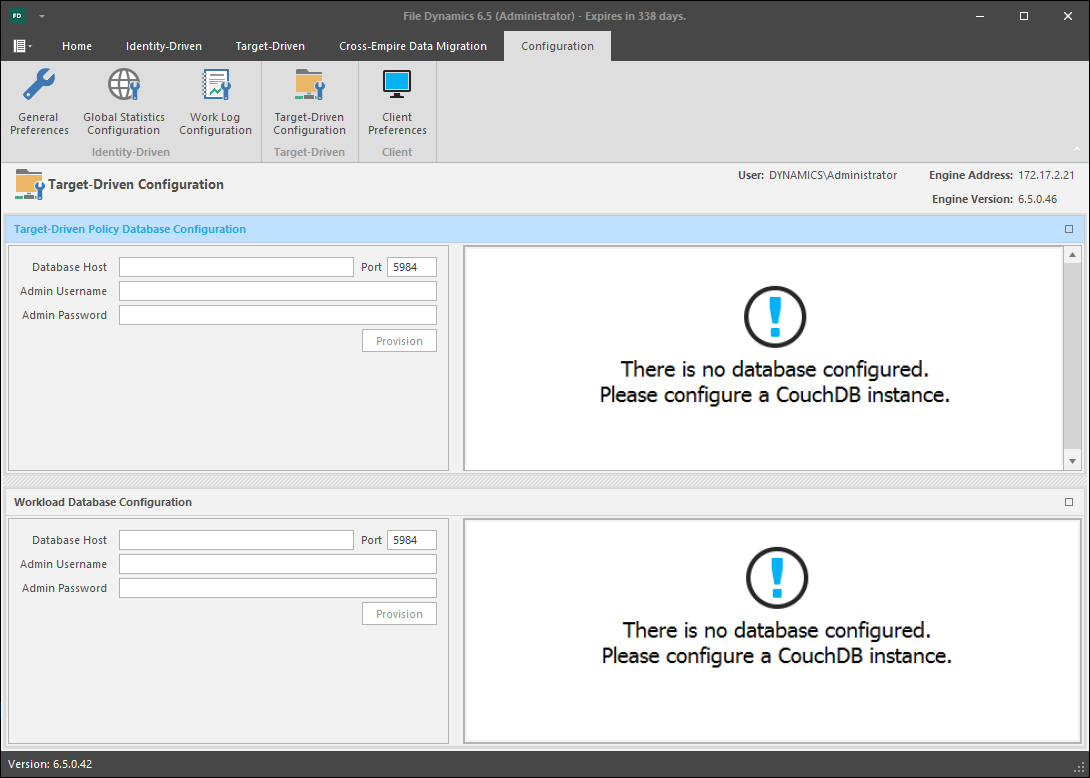
The Target-Driven Database Configuration heading is blue, indicating that the fields in that region of the page can be edited.
-
In the Database Host field, enter the IP address or DNS host name or the server hosting CouchDB.
-
Set the Port field address setting to 5984.
-
Enter the CouchDB admin username and password and click Provision.
-
When notified that the database settings have been saved, click OK.
10.5.9 Creating an Epoch Data Protection Policy
With the CouchDB now configured to communicate with the Admin Client, you are ready to create Epoch Data Protection policies.
IMPORTANT:When upgrading from File Dynamics 6.x you will need to re-provision the database to update the CouchDB schema before your File Dynamics 6.x notification policies can be updated. After the schema has been updated, each legacy Security Notify policy will need to be updated with the new required information for the new options.
-
In the Admin Client, click the Target Driven tab.
-
Click Policies.
-
Select New > Epoch Policy.
-
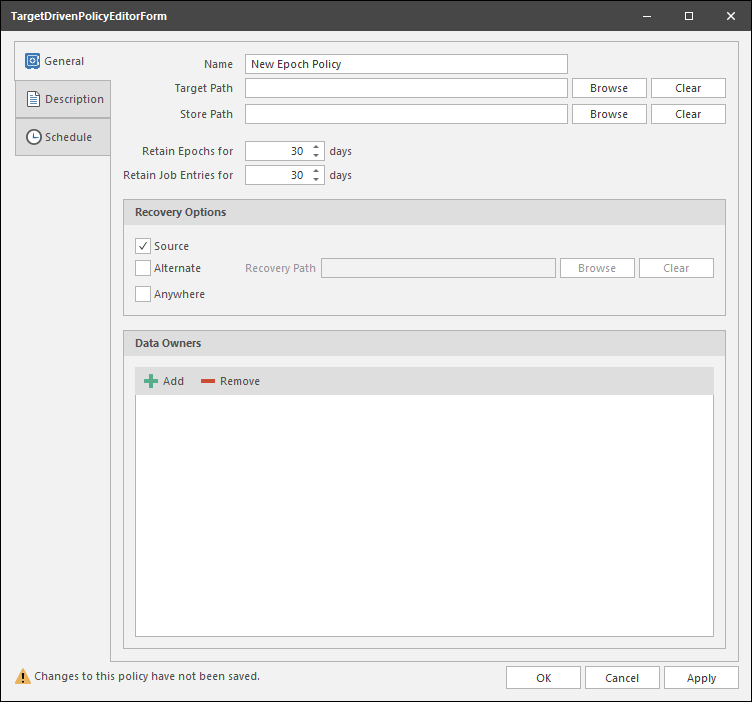
In the Name field, give the Epoch Data Protection policy a descriptive name.
For example, Sales Records and Projections.
-
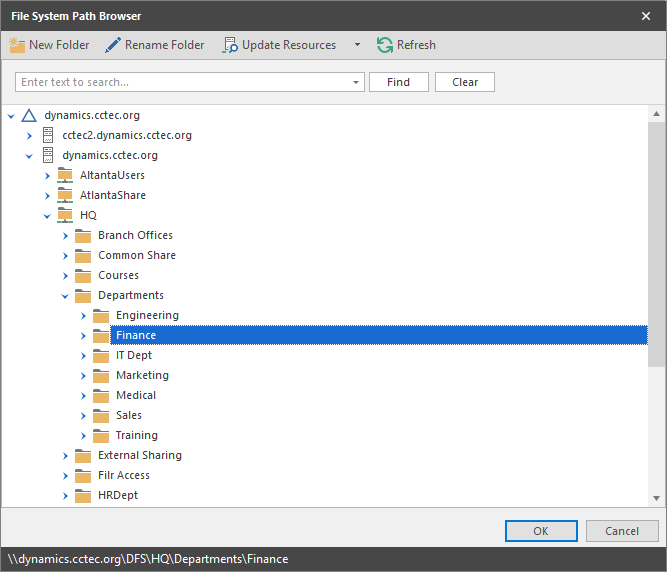
Click the Browse button that pertains to the Target Path field.
-
In the File System Path Browser, specify a High-Value Target in the file system from where you will be archiving files for this policy.
-
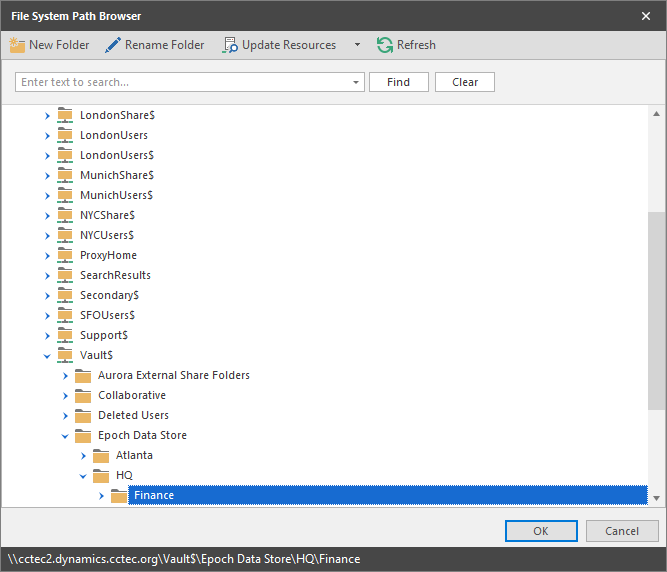
Click the Browse button that pertains to the Store Path field.
-
In the File System Path Browser, specify the nearline storage location in the file system where archived files from HVTs are to be stored for this policy.
-
In the Retain Epochs for field, specify the number of days that an Epoch will be saved before it is purged.
-
In the Retain Job Entries for field, specify the number of days that a job will be listed on the Target Policy Jobs page before it is removed.
-
In the Recovery Options region, specify where the Data Owner will be allowed to place recovered files for this policy.
Source: Selected by default, this specifies that recovered files will be placed back in the location where the files are or were originally.
Alternate: This lets you specify an alternate location for placing recovered files. Once you check the Alternate check box, a text box and associated Browse button appear so that you can enter or browse to the alternate path.
Anywhere: This lets you place recovered files anywhere that the user of the Data Owner Client can browse to.
Recovery Path: If the Anywhere check box is deselected, you can use the Browse button to specify a recovery path in this field.
-
Click Add.
-
In the Directory Services Browser, locate and select users or groups that will be Data Owners for this policy.
-
Click the Description tab and in the Description field, specify any information you want to include pertaining to this policy.
-
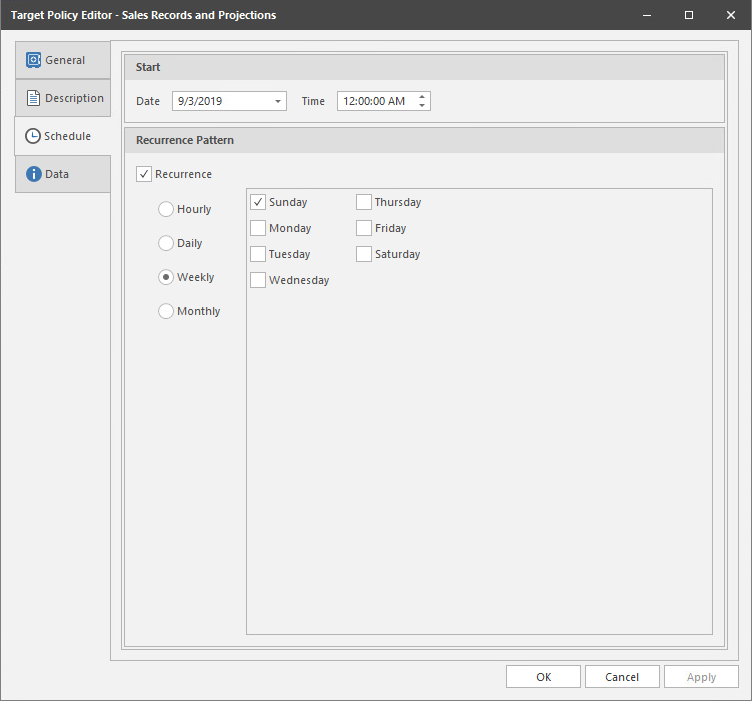
Click Schedule.
-
In the Date field, specify the date you want the policy to be initially invoked.
-
In the Time field, specify the time you want the policy to be initially invoked.
-
In the Recurrence Pattern region, select one of the options.
-
Click Apply to save the schedule.
-
Click OK.
10.5.10 Execute a Scan for an Epoch Data Protection Policy
The term “Scan” means the act of archiving a High-Value Target to nearline storage. This is conducted through a schedule specified in the Epoch Data Protection policy, but it can also be performed at the moment you want to.
-
In the Admin Client, click the Target Driven tab.
-
Click Policies.
-
Right-click the Epoch Data Protection policy for which you want to execute a scan and select Execute.
-
When the confirmation dialog box appears, click Yes.
-
(Optional) Click Jobs to view the status of the Scan job.
10.5.11 Execute an Integrity Check for an Epoch Data Protection Policy
An Integrity Check verifies that the CouchDB and corresponding data store file system are in a consistent and correct state.
The Integrity Check will ensure that all referenced files are locatable on disk. It flags any reference to files that could not be found in the data store. Likewise, the data store is examined to ensure that every file found within it has a corresponding reference in the database. Anything in the data store that's not referenced gets removed. This facilitates cleaning up remnants of aborted or interrupted Epochs.
-
In the Admin Client, click the Target Driven tab.
-
Click Policies.
-
Right-click the Epoch Data Protection policy for which you want to execute an Integrity Check and select Execute > Integrity Check.
-
When the confirmation dialog box appears, click Yes.
-
(Optional) Click Jobs to view the status of the Integrity Check job.
10.5.12 Recovering Data Using the Data Owner Client
Once HVTs have been archived to Epochs, the Epochs become the means of recovering data and permissions via the Data Owner Client. Procedures for recovering data using the Data Owner Client are detailed in the File Dynamics 6.5 Data Owner Client Guide.