12.2 Identity Driven Tab
The Identity Driven tab provides access to tools for creating and managing Identity-Driven policies in File Dynamics.
12.2.1 Statistics
This page charts graphical statistics for all Identity-Driven actions taken over a specific period of time.
Figure 12-7 Statistics Page

By default, all actions indicated in the legend will appear on the chart. To make the chart less busy, you can remove categories by holding the Control key and in the left pane, deselecting categories.
12.2.2 Identity Objects
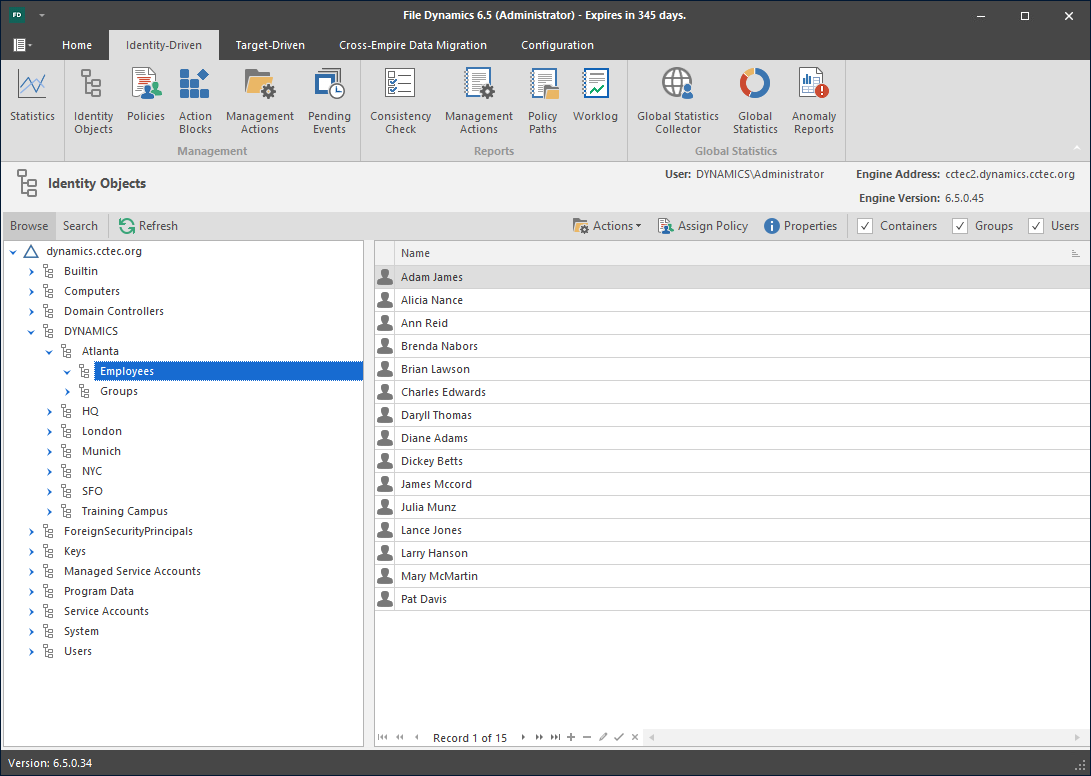
The Identity Objects page lets you manage the associations between File Dynamics Identity-Driven policies and Active Directory objects such as organizational units, groups and users. This management includes creating organizational units, setting context, viewing properties, performing Management Actions, and assigning policies.
Figure 12-8 Identity Objects Page
Left Pane
Use the left pane to browse and select organizational units in the directory. Right-clicking an organizational unit in the left pane lets you take additional actions:
-
Create an organizational unit (OU)
-
Set the directory context in the left pane to display the hierarchy from the root or from the selected organizational unit
Right Pane
Use the right pane to view the objects within a selected organizational unit as well as view properties, perform Management Actions, and assign policies. The right pane displays containers (organizational units), groups, and users, according to what you have selected in the Filter check boxes.
IMPORTANT:When you perform actions in the right pane, it is important that you know whether you are performing management specific to users, groups, or organizational units (containers).
Assign Policy
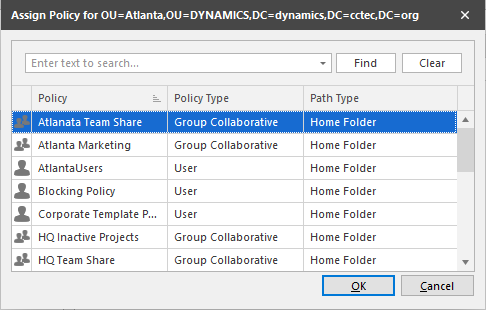
Right-clicking a User, Group, or Organizational Unit object and selecting Assign Policy lets you easily assign any of these objects a policy while you are in the Objects page. If an effective policy is already assigned to one of these objects, you can assign a new policy, replacing the effective policy with an assigned policy.
Figure 12-9 Policy Selector Dialog Box
Properties
You can easily view an expanded set of object properties in the Objects page by right-clicking an object in the right pane and selecting Object Properties.
The five tabs display the following information:
Properties: Displays Active Directory values and Engine database values. If you are working with a Micro Focus Support representative to resolve a problem, you might need to provide information from this page.
Effective Policies: Lists all of the effective policies for the selected object. An effective policy is a policy that affects a user either directly through association or inheritance by membership in a domain, container, or group.
Associated Policies: Lists all of the associated policies for an object. An associated policy is an explicitly assigned policy associated with a domain, container, group, or user.
Transactions: Shows pending events for the selected object. If there are many pending events, but you only want to see those pertaining to a particular user, you can see the pending events for the User object.
History: The GSR Collector maintains multiple histories for an object in Active Directory.
The FDN History records the FDN and SAM Account name of an object, when applicable (e.g. organization unit objects do not have a sAMAccount attribute). When an object gets renamed or moved, on the next run, it will catalog the new location or new name and the corresponding timestamp when the change was recorded.
The Path History records the location of paths that are commonly associated to users. When the Active Directory schema is extended to support user auxiliary storage and collaborative storage, the managed path attributes for user auxiliary, groups, and containers can be cataloged as well. The Path History consists of path types that are managed by File Dynamics. The possible recorded path types are:
-
User Home folder
-
User Profile path
-
User Remote Desktop Services Home Folder
-
User Remote Desktop Services Profile Path
-
User Auxiliary (ccx-FSFAuxiliaryStorage)
-
Collaborative – Groups (ccx-FSFManagedPath)
-
Collaborative – Container (ccx-FSFManagedPath)
The granularity of the historical data is only as fine as the frequency at which you schedule the GSR Collector to run. For more information, see Section 12.2.11, Global Statistics Collector.
If you schedule it to run once a week and you have objects that move several times over the course of a week between the runs, you’ll lose the interim historical move data.
The GSR Collector's historical data can be especially useful when managed paths are moved based on policy.
To view the history of an object, from the Objects page, display a User object in the right pane and then double-click it.
In the Object Properties dialog box, click the History tab.
The example below shows an unmanaged user without a cataloged path.
Figure 12-10 Example of an Unmanaged User without a Cataloged Path
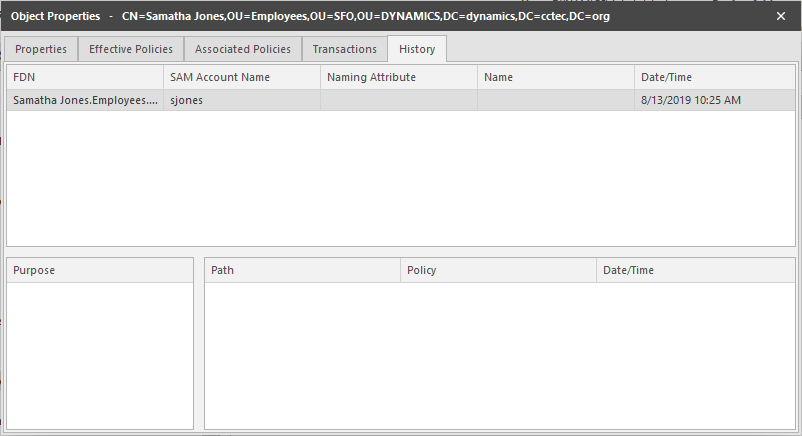
The FDN column is the LDAP formatted location of the object. The SAM Account Name column is the sAMAccount attribute value. The Date/Time column is based on the local time of the Engine when the history record was cataloged.
The example below shows the same unmanaged user that was moved from one organizational unit to another. This example demonstrates a change in the FDN and the date when the new value was cataloged by the GSR Collector when it was run.
Figure 12-11 Example of a Moved Unmanaged User
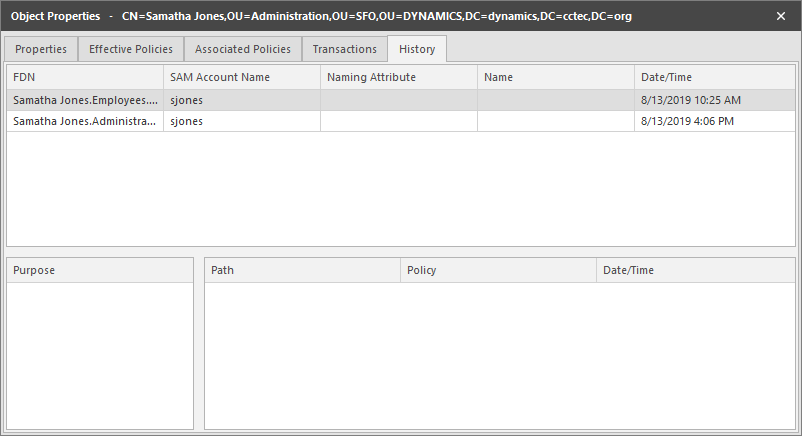
The example below shows an unmanaged user that has a home folder. The Policy column is empty because this user has not been managed. The Date/Time column for the path indicates the time at which the GSR Collector recorded the path.
Figure 12-12 Example of an Unmanaged User with a Home Folder
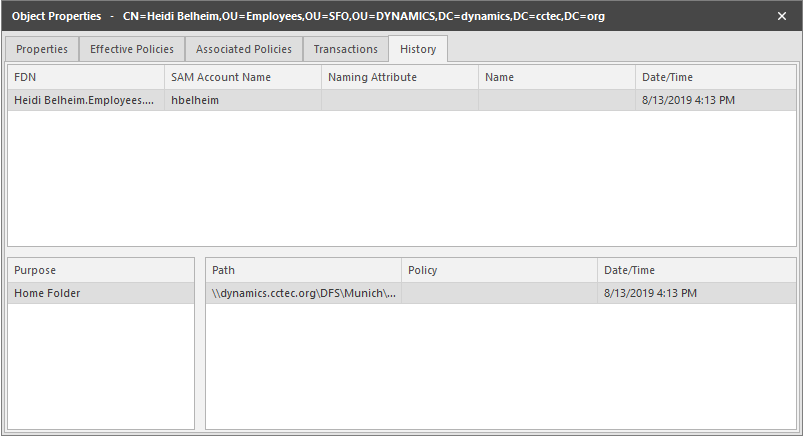
The example below shows the same user that has now been managed. The path now contains two entries. The first path reflects when the user was originally cataloged. The second path reflects that the user is now managed and the policy that is managing it. This is useful because the Date/Time for Policy “History” indicates when the object became managed.
Figure 12-13 Example of a Managed User
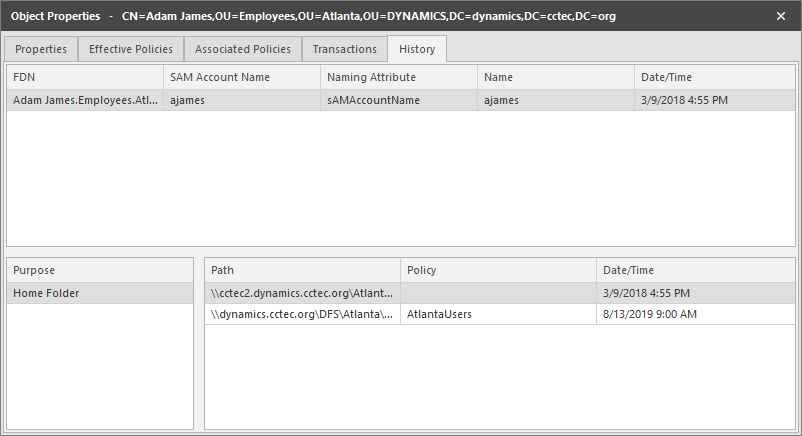
The example below shows the same user has now been moved from one container to another that is managed by a different policy. The user’s new FDN has been recorded as well as the new location of the path.
Figure 12-14 Example of a Moved Managed User
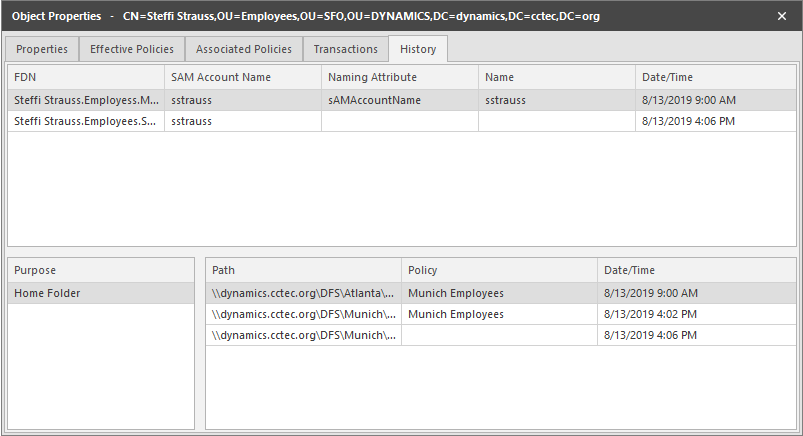
The example below shows the same user has now been moved to a container that is not managed by policy. The Policy column now shows that the path is no longer managed by an effective policy.
Figure 12-15 Example of a Moved User to a Container Not Managed by a Policy
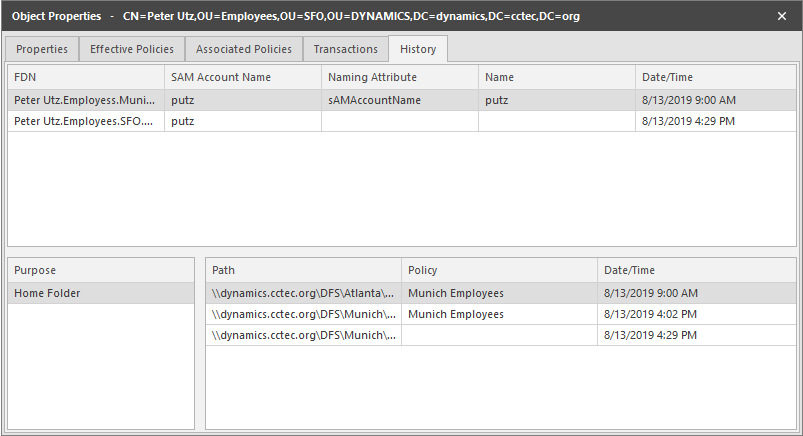
The History data also tracks the rename of objects and the relevant paths. The example below shows a managed user before it has been renamed.
Figure 12-16 Example of a Managed User Before Being Renamed
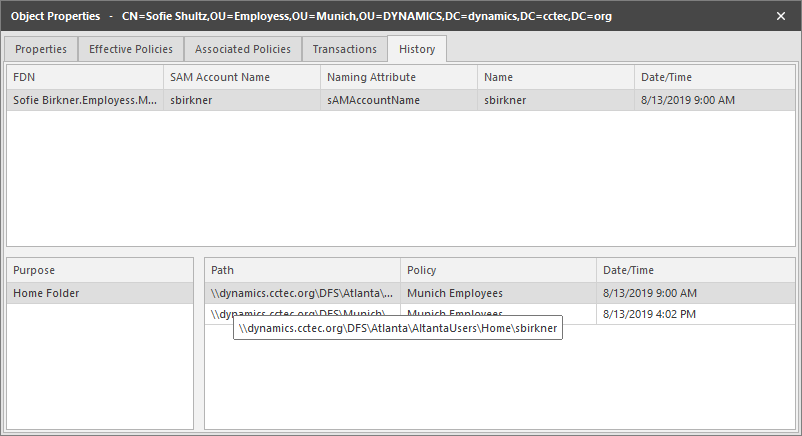
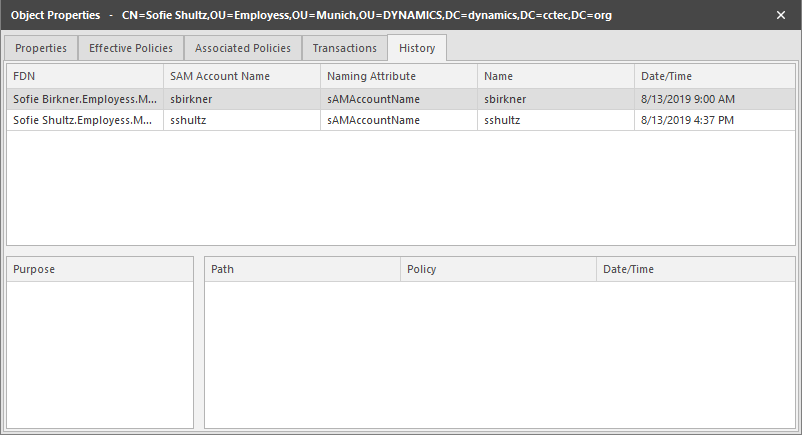
The example below shows the new FDN, SAM > Account Name, and Path after having been renamed.
Figure 12-17 Example of a Managed User After Being Renamed
12.2.3 Policies
The Policies page displays all policies, along with a summary of policy details. When you select a policy, applicable tools in the toolbar are activated. A summary of the toolbar follows.
NOTE:All of these tools are also accessible by right-clicking a selected policy.
Manage: Lets you create any of the following policies:
-
User Home Folder
-
User Profile Path
-
User Remote Desktop Services Home Folder
-
User Remote Desktop Services Profile Path
-
Group Multi-Principal Collaborative
-
Group Collaborative
-
Container Collaborative
-
Auxiliary
Edit: Brings up the Policy Editor, where you can edit the selected policy.
Rename: Lets you rename the selected policy.
Delete: Lets you delete the selected policy.
Auxiliary Purpose Mappings: Selecting this brings up the Auxiliary Purpose Mappings page, where you can establish or edit Auxiliary Purpose Mappings.
Auxiliary policy mappings give you the ability to specify a purpose or classification for auxiliary storage policies. For example, you might want to create an HR purpose for all of the auxiliary storage policies that create HR folders for employees. With each of the auxiliary storage policies that create HR folder assigned the same purpose, it makes it possible for File Dynamics to make intelligent decisions for auxiliary storage when a user is moved.
For example, if a user in the Detroit office transfers to the Dallas office, and the user has a home folder and an auxiliary storage folder in the Detroit office’s HR department, you want to migrate both the home folder and the auxiliary storage folder to correct locations in Dallas. Having the Detroit auxiliary storage policy and the Dallas auxiliary storage policy identified with the same HR purpose, ensures that the user moved from Detroit to Dallas, will have his auxiliary storage properly established with the move. For procedures on establishing Auxiliary Purpose Mappings, see Section 6.11.4, Establishing Auxiliary Purpose Mappings.
Import: Provides the ability to import policies that were previously exported through the Export menu option.
NOTE:Policy associations are not imported. After policies are imported, you need to associate the policies to containers or groups.
For more information on importing policies, see Section 6.13, Importing Policies.
Export: Provides the ability to export policies so that they can be imported later. For example, many customers first evaluate File Dynamics in a lab environment and create a large number of policies in the process. You can export these policies and later import them into the production environment. All exported policies are saved in a single XML file. For more information, see Section 6.12, Exporting Policies.
Actions: Provides menu options that are applicable to Auxiliary policies. To activate this menu, click an Auxiliary policy. Menu options include Manage, Groom, > Apply Attributes, Apply Quota, Apply Rights, and Assign Auxiliary Attributes.
Redistribute: Allows you to define additional target paths in the policy and then redistribute or load-balance the data among the various paths.
Figure 12-18 Redistribute Policy Paths Dialog Box
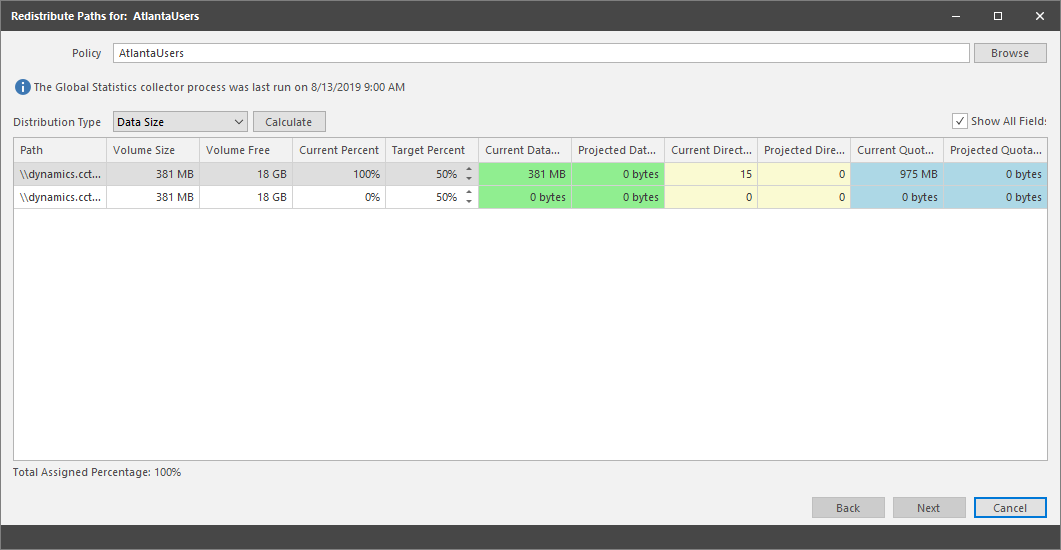
Using the Redistribute Paths dialog box, you can redistribute the user and collaborative storage across the target paths associated with a policy.
NOTE:The data displayed in the dialog box is taken from the most recent report from the GSR Collector.
Use the Distribution Type drop-down menu to view your data distribution according data size, directory count, and quota commitment.
Click Next to view the current locations of the home folders and collaborative storage folders, and the location where File Dynamics proposes to redistribute the folders. If you want, you can deselect a folder for distribution by deselecting the check box corresponding to the folder. You can also indicate a new target path for the folder by clicking in the Target Policy Path column and selecting a new target path.
Clicking Submit begins the process of redistributing the folders.
Search: Provides a search field for locating policies.
Refresh: Refreshes the list of policies.
NOTE:Refreshing locks the database during the refresh operation. For best performance, do not refresh more than is necessary.
Reload: Reloads your policies from the database. You can use this tool, for example, if you have a new policy that is not displayed in the list.
Check Boxes: The Admin Client shows only the policy types that are checked.
12.2.4 Action Blocks
This page lets you create Action Blocks that can be linked to a policy.
Overview
Action Blocks allow the sharing of specific policy options between multiple policies. The design goal behind Action Blocks is to provide a framework where the sharing of options between policies can be achieved in a straightforward and easy to understand manner.
Figure 12-19 Action Block Overview
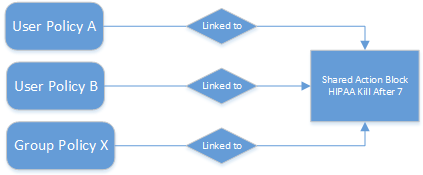
Action Blocks do not introduce a new policy type. Rather, they are extensions of policies in that the set of options they represent are not contained within the policy itself. This eliminates the need for policies to inherit from each other and promotes the sharing of general and often-repeated policy options such as groom and vault rules. Existing User, Group, and Collaborative policy types remain as they previously did with the exception that they have been extended to support a relationship value providing the necessary link for a given Action Block.
An Action Block can have a many-to-one relationship. This means that any number of policies can share any particular Action Block for a given policy option. Action Block inheritance cannot be chained. That is to say, “Policy A” cannot inherit the Filter rules from “Groom Block A” and “Groom Block B”. “Policy A” can only be to linked to one of the two Action Blocks and they do not inherit from each other. When changes are made to an Action Block, those changes are implicitly taken up by every linked policy. Thus, before making changes to an Action Block, it is important to understand the impact of those changes. As with normal event processing and policy editing, if a change is made to an Action Block while an event is in-flight for its given options, those changes may not be reflected in the outcome of the event.
Private Versus Shared
Regardless of an Action Block’s type, it is either Private or Shared.
A Private Action Block represents a set of policy options that aren’t shared, yet have been migrated to the Action Block architecture. Private Action Blocks are also created and associated to a policy when the policy is upgraded as new Action Block types are supported. Below is an example of the relationships between policies and their Private Action Blocks for Filters. Any of these might be the result of creating a new policy with Groom Rules or an upgrade from the legacy policy architecture.
Figure 12-20 Relationships Between Policies and their Private Action Blocks for Filters
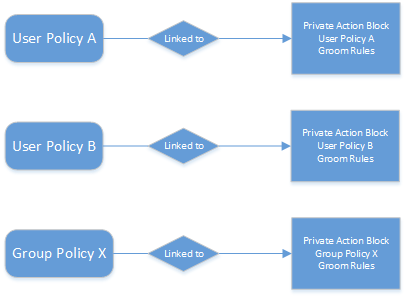
When you create an Action Block, it is automatically marked as Shared and is available for being shared with other policies. However, if you edit a policy that does not derive a particular policy option from an Action Block, a Private Action Block is created and associated to the policy when the policy is saved. If you change a policy that has a Private Action Block to use a Shared Action Block, the policy’s Action Block reference is updated to that of the Shared Action Block and the Private Action Block is deleted.
Figure 12-21 Shared and Private Action Block Associations
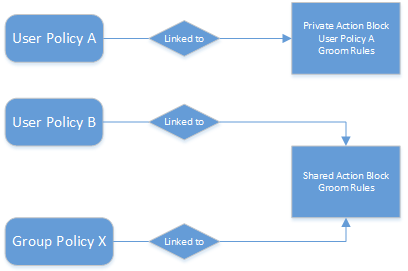
By default, a Private Action Block is not viewable in the list of Shared Action Blocks.
Creating a Filter Action Block
-
In the Admin Client, click the Identity Driven tab.
-
Click Action Blocks.
-
Select Manage > New> Filter.
-
In the Name field, give the new Action Block a name and click OK.
The following dialog box appears:
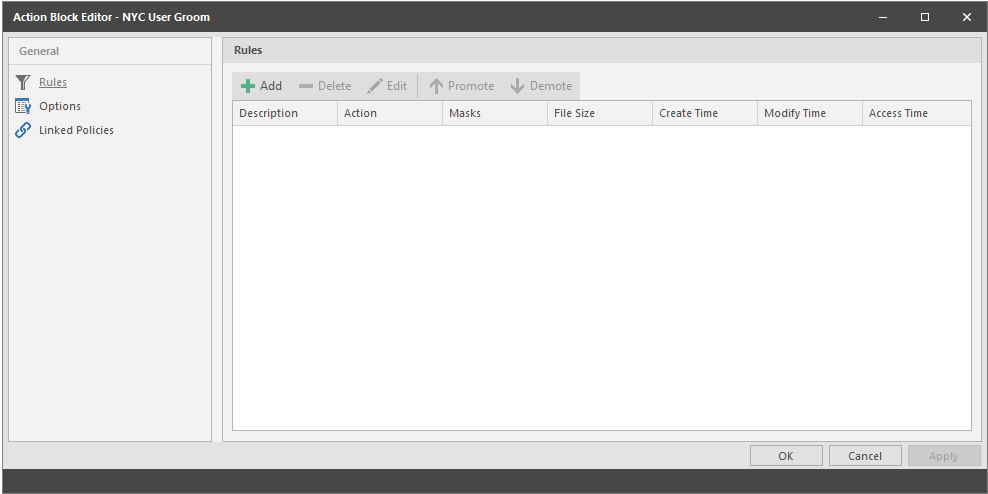
Rules: Rules are composed of the standard File Dynamics rule options. Rules cans be added, deleted, edited, promoted, and demoted. Once a Filter Action Block is saved, those settings will be effective immediately.
Options: The Description option can be used to provide detailed context for the usage and implementation of the Filter Action Block.
Linked Policies: Linked Policies is a read-only view of which policies are linked to the Filter Action Block.
-
Click Add.
-
In the Rule Editor, specify the parameters for the Action Block Filter and click OK.
For procedures on entering settings in the Rule Editor, see Section 6.5.8, Setting Vault Rules.
-
Click OK to close the Action Block Editor dialog box.
Linking Filter Action Blocks
Filter Action Blocks can be linked to the following:
-
Policy-based Vault
-
Policy-based Groom
Linking a Filter Action Block to a Policy
These procedures specify how to link a Filter Action Block to an existing policy. You can also link a Filter Action Block to a new policy as you create one.
-
In the Admin Client, click the Identity Driven tab.
-
Click Policies.
-
Right-click a selected policy and select Edit.
-
Click either Vault or Groom.
-
Click Link Action Block.
-
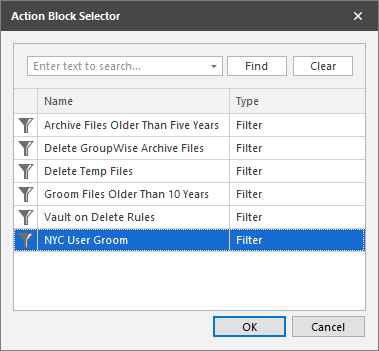
From the Action Block Selector dialog box, select the Filter Action Block you want to link.
-
Click OK.
The link is specified in the Groom Rules or Vault on Delete Rules header.
When a policy's Vault or Groom Rules are linked to a Filter Action Block, the rules displayed in the policy editor are read-only. To edit the Filter Action Block, click the name as it appears in the header.
-
Click OK to save the link.
Creating a Managed Path Naming Attribute Action Block
You can use a Managed Path Naming Attribute Action Block to specify the naming attribute and its corresponding definition, to an existing policy.
For specifications pertaining to Managed Path Naming Attribute, see Section F.0, Managed Path Naming Attribute Specifications.
-
In the Admin Client, click the Identity Driven tab.
-
Click Action Blocks.
-
Select Manage > New> Managed Path Naming Attribute.
-
In the Name field, give the new Action Block a name and click OK.
The following dialog box appears:
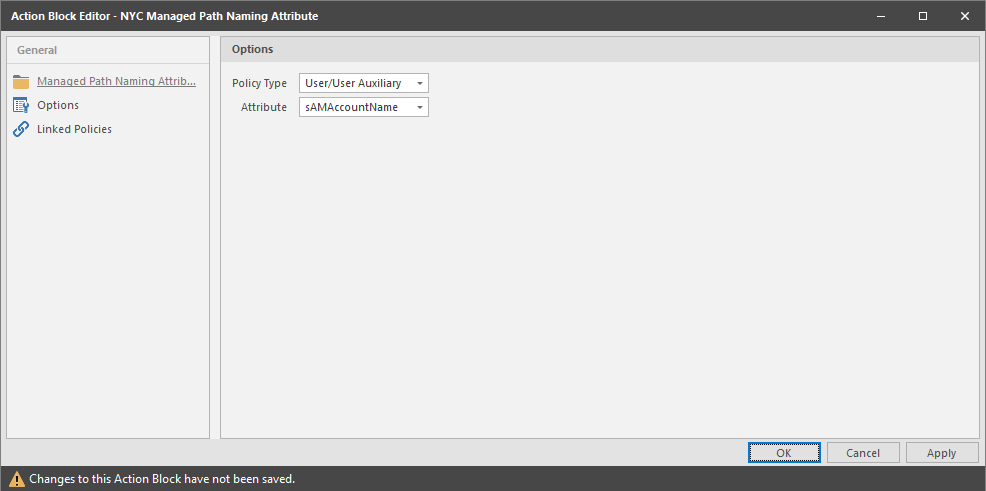
Managed Path Naming Attribute: Displays the Policy Type and Attribute drop-down menus.
Options: The Description option can be used to provide detailed context for the usage and implementation of the Managed Path Naming Attribute Action Block.
Linked Policies: Linked Policies is a read-only view of which policies are linked to the Managed Path Naming Attribute Action Block.
-
From the Policy Type drop-down menu, specify whether the Managed Path Naming Attribute Action Block will be linked to a User/User Auxiliary policy or a Group Collaborative storage policy.
The attributes types that you can select vary based on the selected policy type.
-
From the Attribute drop-down list, select one of the single-valued Active Directory attributes for the User or Group object.
You have the ability to specify an attribute other than sAMAccountName. This ability was added to provide network administrators the ability to give provisioned folders a more descriptive name.
Once you select a different attribute, you can then use an account provisioning system such as Micro Focus Identity Manager to automatically populate the selected attribute with a desired folder name and then File Dynamics will automatically provision the home folder based on this attribute setting.
For more information, see Section 6.5.4, Setting Target Paths.
-
Click Apply.
Linking a Managed Path Naming Attribute Action Block to a Policy
These procedures specify how to link a Managed Path Naming Attribute Action Block to an existing policy. You can also link a Managed Path Naming Attribute Action Block to a new policy as you create one.
-
In the Admin Client, click the Identity Driven tab.
-
Click Policies.
-
Right-click a selected policy and select Edit.
-
In the Policy Editor, click Target Paths.
-
Click Link Action Block.
-
Select the Action Block you want to link.
-
Click OK.
Creating a Move Schedule Action Block
Use Move Schedule Action Blocks to standardize when data can be moved during data movement operations.
-
In the Admin Client, click the Identity Driven tab.
-
Click Action Blocks.
-
From the Manage menu, select New > Move Schedule.

-
Enter a descriptive name for the new Action Block and click OK.
The following page appears:
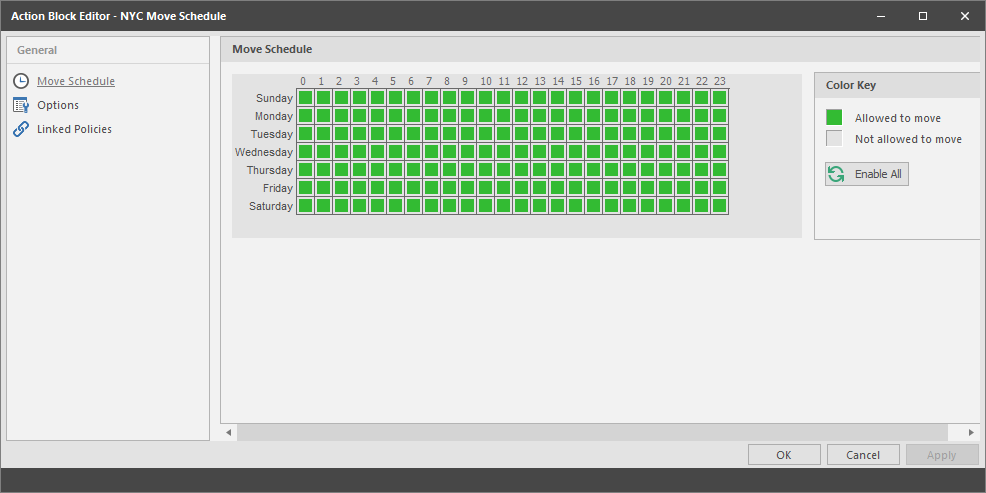
By default, all days and times are available for data movement. If data movement during regular business hours creates unacceptable network performance, you can choose to move data after regular business hours.
-
In the Move Schedule grid, click the squares for the day and hour you want to disable for data movement.
-
Click Apply to save your settings.
-
Click OK to close the page.
Linking a Move Schedule Action Block to a Policy
These procedures specify how to link a Move Schedule Action Block to an existing policy. You can also link a Move Schedule Action Block to a new policy as you create one.
-
In the Admin Client, click the Identity Driven tab.
-
Click Policies.
-
Right-click a selected policy and select Edit.
-
In the Policy Editor, click Move Schedule.
-
Click Link Action Block.
-
Select the Action Block you want to link.
-
Click Apply to save your settings.
-
Click OK to close the page.
Creating a Multi-Principal Suffix Mapping Action Block
Use Multi-Principal Suffix Mapping Action Blocks to standardize the groups and their associated permissions for the collaborative storage folders that are provisioned by File Dynamics.
-
In the Admin Client, click the Identity Driven tab.
-
Click Action Blocks.
-
From the Manage menu, select New > Multi-Principal Suffix Mapping.

-
Enter a descriptive name for the new Action Block and click OK.
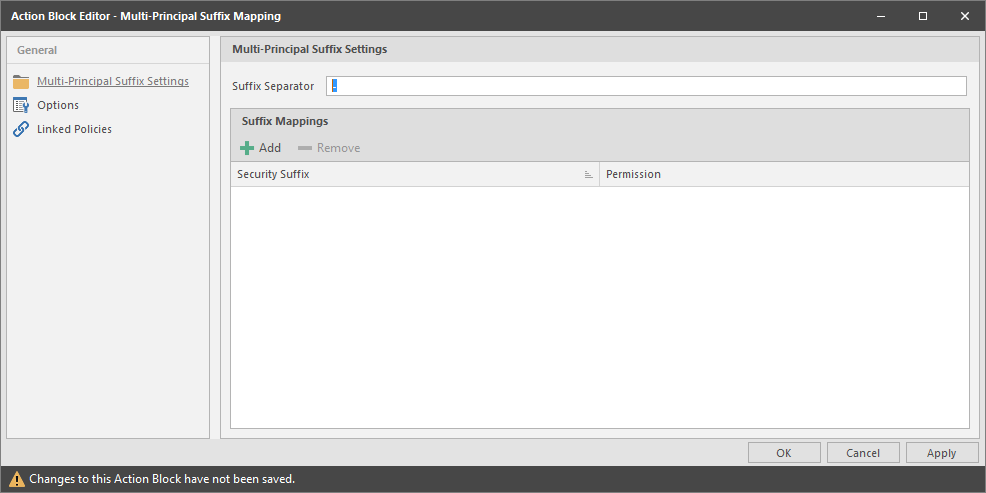
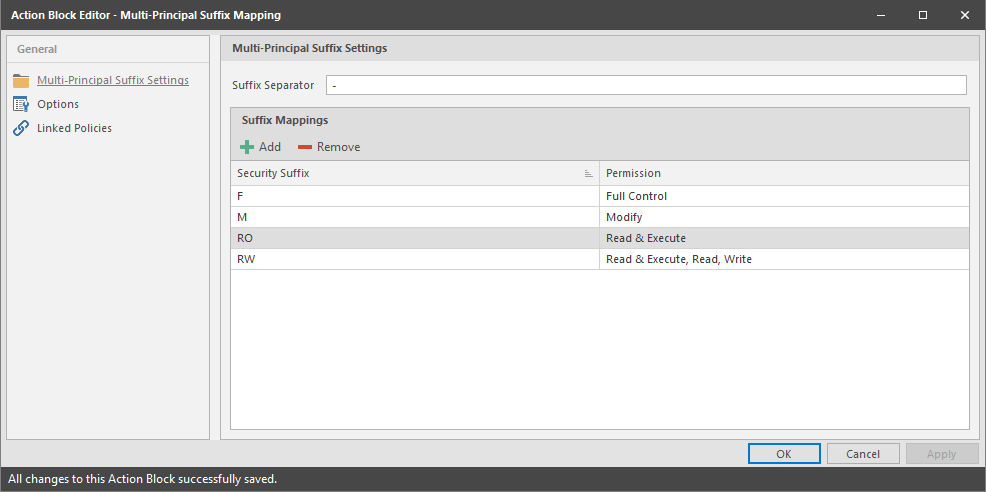
The following page appears:
-
Click Add.
-
In the Security Suffix column, highlight SampleSecuritySuffix and edit it to a more descriptive name of a group that will access the collaborative storage folder.
-
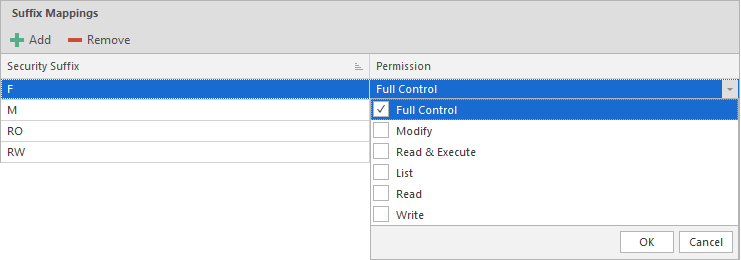
Click the Full Control setting to access a drop-down menu of access permissions.
-
Specify the permissions for the particular group and click OK.
-
Repeat Step 5 through Step 8 to create all groups and permissions to the collaborative storage folder.
-
Click Apply.
-
Click OK.
Linking a Multi-Principal Suffix Mapping Action Block to a Policy
These procedures specify how to link a Multi-Principal Suffix Mapping Action Block to an existing policy. You can also link a Multi-Principal Suffix Mapping Action Block to a new policy as you create one.
-
In the Admin Client, click the Identity Driven tab.
-
Click Policies.
-
Right-click a selected Group Multi-Principal Collaborative policy and select Edit.
-
In the Policy Editor, click Provisioning Options.
-
Click Link Action Block.
-
Select the Action Block you want to link.
-
Click Apply to save your settings.
-
Click OK to close the page.
Creating a Target Paths Action Block
Use Target Paths Action Blocks to standardize the placement rules for the managed path, as well as the paths to the shares where managed paths will be hosted.
-
In the Admin Client, click the Identity Driven tab.
-
Click Action Blocks.
-
From the Manage menu, select New > Target Paths.
-
Enter a descriptive name for the new Action Block and click OK.
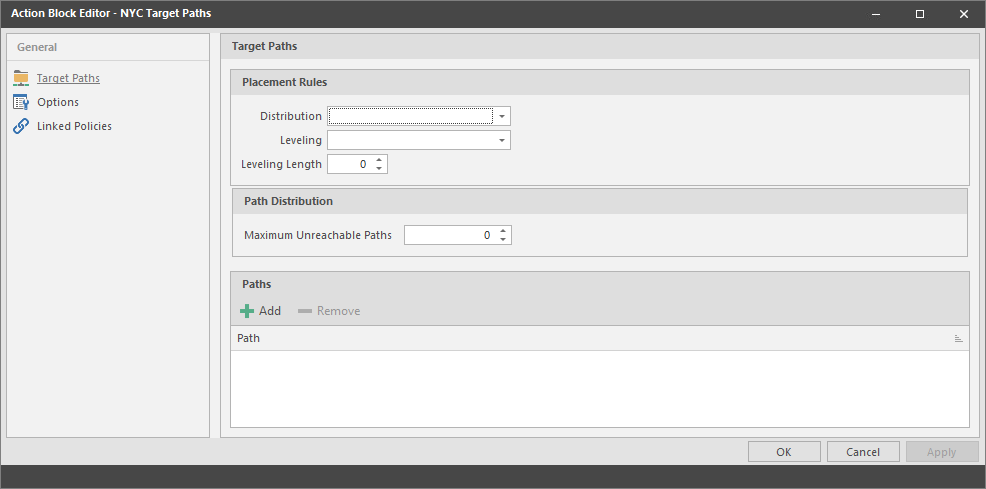
The following page appears:
-
Click Add to access the Path Browser.
-
Browse to the location of the target path you want and click Add to add the target path to the Selected Paths pane.
-
Click OK to close the Path Browser.
-
In the Placement Rules region, specify a Distribution field setting and if you choose, Leveling parameters.
For more information on target path distribution and leveling, see Section 6.5.4, Setting Target Paths.
-
Click Apply.
-
Click OK.
Linking a Target Paths Action Block to a Policy
These procedures specify how to link a Target Paths Action Block to an existing policy. You can also link a Target Paths Action Block to a new policy as you create one.
-
In the Admin Client, click the Identity Driven tab.
-
Click Policies.
-
Right-click a selected policy and select Edit.
-
In the Policy Editor, click Target Path Options.
-
Click Link Action Block.
-
Select the Action Block you want to link.
-
Click Apply to save your settings.
-
Click OK to close the page.
12.2.5 Management Actions
In managing user and collaborative storage with File Dynamics, there are cases when you need to retroactively apply policies, rights, attributes, and quotas to existing user storage, or perform some administrative corrective action or operation on a large set of users, groups, or containers.
In File Dynamics, performing these types of operations is collectively referred to as performing a Management Action and is done through the Take Action page.
You can perform a Management Action on an organizational unit, a Group object, or a User object. Management Action operations on a Group object apply to users who are members of the group. Management Action operations on an organizational unit apply to users in the organizational unit, and optionally to all subordinate organizational units.
IMPORTANT:The Management Actions vary based on whether the selected mode is User, Group, or Container. For example, if Group mode is selected, the Management Action will be performed for collaborative storage processing using Dynamic Template processing. If Collaborative mode is selected, the Management Action will be performed for container based collaborative storage.
File Dynamics analyzes each User object independently, regardless of whether the Management Action is initiated via organizational unit, Group objects, or User objects.
Management Actions Dialog Box
Whenever you initiate a Management Action, you work in a dialog box similar to the one below. A description of the components follows the graphic.
Figure 12-22 Management Action Dialog Box
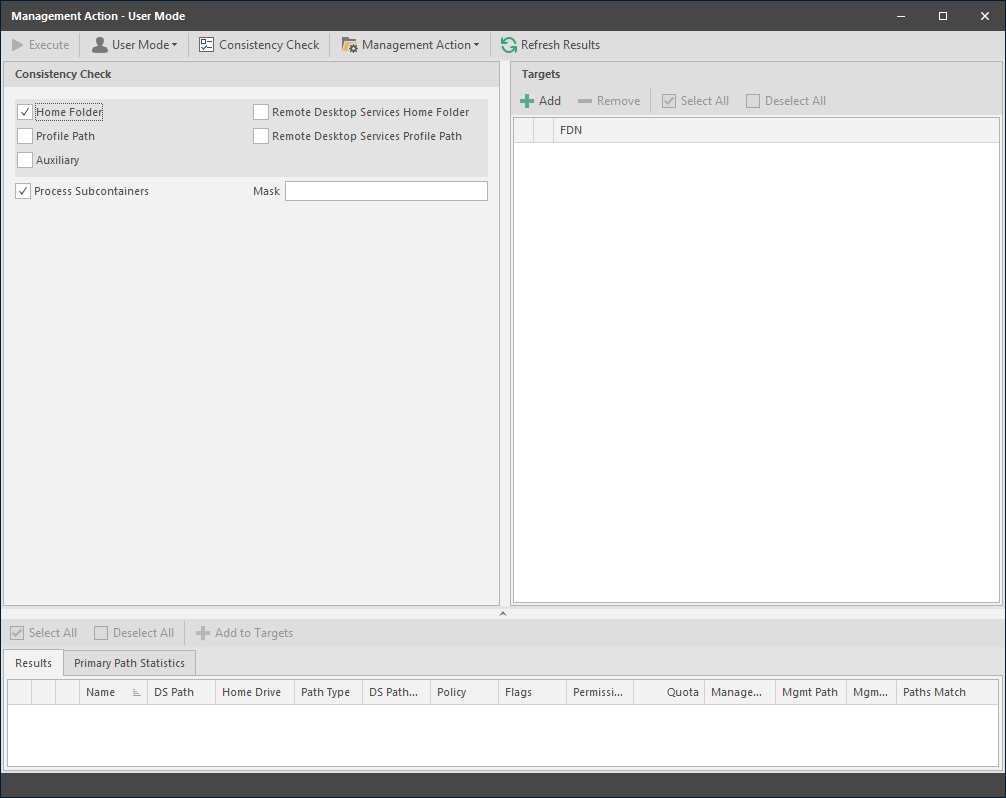
Execute: Clicking this button executes the management action. Once you have specified a target and selected a Management Action, a Preview option appears, allowing you to preview the effects of the Management Action before executing the action.
Mode: This drop-down menu lets you indicate if the Management Action is to apply to a User, Group, or Container policy.
Consistency Check: This button lets you perform a consistency check before determining what Management Actions to perform. You can also use the Consistency Check button to view the results after you perform a Management Action.
A consistency check notifies you of inconsistencies or potential problems pertaining to user and group storage being managed through File Dynamics. These potential problems might be missing storage quotas, inconsistent directory attributes, missing and inconsistent managed paths, and more.
In addition to reporting on storage issues, consistency check reports let you review current quota assignments and can help you with the design and planning of storage policies. In Section 5.1, Running Consistency Check Reports on Existing Storage, you ran a consistency check before creating your first primary user policy to help you determine how to configure the policy.
Management Action: This drop-down menu lets you change from one Management Action to another while you are in the dialog box.
Refresh Results: This button refreshes the results displayed in the bottom pane of the dialog box.
Top Left Pane: The fields, options, and check boxes in this region vary based on the Management Action you are performing. In some cases, there is nothing in this region, because there are no settings to create. This region includes some powerful options for Management Actions, including the following:
-
Process Subcontainers
-
Mask
When you perform a Management Action on an organizational unit, File Dynamics applies the action to all subcontainers. If you do not want the action applied to subcontainers, you can deselect the Process Subcontainers check box.
For Management Actions performed on organizational units or Group objects, you can enter a search filter in the Mask field to limit the number of objects that File Dynamics analyzes. You can enter standard wildcard characters with multiple strings separated by the “|” character.
Top Right Pane: This part of the dialog box lets you add, delete, or select objects to which the Management Action applies.
Bottom Pane: This part of the dialog box displays the results after the Management Action has taken place. To expand the viewable area, click the ^.
Available Management Actions
Manage
This Management Action catalogs objects in File Dynamics, putting them in a managed state.
If the existing objects already have established managed paths, attributes, and rights, File Dynamics does not change these settings, nor does it enforce policy paths, grooming, and quota management. If you need to change attributes and rights, or enforce policy paths, grooming, and quotas, you can do so through the specific Management Actions.
If these existing objects do not have established managed paths, Manage creates the managed paths and sets the rights, attributes, quotas, etc. according to the policies that apply to the objects.
Enforce Policy Path
This Management Action moves data to where the policy’s target path specifies. If you decide to move your user home folders from one location to another, you can simply change the target path in the policy and then select Enforce Policy Path to move the home folders.
The Enable pre-stage data copy option lets you copy data without alerting you to failures if there are files open. When a user is moved in Active Directory and the policy dictates that the home folder is to be moved to a new target path, this option allows for all closed files to be moved. At a later time, you can go back and run an Enforce Policy Path Management Action without the Enable pre-stage data copy check box selected, to move the files that were previously open.
Enforce Policy Path for Vault
This Management Action will set or reset the user's vault path to one that matches their managing policy's vault path. This can be useful in cases where a previous vault is no longer valid. For example, when an administrator decommissions the previous server or share used for vaulting and has established a new vault location.
Groom
This Management Action carries out file grooming according to the file grooming specifications in the applied policy.
Apply Attributes
This Management Action lets you apply file system attributes. If you decide to modify the file system attributes in a policy, you can select Apply Attributes to immediately apply the new attributes for all of the affected objects.
If you cataloged existing objects with existing managed paths through Manage, the attributes for the managed path are not modified once the object’s managed path attribute is cataloged (see Manage above). If you want to modify the original attributes of the managed path, you can do so through the settings in the in the left pane of the Apply Attributes dialog box.
Apply Home Drive
When the Home Folder check box is selected, this Management Action changes the home drive letter for the user that is assigned under Active Directory, to the drive letter that is specified in the File Dynamics policy.
If you have a File Dynamics Remote Desktop Services home folder policy and you want to apply the drive letter that is established in that policy, you can select the Remote Desktop Services Home Folder check box.
NOTE:The new drive letter does not take effect until the user logs out and then logs in again.
Apply Members
This Management Action is included to create the owner folder and personal folders in a collaborative storage area, where these folders did not exist previously. You must first modify the collaborative storage template in the policy to include -OWNER- and -MEMBER-. For more information, see Section 8.0, Managing Collaborative Storage.
If you do have personal folders in the collaborative storage area and you later change the rights on -MEMBER-, you use the Apply Members Management Action to enforce the new rights.
Apply Owner
This Management Action lets you set ownership of the home folder and home folder contents.
Figure 12-23 Apply Owner Management Action Page
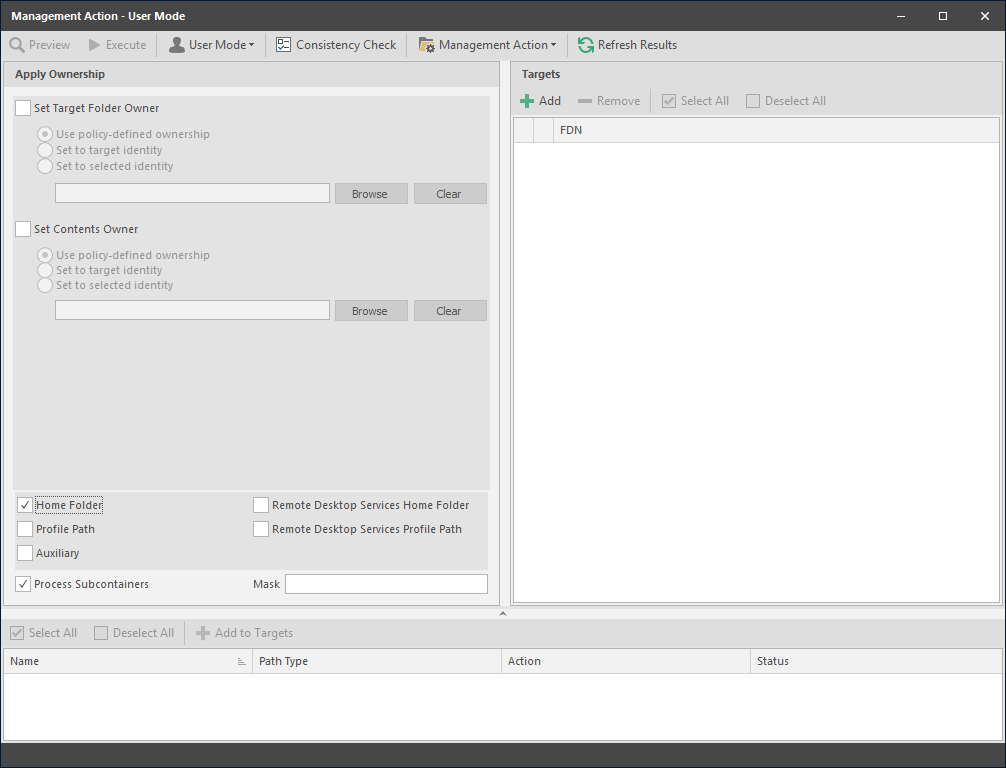
NOTE:The ownership specifications you make on the page shown above are applied to folders and files that exist at the time the Management Action takes place. The ownership of files and folders that are created later is not affected by this action. For example, if a user's home folder is moved due to an Enforce Policy Path action, the ownership of the user’s home folder will be determined by the settings in the policy.
Set Target Folder Owner: Select this check box to specify that the ownership applies only to the home folder and not to any subfolders.
Use policy-defined ownership: This option sets the home folder owner according to the specified owner in the Path Owner field of the policy.
Set to target object: When this option is selected, each of the selected users’ home folders is set to have that User object as the owner.
Set to explicit object: This option lets you browse to select a specific owner for the home folder.
Set Contents Owner: Select this check box to specify that the ownership applies to the subfolders and files contained in the home folder.
Use policy-defined ownership: This option sets the home folder contents owner according to the specified owner in the Path Owner field of the policy.
Set to target object: When this option is selected, each of the selected users’ home folders is set to have that User object as the owner.
Set to explicit object: This option lets you browse to select a specific owner for the contents of the home folder.
Specify the policy types you want this Management Action to apply to by selecting from the policy type check boxes.
Process Subcontainers: Selecting this option specifies that you want the settings on this page to apply to users that reside in the subcontainers within the container where this policy is applied.
Mask: For Management Actions performed on organizational units or Group objects, you can enter a search filter in the Mask field to limit the number of objects that File Dynamics analyzes. You can enter standard wildcard characters with multiple strings separated by the “|” character.
Apply Quota
This Management Action lets you apply managed path quotas. If you decide to modify the quota settings in a policy, you can select Apply Quota to immediately apply the new quota setting to all of the affected users.
If you cataloged existing network users with existing home folders through Manage, there might be no quota settings for the user home folders. Or, the quota settings might be inconsistent with those specified in the policy. If you want to establish or reset the quota for the home folder, you can do so through the settings in the left pane of the Apply Quota dialog box.
Apply Permissions
This Management Action lets you apply NTFS file system permissions. If you decide to modify the file system permissions in a policy, you can select Apply Permissions to immediately apply the new permissions for all of the affected users.
Apply Template
This Management Action lets you apply a template specifying how to provision user or collaborative storage. If you decide to modify the template in a policy, you can select Apply Template to immediately apply the new template structure to all of the affected users. This can be especially useful if you need to quickly provision a new subfolder with a document, such as a new health benefits document for all employees. All you need to do is modify the template to include the new subfolder and document inside the subfolder and then use Apply Template to provision it to everyone.
If you cataloged existing network users with existing home folders through Manage, the file structure created by the template is not modified after the user and his or her associated home folder are cataloged (see Manage above). If you want to modify the original file structure for the home folder, you can do so through the settings in the in the left pane of the Apply Template dialog box.
Clear Managed Path Attribute
This Management Action removes the managed path attribute so you can create a new one. Administrators might find this useful when users have invalid values for their home folder attributes and want to start over by creating new ones.
Recover Managed Path Attribute
If the attribute for a user home folder, profile path, Remote Desktop Services home folder, or Remote Desktop Services profile path ever becomes corrupted, this Management Action can be used to recover an uncorrupted version of the attribute from the File Dynamics database.
Assign Managed Path
You can use this Management Action to assign an attribute to a user folder, profile path, Remote Desktop Services home folder, or Remote Desktop Services profile path.
Directory Merge
This Management Action lets you merge contents of one home folder with those of another. This is especially useful if a user leaves an organization and you want to transition the files from the former user to another user. Another example might be if a user has two home folders and you want to merge the contents into one.
Remove from Engine Database
This Management Action removes objects from the File Dynamics database and makes the object unmanaged.
12.2.6 Pending Events
This page displays a list of pending events for the Engine. All of the pending events are listed with details on the status of those events. Some events process very quickly and might actually be completed before they can be viewed in the list. Other events might remain in the queue for a long time, waiting for some condition to be met before they can be completed.
Clicking a listed event or events activates the toolbar. The toolbar has the following options:
Properties: Displays event properties such as FDN, ID, Action, and Current Status.
Make Eligible: If an event is deferred, you can click this option to make the event eligible immediately.
Defer: If an event is eligible, you can click this option to manually defer it to a specific date. The chosen deferral date is displayed in a Notes field. You can also enter any notes explaining the reason you are deferring the event. Text from the Notes field is also displayed in the Deferred Notes field of the Properties dialog box.
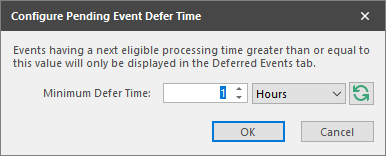
Configure: Lets you adjust the time parameter for making pending events eligible for display as deferred events.
The default setting is one hour, meaning that any pending events scheduled to be addressed within one hour will be displayed when the Active Only menu option is selected. Those events scheduled to be addressed later than one hour will be displayed when the Deferred Only menu option is selected.
Figure 12-24 Configure Pending Event Defer Time Dialog Box
Bypass: Lets you bypass the status that is holding up the event.
Abort: Lets you terminate the selected event or events.
Refresh: Refreshes the event list.
View Events: Lets you filter the displayed events by displaying All, Active, or Deferred pending events.
NOTE:These settings are persisted across Engine restarts. Therefore, if you stop processing and restart the Engine or the server hosting the Engine reboots for some reason, event processing will remain off until you turn it back on.
-
Accepting: A green check mark indicates that File Dynamics is accepting events to process. You can stop accepting events to process by clicking this button. You are prompted to enter text in a field indicating your reason for stopping the acceptance of events. The text you enter is recorded on the Engine Status page.
-
Processing: A green check mark indicates that File Dynamics is processing events. You can stop processing events by clicking this button. You are prompted to enter text in a field indicating your reason for stopping the processing of events. The text you enter is recorded on the Engine Status page.
12.2.7 Consistency Check
This page is used to access and export stored Consistency Check reports.
To access a report, double-click a report listing to access the View Report dialog box.
Figure 12-25 Consistency Check Report
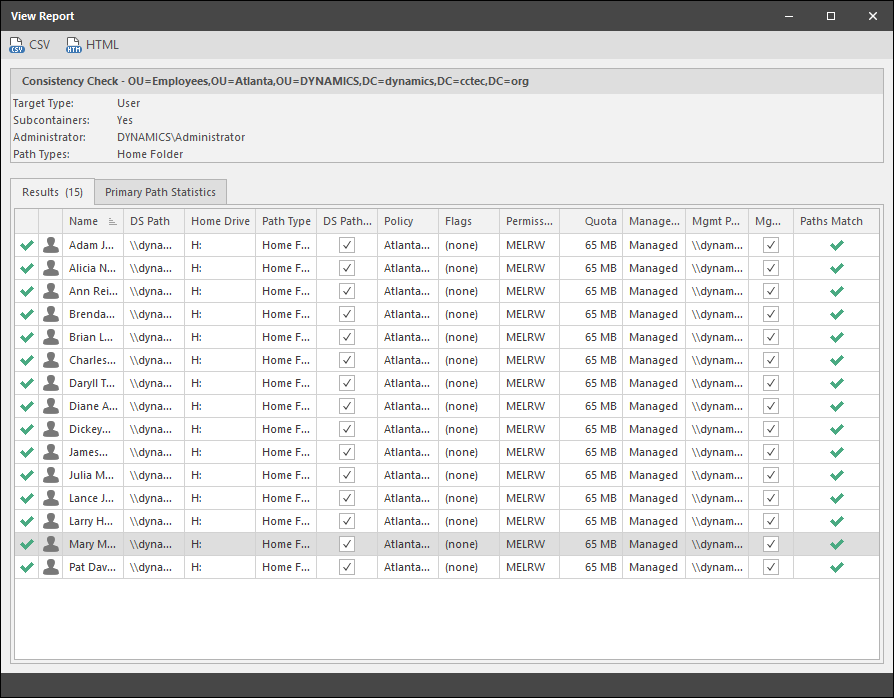
The dialog box displays the contents of the Consistency Check report.
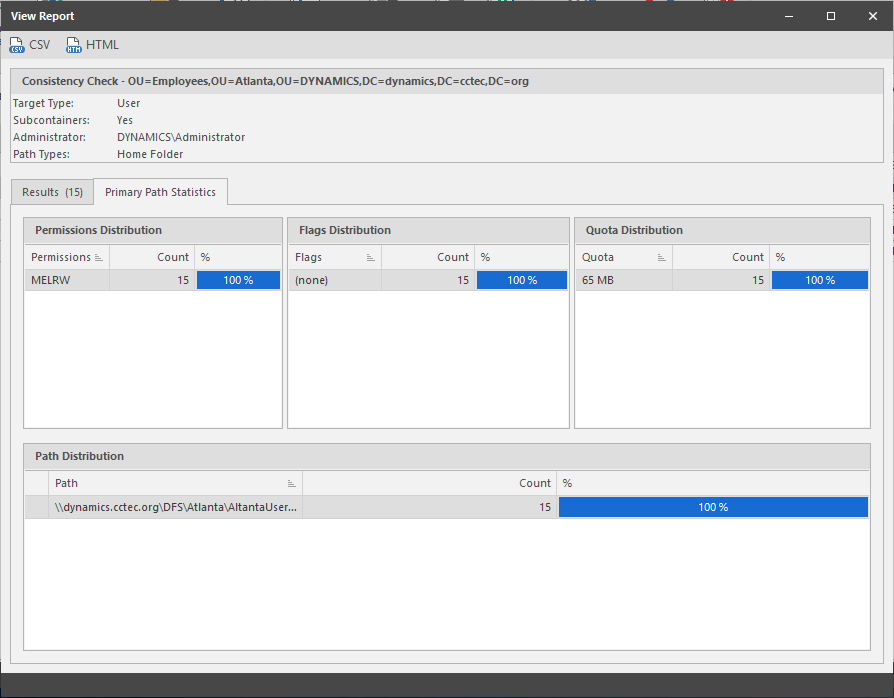
The Primary Path Statistics tab shows the rights, flag, and path distribution data in text and graphical format.
Figure 12-26 Primary Statistics in a Consistency Check Report
To export a Consistency Check report, double-click a report listing to access the View Report dialog box, and then in the upper-left corner of the dialog box, click either the CSV or HTML icons.
For more information on Consistency Check Reports, see Section 5.1, Running Consistency Check Reports on Existing Storage and Section 5.8, Performing a Consistency Check.
12.2.8 Management Actions
Management Action reports are stored each time a Management Action is performed. Use this page to view or export to a report, the results of any Management Action performed. A list of available Management Action reports is presented, identifying the report by the Active Directory object it was run on, and the time the report was generated.
Double-clicking any item in the list brings up the individual Management Action report.
Figure 12-27 Management Action Report
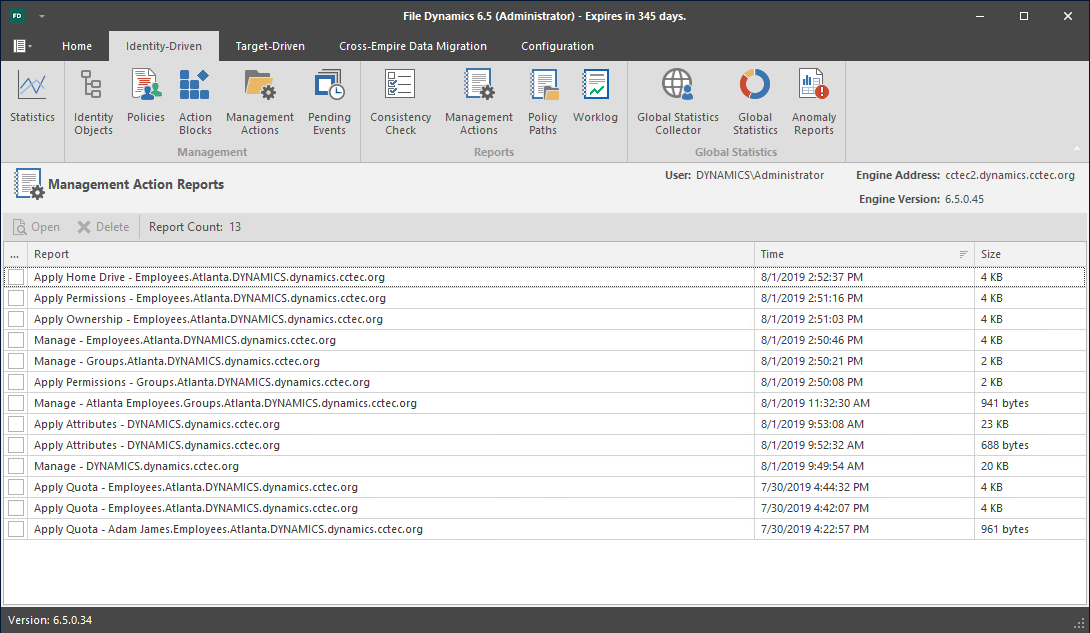
To export an Action report, double-click a report listing to access the View Report dialog box, and then in the upper-left corner of the dialog box, click either the CSV or HTML icons.
12.2.9 Policy Paths
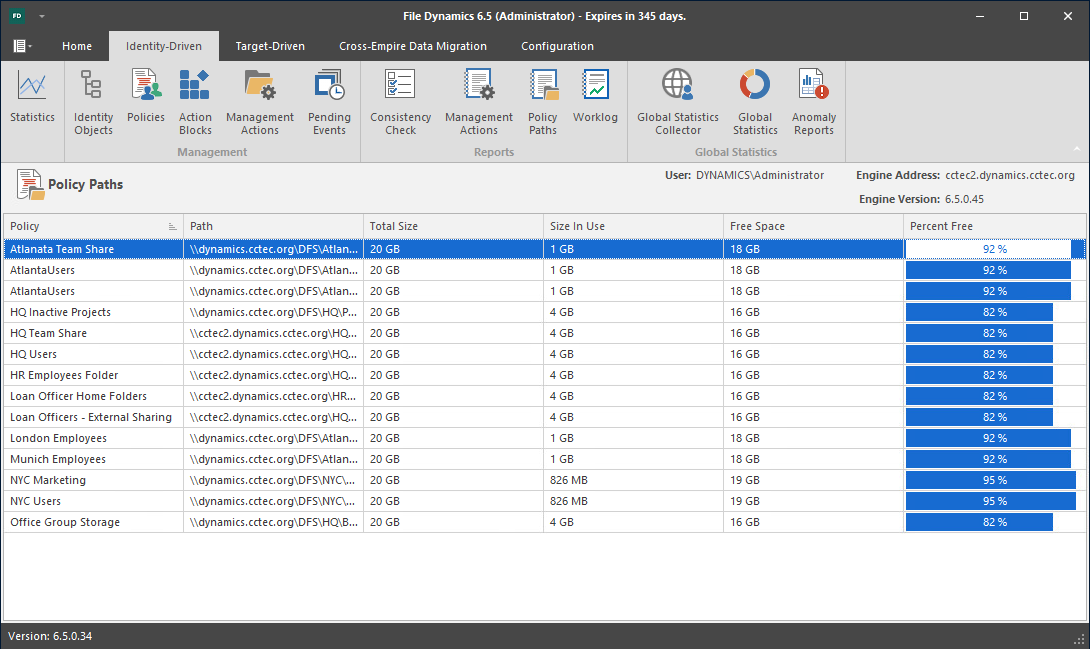
This page shows high-level statistical information pertaining to your policies, their corresponding target paths, and size and free space information.
Figure 12-28 Policy Paths Report
12.2.10 Work Log
Click Work Log to build Work Log reports. For details and procedures for doing so, see Section 11.4, Building Work Log Reports.
12.2.11 Global Statistics Collector
The Global Statistics Report (GSR) Collector is a multi-purpose mechanism that collects data for storage usage statistics and policy-based storage redistribution, generates reports on anomalies such as a user with a non-existent home folder, and catalogs objects and their paths for historical purposes.
The data collected by the GSR Collector has four primary uses:
-
GSR Collector Anomaly Analysis
-
Global Statistics
-
History
-
Policy-based Path Redistribution
Your usage of the GSR Collector data may be specific to all of these or some subset. You should analyze your needs of the feature set it provides and weigh them with the frequency and scope that best suits your needs.
For example, Anomaly Analysis may be an important tool for helping you determine the state of your unmanaged data when you have no configured policies or when you’re initially implementing File Dynamics. Thereafter, you may not need to examine the reports on a daily basis. In this case, after your policies are configured and users are managed, you might opt to change the schedule of the GSR Collector to run weekly.
NOTE:GSR Anomaly Analysis is discussed in Section 12.2.13, Anomaly Reports.
The Global Statistics provided by the GSR Collector offer insight into how your storage is being consumed by the supported categories of objects (e.g. user and collaborative) but it comes at a price. It can be expensive to run if you do not have quotas enabled via File Storage Resource Manager (FSRM) or your managed storage resources primarily consist of NAS devices.
Alternatively, you might find that the Global Statistics are less important in lieu of your need for a finer granularity of historical data. The same size data used for the Global Statistics is also used for Policy-based Path Redistribution. Depending on the policies for which you plan to redistribute data, you might configure the GSR Collector to perform a Complete Inspection on the paths for a specific policy. Thus eliminating the need to wait for Complete Inspection to be performed needlessly against all storage resources.
The GSR Collector is designed to be run on a scheduled interval so that you can collect the appropriate data to provide the necessary granularity for your needs. By default, the GSR Collector will not run unless you run it manually or configure it to run based on a schedule.
Performance Caveats
Due to the number of objects, amount of data to scan, and your configuration, the GSR Collector can be resource intensive and long running. By default, it will collect data on all objects and accessible shares in Active Directory. This default configuration is not ideal for most File Dynamics deployments. However, the configuration of the GSR Collector allows you to scope it according to your needs. You are encouraged to scope it according to the objects and shares that will be managed by File Dynamics. You should be careful when running the GSR Collector during peak traffic load on the Engine.
Global Statistics Collector Interface
The GSR Collector interface is the means of running and scheduling the GSR Collector, as well as viewing the results of when it was run previously.
Figure 12-29 Global Statistics Collector
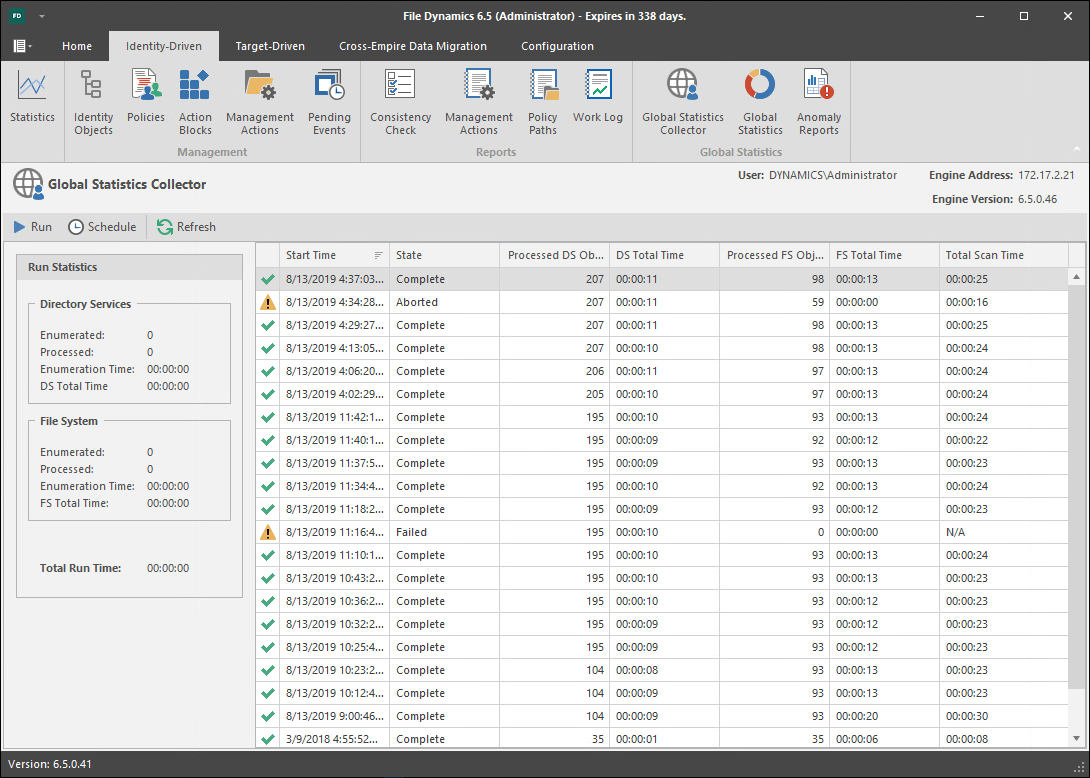
Run: Runs the GSR Collector according to the current GSR Collector configuration. For information on the GSR Collector configuration, see Section 12.5.2, Global Statistics Configuration.
Schedule: Lets you schedule when the GSR Collector is run.
Refresh: Refreshes the list of GSR Collector runs listed in the right pane of the page.
Run Statistics: Displays statistics as the GSR Collector is being run. Once the GSR Collector has completed its run, the statistics are appended to the top of the list in the pane on the right side of the page.
12.2.12 Global Statistics
This page displays a variety of statistics according to the findings of the GSR Collector.
Figure 12-30 Global Statistics
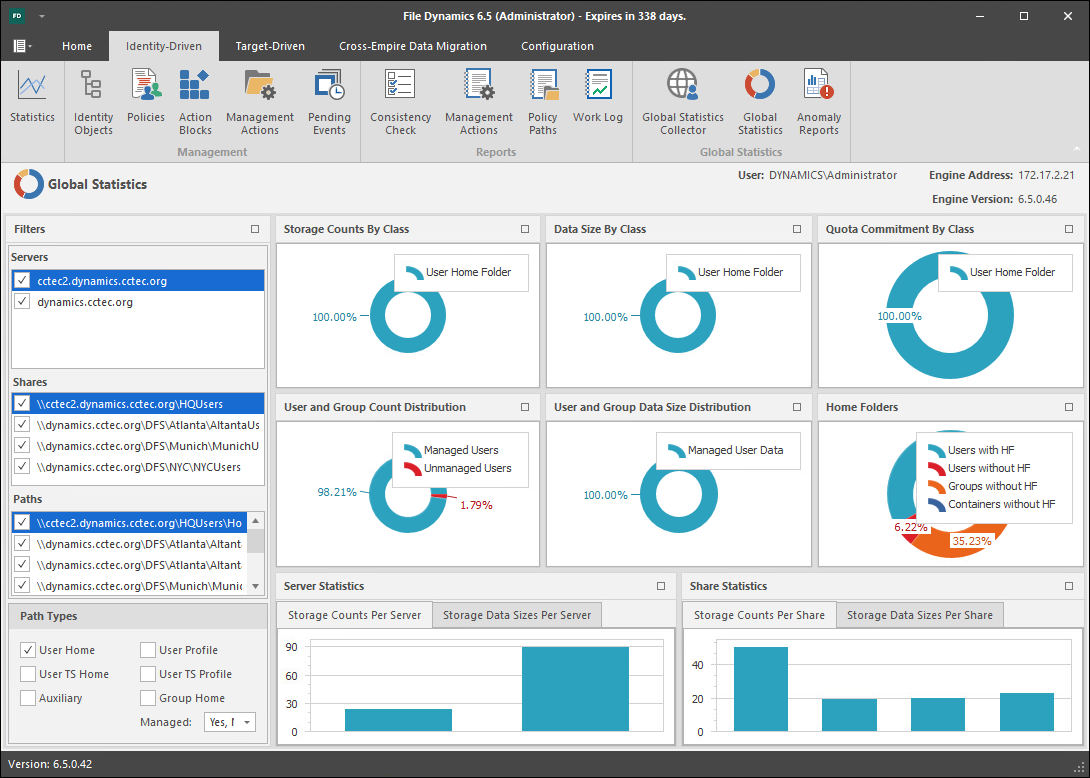
The Global Statistics page is laid out in a way that you can set the parameters for display on the left-hand portion of the page and then see the results on the right.
12.2.13 Anomaly Reports
The GSR Collector performs Anomaly Analysis that generates data for Anomaly Reports. These reports are designed to help you evaluate the state of your storage infrastructure. Additionally, they can be used in preparation for using File Dynamics to bring storage under management by policy. Anomaly data will be produced for each object and path type specified in the GSR Collector configuration.
Figure 12-31 GSR Anomaly Report
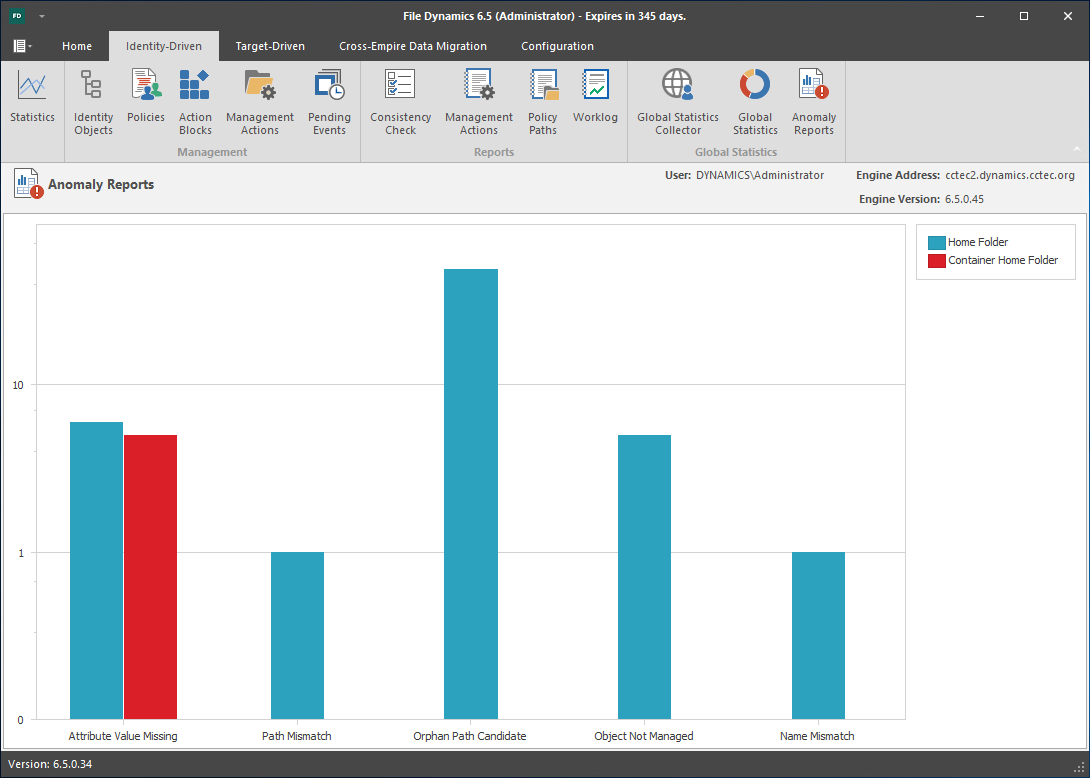
To see further detail about a specific anomaly report, single-click on the column.
A detailed summary of each of the GSR Anomaly reports follows.
Attribute Value Missing
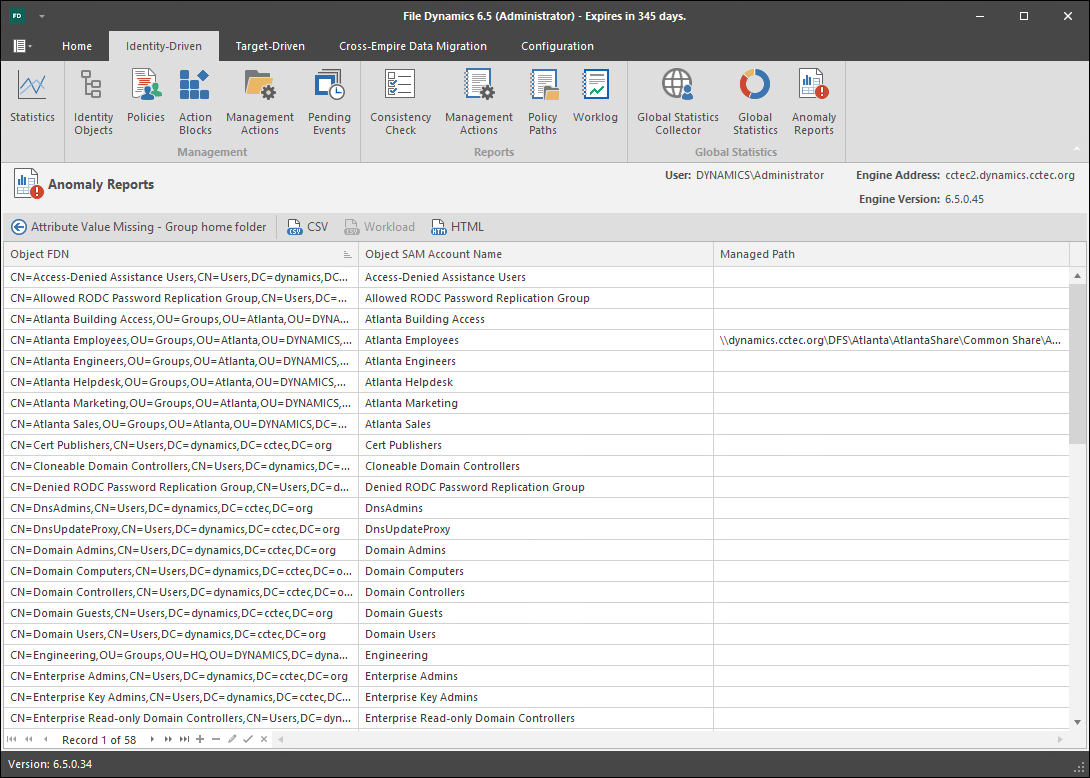
This Anomaly report indicates that the respective path attribute (e.g. home folder) does not have a value for a given object in Active Directory.
Figure 12-32 is an example of an Attribute Value Missing Anomaly report. The Object FDN and Object SAM Account Name columns display the respective attributes. The Managed Path column does not have a value because this object is not yet managed by File Dynamics. These objects are reported because they do not have homeDirectory attribute values. This report can be used to identify objects that should be managed. It can also identify objects that have had their respective path attribute cleared accidentally or erroneously by an identity management system.
Figure 12-32 Attribute Value Missing
Path Missing on Disk
This Anomaly report indicates that the respective path attribute value (e.g. home folder) for a given object cannot be found on disk.
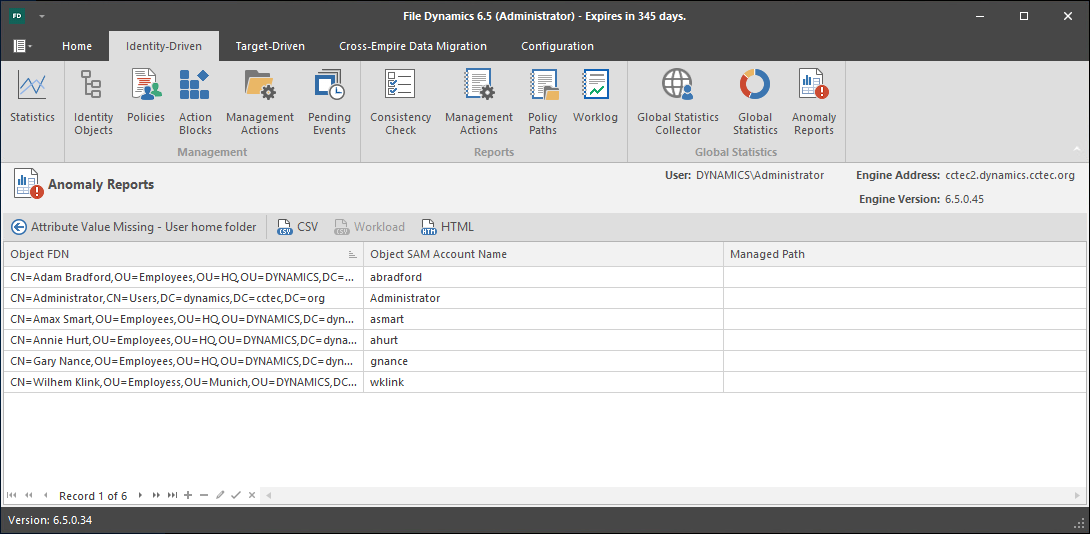
Figure 12-33 is an example of a Path Missing on Disk Anomaly report. The Object FDN and Object SAM Account Name columns display the respective attributes. The Path column is the value of the homeDirectory attribute. The Managed Path column does not have a value because this object is not yet managed by File Dynamics. This object is reported because the path specified by its homeDirectory attribute does not exist on disk or could not be found. This report can be used to identify objects whose respective path attribute value no longer exists at that location because of accidental deletion or being moved manually.
Figure 12-33 Path Missing on Disk
Name Mismatch
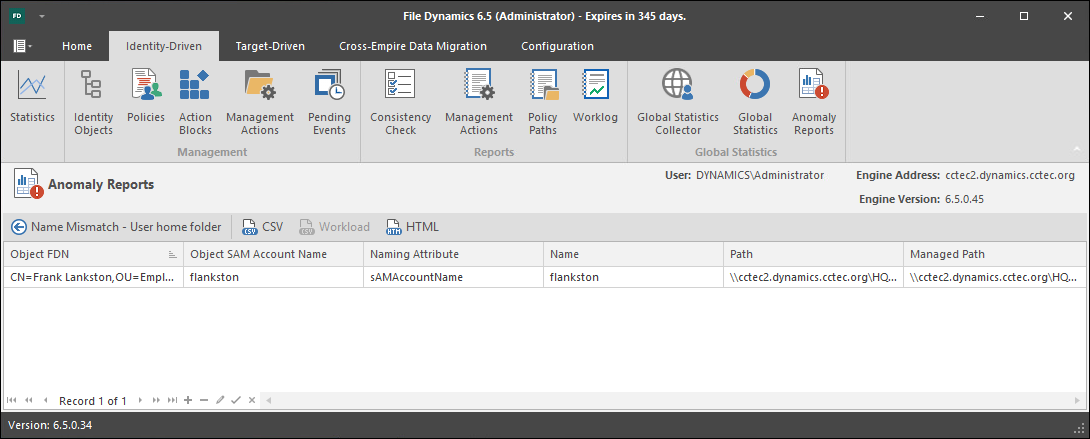
This Anomaly report indicates that the leaf path name of the respective attribute value (e.g. home folder) does not match that of the respective object’s name.
Figure 12-34 is an example of the Name Mismatch report. The Object FDN and Object SAM Account Name columns display the respective attributes. The Path column is the value of the homeDirectory attribute. The Path column contains the current respective path attribute value obtained from Active Directory. The Managed Path column contains the path value when the object was last managed. This object is reported because the leaf path name specified by its homeDirectory attribute does not match the sAMAccount name attribute. This report can be used to identify objects whose respective path might have been changed manually.
Figure 12-34 Name Mismatch
Path Duplicate Value
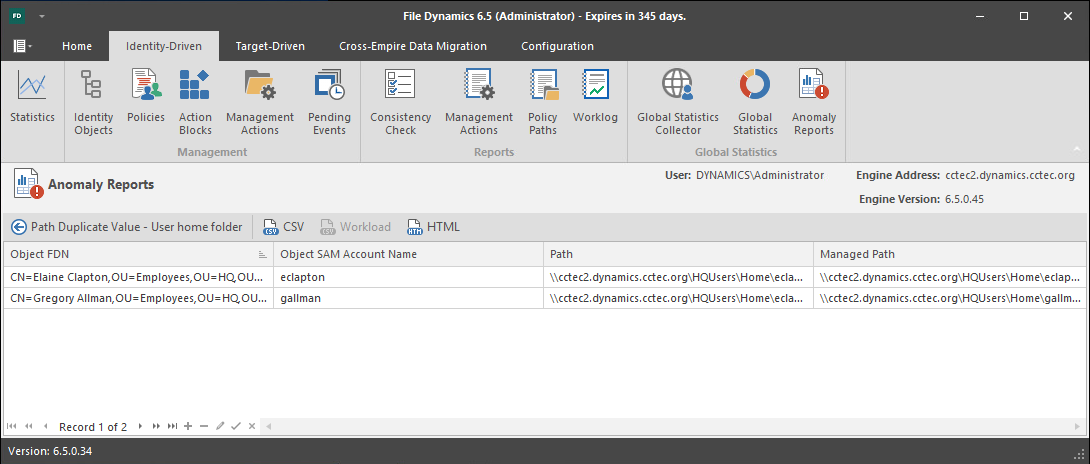
This Anomaly report indicates that two or more objects have been detected that contain the same value for the respective path attribute (e.g. home folder).
Figure 12-35 is an example of the Path Duplicate Value report. The Object FDN and Object SAM Account Name columns display the respective attributes. The Path column is the value of the homeDirectory attribute. The Path column contains the current respective path attribute value obtained from Active Directory. The Managed Path column does not have a value because these objects are not yet managed by File Dynamics. These objects are reported because they have the same value for their homeDirectory attribute. This report can be used to identify objects who erroneously share the same path for the respective path attribute.
Figure 12-35 Path Duplicate Value
Path Parent Crosstalk
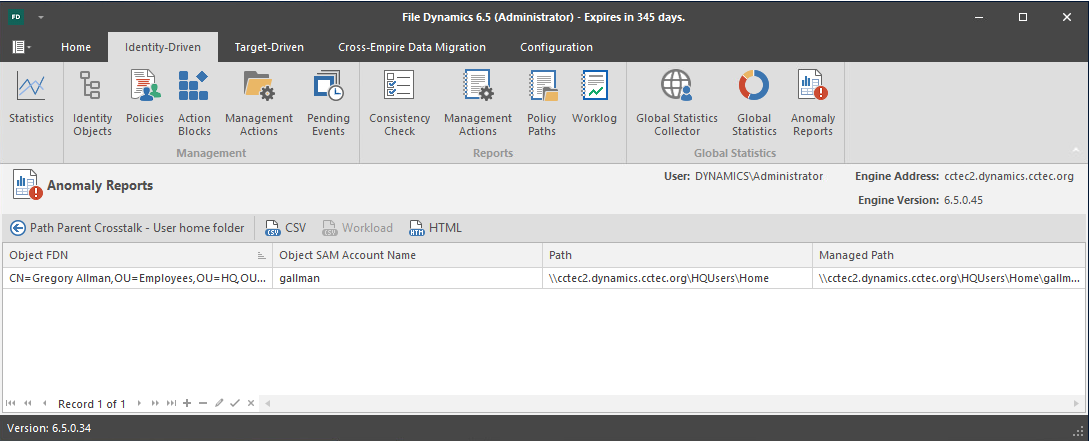
This Anomaly report indicates that the object’s respective path attribute value (e.g. home folder) has been detected as being the parent of another object’s path attribute value (e.g. home folder).
Figure 12-36 is an example of the Path Parent Crosstalk report. The Object FDN and Object SAM Account Name columns display the respective attributes. The Path column is the value of the homeDirectory attribute. The Path column contains the current respective path attribute value obtained from Active Directory. The Managed Path column does not have a value because these objects are not yet managed by File Dynamics. This object is reported because the value for its homeDirectory attribute has been detected as being the parent of another object’s homeDirectory attribute. This report can be used to identify objects whose respective path attribute is set to the wrong location and might impact another object’s storage.
Figure 12-36 Path Parent Crosstalk
Path Child Crosstalk
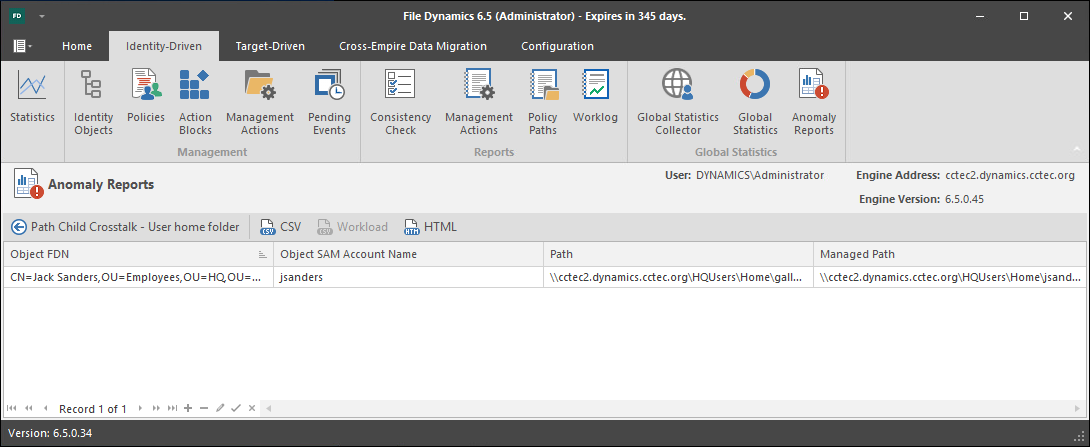
This Anomaly report indicates that the object’s respective path attribute value (e.g. home folder) has been detected as being the subordinate of another object’s path attribute value (e.g. home folder).
Figure 12-37 is an example of the Path Child Crosstalk report. The Object FDN and Object SAM Account Name columns display the respective attributes. The Path column is the value of the homeDirectory attribute. The Path column contains the current respective path attribute value obtained from Active Directory. The Managed Path column does not have a value because these objects are not yet managed by File Dynamics. This object is reported because the value for its homeDirectory attribute has been detected as being the child of another object’s homeDirectory attribute. This report can be used to identify objects whose respective path attribute might be impacted by another object’s storage.
Figure 12-37 Path Child Crosstalk
To see which object is a parent of this object’s homeDirectory attribute value, see Path Parent Crosstalk.
Orphan Path Candidate
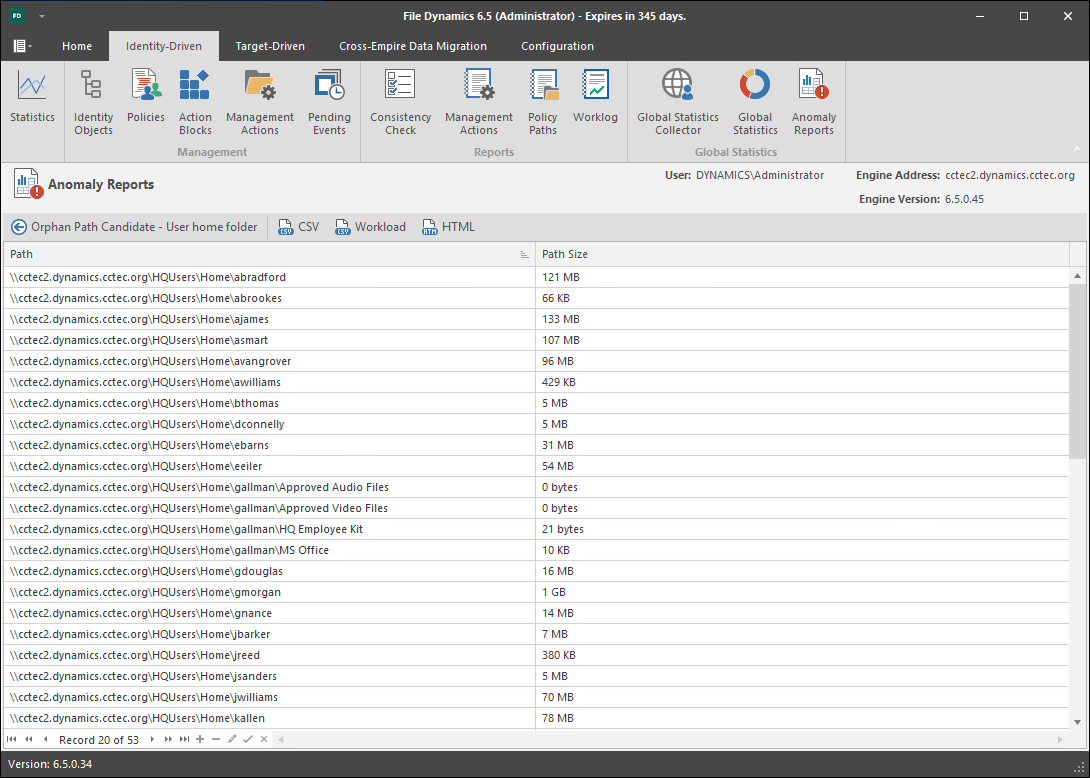
This anomaly report indicates that the path is directly subordinate to a path at which other DS-associated paths have been found, but has not been detected as being associated with any DS object via a path attribute (e.g. home folder).
Figure 12-38 is an example of the Orphan Path Candidate report. The Path column is any path that is directly subordinate to a path at which other DS-associated paths have been found. However, the path is not associated with any object via a path attribute. This report can be used to identify folders that don’t belong to objects or are considered unmanaged.
Figure 12-38 Orphan Path Candidate
