15.2 Creating a Bundle for the GroupWise Windows Client Software
ZENworks Configuration Management deploys software as bundles that include all the files and instructions required to successfully install software on users’ workstations.
15.2.1 Creating a New GroupWise Bundle
To create a ZENworks Configuration Management bundle for the GroupWise Windows client software:
-
In ZENworks Control Center, click , then click .

-
Select , then click .

-
Click to accept the default of .

-
Define the new bundle:
-
In the field, specify a unique name for the bundle, such as GW2012.
-
In the field, browse to and select the following file:
software_distribution_directory\client\win32\grpwise12.ico -
Click to display the bundle summary.

-
Select so that you can set up all the components of the bundle before publishing the bundle, then click .
is selected by default, which enables you to conveniently set up all the bundle components.

-
-
Click to create installation actions for the GroupWise bundle:

-
Continue with Adding Installation Actions to the GroupWise Bundle.
15.2.2 Adding Installation Actions to the GroupWise Bundle
Several installation actions are required in order to install the GroupWise Windows client software.
Creating an Install Files Action to Copy the GroupWise Windows Client Software to Temporary Location
-
On the tab, click to add an Install File(s) action.

The option copies the files that you select to a location that you specify. The first action you create copies the GroupWise Windows software files to a temporary location on your local server.
-
In the field, customize the name to clearly identify the action, for example:
Install Files to Temporary Directory
-
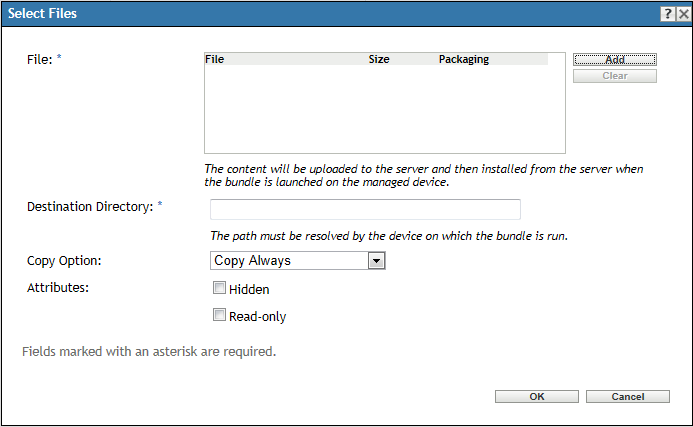
Click to open the Select Files dialog box.
-
Click .
-
Browse to the following directory:
software_distribution_directory\admin\utility\setupip -
Select the following files:
-
extract.bat
-
setupip.fil
-
setupip.xx (where xx is a two-letter language code)
-
-
(Conditional) If your version of ZENworks Configuration Management provides the , select this option.
The largest file, setupip.fil, is already compressed. The other files are small and would not benefit substantially from compression.
The uploaded files display in the list.
-
In the field, specify the temporary directory where you want to create a copy of the GroupWise Windows client software, for example:
c:\gwclient
If the directory does not already exist, it is automatically created.
-
Click to close the Select Files dialog box and return to the Install File(s) dialog box with the selected files listed.
 dialog bog with the GroupWise Windows client software files listed")
-
(Optional) Select .
The default of is also appropriate for most systems.
-
Click to close the Install File(s) dialog box and return to the GroupWise Bundles page with the first installation task listed.
 task")
-
Click to save the first installation action.
-
Continue with Creating a Run Script Action.
Creating a Run Script Action
-
On the tab, click to add a Run Script action.

The option runs the script that you specify to extract all the Windows client software files from the setupip.fil file into a win32 subdirectory under gwclient.
-
In the field, customize the name to clearly identify the action, for example:
Run Script to Extract GroupWise Client Software
-
In the field, specify the full path to the batch file for extracting the GroupWise Windows client software, for example:
c:\gwclient\extract.bat
-
In the box, select .
-
Click .

-
In the box:
Select .
or
Select .
-
Click to add this installation action to the list.

-
Click to save this installation action.
-
Continue with Creating an Install Files Action to Add the GroupWise MST Transform File to the GroupWise Windows Client Installation.
Creating an Install Files Action to Add the GroupWise MST Transform File to the GroupWise Windows Client Installation
-
On the tab, click to add an Install File(s) action.
The option copies the GroupWise MST transform file to the temporary location on your workstation.
-
In the field, customize the name to clearly identify the action, for example:
Install File groupwise.mst
-
Click to open the Select Files dialog box.
-
Click .
-
Browse to the following directory:
software_distribution_directory\client\win32 -
Select the groupwise.mst file.
-
(Conditional) If your version of ZENworks Configuration Management provides the , select this option.
The groupwise.mst file is very small and does not benefit from compression.
The uploaded files display in the list.
-
In the field, specify the win32 subdirectory of the temporary directory where you created the copy of the GroupWise Windows client software, for example:
c:\gwclient\win32
-
Click to close the Select Files dialog box and return to the Install File(s) dialog box with the groupwise.mst file listed.
 dialog box with the groupwise.mst file listed")
-
(Optional) Select .
The default of is also appropriate for most systems.
-
Click to close the Install File(s) dialog box and return to the GroupWise Bundles page with this installation task listed.
 task")
-
Click to save this installation action.
-
Continue with Creating a Launch Executable Action.
Creating a Launch Executable Action
-
On the tab, click to add a Launch Executable action.

The option launches the install.bat file to install the GroupWise Windows client software on users’ workstations.
-
In the field, customize the name to clearly identify the action, for example:
Launch Executable install.bat
-
In the field, specify the full path to the executable file that was extracted from the setupip.fil file, for example:
c:\gwclient\win32\install.bat
-
In the field, specify one of the following parameters:
-
/unattended: Users see the window displayed by the groupwise.msi file while the GroupWise client software is being installed. The users do not need to do anything during the process, but they are informed that the installation is taking place.
-
/silent: Users see nothing happening while the GroupWise client software is being installed, so they do not know that it has occurred.
The instructions that follow assume that /silent has been specified.
-
-
In the box:
-
Click .

Two environment variables must be set in order to customize the interaction of the groupwise.msi file with the groupwise.mst file.
-
In the field, specify GW_INST_TRANSFORM_FILE.
This environment variable provides the name of the GroupWise MST transform file. The default location of the file is the same as the location of the MSI file, so you do not need to specify a full path for the file.
-
In the field, specify groupwise.mst, then click to return to the Launch Executable dialog box.
-
Click again to add the second environment variable.
-
In the field, specify GW_INST_REMOVE_MSI.
This environment variable allows for updates of previous versions of the GroupWise Windows client that were installed using the groupwise.msi file. For example, it allows the automatic removal of obsolete GroupWise icons.
-
In the field, specify True, then click to return to the Launch Executable dialog box.

-
-
Click .
-
In the box, select .
-
In the box:
Select .
or
Select .
-
Click to close the Launch Executable dialog box and return to the GroupWise Bundles page with this installation task listed.
-
Click to save this installation action.
-
(Optional) Add additional installation actions based on your preferences for how you want to install the GroupWise Windows client software.
-
Continue with Adding a Launch Action to the GroupWise Bundle.
15.2.3 Adding a Launch Action to the GroupWise Bundle
The launch action is the command to start the GroupWise Windows client on users workstations. It is useful for testing your GroupWise bundle. You might not want to use it after you have tested your GroupWise bundle.
-
On the GroupWise Bundle page, click .

-
Click to open the Launch Executable dialog box.
-
In the field, customize the name to clearly identify the action, for example:
Launch Executable grpwise.exe
-
In the field, specify the command to start the GroupWise Windows client.
The command depends on the architecture of the Windows workstation where the GroupWise Windows client is being installed:
32-bit architecture:
C:\Program Files\Novell\GroupWise\grpwise.exe
64-bit architecture:
C:\Program Files (x86)\Novell\GroupWise\grpwise.exe
For testing purposes, specify the command for the architecture of workstation where you plan to test the bundle.
-
(Conditional) If your environment includes both 32-bit and 64-bit workstations, define the system requirements for this launch action:
-
Click .

-
In the drop-down list, select , then select or .
-
Click to return to the tab.
-
In the field, customize the name with the architecture you selected for the launch action.
-
-
(Optional) In the field, add any desired client startup options, as listed in
Startup Options for the GroupWise Windows Client
inClient
in the GroupWise 2012 Administration Guide.For this installation action, no settings are required, because the default settings of and are appropriate.
-
Click to return to the Launch Executable dialog box.

-
Click to save the launch action.
-
(Conditional) If you selected an architecture requirement in Step 5, repeat Step 1 through Step 8 to create a launch action for the other workstation architecture in your environment.
-
Continue with Displaying GroupWise Bundle Activity on User Workstations.
15.2.4 Displaying GroupWise Bundle Activity on User Workstations
By default, ZENworks Configuration Management does not display any user interface when it is installing a software bundle. You can configure the GroupWise bundle to provide feedback to the user about how the installation is progressing.
-
On the GroupWise Bundle page, click :

-
In the field, click .
With this setting enabled, users receive messages showing status information as the GroupWise Windows software is downloaded and installed on their workstations.
-
Continue with Section 15.2.5, Publishing the GroupWise Bundle.
15.2.5 Publishing the GroupWise Bundle
-
On the GroupWise Bundle page, click .

The default setting of is appropriate for the GroupWise bundle.
-
Click to publish the GroupWise bundle.
This changes the field from to .
-
Continue with Section 15.3, Associating the GroupWise Bundle with Devices on Your Network.