4.3 Managing Your Calendar
4.3.1 Reading a Calendar Entry
-
In the Folder List, click .
-
Double-click the item you want to read.
In all views except the Year view, you can mouse over most items and see more information such as Subject, Time, Place, and To.
4.3.2 Creating a Personal Calendar
-
Click > > .

-
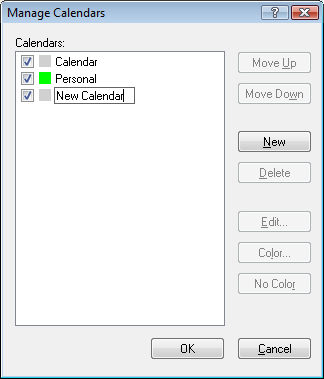
Type a name for the new calendar.
-
(Optional) Click . Select a color for the calendar by clicking the colored square. Click .
-
Select what order you want your calendars to display in by selecting the calendar, then clicking or .
-
Click .
4.3.3 Customizing a New Calendar
You can set several options to customize your Calendar view. For example, you can make it easier to see your work days by specifying the first day of the week and highlighting weekends.
Customizing Your Calendar Views for a New Calendar
Various GroupWise Calendar views can be selected to provide the look and feel that best suits your needs. For example, you can choose to remove the monthly calendars from the Week view or display the calendars with pages that resemble a planner.
The following sections provide examples of some of the ways you can customize your Calendar view. These sections do not provide information about all of the possible views, but they show you how to perform some common changes.
Changing a Calendar View
-
Click on the Nav Bar.
-
Right-click the view you want to change, then click .
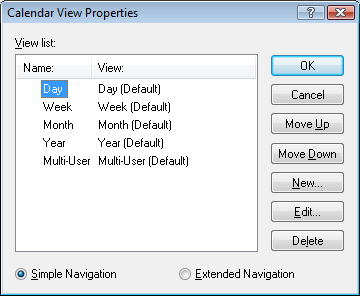
The Calendar View Properties dialog box opens.

The Calendar View Properties dialog box lets you change the view used to display your Day, Week, Month, Year, and Multi-User calendars.
-
Select the name of the view you want to change, then click .
The Edit View dialog box opens.

-
Click the down-arrow to open the drop-down list.
The drop-down list contains a variety of available views.
-
Select the view you want to use, then click to close the Edit View dialog box.
-
Click to close the Calendar View Properties dialog box.
Removing the Month Calendar from the Week View
You might want to remove the month calendar from the Week view to allow more space for your weekly appointments to display.
-
Click on the Nav Bar.
-
Right-click , then click .
The Calendar View Properties dialog box opens.
-
Select , then click .
The Edit View dialog box opens.
-
Click the down-arrow to open the drop-down list.
-
Select —not —then click to close the Edit View dialog box.
-
Click to close the Calendar View Properties dialog box.
Now, when you view the weekly calendar, the month calendar does not display.
Adding Month Calendars to the Month View
By default, the Month view shows the current month’s appointments. To show the month calendars for the previous month and the next several months, change the Month view from to .
-
Click on the Nav Bar.
-
Right-click , then click .
The Calendar View Properties dialog box opens.
-
Select , then click .
The Edit View dialog box opens.
-
Click the down-arrow to open the drop-down list.
-
Select , then click to close the Edit View dialog box.
-
Click to close the Calendar View Properties dialog box.
Now, when you view the monthly calendar, as many month calendars display below the current month’s appointment calendar as can fit in your GroupWise window.
Adding Extended Navigation to the Calendar
By default, the Calendar opens with the Simple Navigation feature selected. Simple Navigation allows you to move forward or back one day, week, month, or year, depending on the selected calendar view, by clicking the forward or back button.
Figure 4-6 Simple Navigation Forward and Back Buttons

The Extended Navigation feature provides additional functionality by making it possible to move forward or back 1, 7, 31, or 365 days.
Figure 4-7 Extended Navigation Forward and Back Buttons

-
Click on the Nav Bar.
-
Right-click any view, then click .
The Calendar View Properties dialog box opens.
-
Select .
-
Click to close the Calendar View Properties dialog box.
Now, when you view the monthly calendar, as many month calendars display below the current month’s appointment calendar as can fit in your GroupWise window.
Saving a Calendar View
You can save a customized calendar view.
-
Click on the Nav Bar.
-
Customize your calendar views.
-
Right-click any view, then click .
The Calendar View Properties dialog box opens.
-
Select the view you want to save, then click .
-
Type the name of your custom view, select a view type, then click .
The new view is added to the list of views.
Defining Your Work Schedule
Your work schedule shows others when you are available and affects how calendars display. By default, GroupWise assumes an 8:00 a.m. to 5:00 p.m. workday, Monday through Friday. If you have a different work schedule, you can set your schedule to display accurately.
-
Click
-
Double-click , then click the tab.
-
(Optional) If you are always available for appointments, click and skip the remaining steps.
-
In the field, specify the time when your day typically begins.
-
In the field, specify the time when your day typically ends.
-
Select the days when you work and leave your usual days off deselected.
-
Confirm that the time zone shown is correct.
If the time zone is incorrect, right-click the clock in your Windows notification area, select , click the tab, then select the correct time zone.
-
Click .
Changing the First Day of the Week in Your Calendar
GroupWise checks the locale of your workstation’s operating system to determine the standard first day of the week for your locale. If you prefer, you can change the first day of the week to be a day other than the default.
-
Click > .
-
Double-click , then click the tab.
-
Select a day in the group box, then click .
Highlighting Weekends
You can highlight weekends and make weekends and weekdays easier to differentiate in your Calendar.
-
Click
-
Double-click , then click the tab.
-
Select the check box, then click .
Showing Week Numbers
-
Click
-
Double-click , then click the tab.
-
Select the check box, then click .
Setting Whether to Include Yourself on New Appointments
By default, GroupWise automatically includes your name in the list when you create a new appointment. You can disable this feature so you are not automatically included, or to enable it if it has been disabled.
-
Click
-
Double-click , then click the tab.
-
Select the check box, then click .
Setting How to Display Appointment Length
When you configure how to display the length of new appointments, you can select whether to display the appointment length by duration or by an end date and time. You can also set the default length of appointments.
Displaying Appointment Length by Duration or by End Date and Time
By default, GroupWise displays appointment length by duration. That is, when you create an appointment, a field displays where you can enter an amount of time (such as 30 minutes or 2 hours) to indicate the length of the appointment.
If you prefer, you can specify an end date and time for each appointment. If you use this option, GroupWise displays a field for entering an end date and another for entering an end time when you create a new appointment.
-
Click .
-
Double-click , then click the tab.
-
Under , select either or then click .
Setting the Default Appointment Length
By default, a new appointment is one hour long, although you can adjust the time when you create the appointment. For example, if most of the appointments you set up usually last 30 minutes, you can change the default to 30 minutes.
-
Click .
-
Double-click , then click the tab.
-
Specify the number of hours and minutes for the , then click .
Changing a Calendar’s Color
-
In the Folder List, click the Calendar colored square.
-
Select a color.
Changing the Background for Calendar Areas
You can change the background appearance for All Day Events, Appointments, Reminder Notes, and Tasks.
-
Click .
-
Double-click , then click the tab.
-
Under , select if you want to display a background color for , , , and .
-
If you selected to display a background color for any of the calendar items, select a color for each item.
To use the default GroupWise 6.0 background colors, click . To use the default GroupWise 6.5 background colors, click . The GroupWise 6.5 and GroupWise 7 default background colors are the same.
-
Select if you want to display separating lines for reminder notes and tasks.
-
Click , then click .
4.3.4 Sending a Calendar
When you send a calendar, the calendar is sent as an Internet Calendar attachment to an email message. Internet Calendar attachments have the file extension of .ics.
-
Right-click the calendar to export, then click .
-
Select the time period.
Select to send your entire calendar.
or
Select to send part of your calendar. If you select , you must specify a range of days to send.
-
Select the level of detail:
Busy Time Only: Sends only the busy information for the calendar, and no information about the calendar items.
Busy Time and Subject: Sends the busy information as well as the subject of the appointment.
Full Details: Sends the busy time and all the information associated with your calendar items.
-
Select to include private items.
-
Select to include attachments.
-
Click .
A new email message is generated with a .ics attachment.
-
Specify who you want to send the message to, then click .
4.3.5 Exporting a Calendar
When you export a calendar, the calendar is exported as an Internet Calendar. Internet Calendar attachments have the file extension of .ics.
-
Right-click the calendar to export, then click .
-
Type a file name for the item in the field.
-
To save the item in a different directory than is shown, browse to the new directory.
-
Click .
4.3.6 Importing a Calendar
You can import a calendar that has been saved as a .ics file. For information about saving a calendar as a file, see Section 4.3.5, Exporting a Calendar.
-
Right-click the tab, or right-click the main calendar, then click .
-
Specify the file name of the calendar you want to import, including the path to the file, or click and locate the file.
-
(Conditional) If you want to rename the calendar, specify a new name; otherwise, leave the existing name in the field.
If the name specified for the new calendar is the same as a calendar you already have, the new calendar is added into the existing calendar.
-
If a description field is available for the calendar you are importing, type a description, then specify whether to replace or add to the existing contents.
-
Click .