Finding Items
Use Find to look for items that match the criteria you specify.
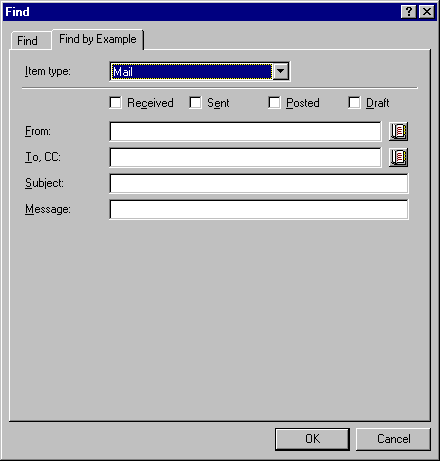
Use the Find by Example tab to find items that match an example you specify in a field. Find by Example is especially helpful for finding documents.
You can save the results in a Find folder, where you can retrieve them any time you open the folder.
Information you specify on the Find tab will not appear on the Find by Example tab and vice versa.
This section contains the following topics:
- Finding an Item By Example
- Finding an Item Using Search Criteria
- Saving the Results of a Find
- Finding a Document and Creating a Reference to It in Your Mailbox
- Finding an Item Using Advanced Find
- Narrowing an Advanced Find Using Filter Operators
Finding an Item By Example
-
Click
 on the toolbar, then click the Find By Example tab.
-
In the Item Type drop-down list, click the type of item you want to search for.
-
If you selected Document in Step 2, click the library you want to search in the Library drop-down list.
-
In each field, specify the information you want to look for.
-
Click OK to begin the Find.
Finding an Item Using Search Criteria
This section contains the following topics:
Finding an Item Using Search Criteria
-
Click
 on the toolbar.
-
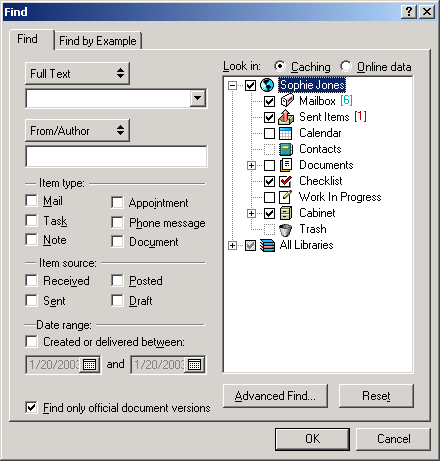
To search for specific text, select Full Text or Subject from the drop-down list, then type what you are looking for in the text box.
-
To search for a name, select From/Author or To/CC from the drop-down list, then type the name in the text box.
-
Select each item type you are looking for, then select each item source you are looking for.
-
To specify a date range, select the Created Or Delivered Between check box, then type or select the dates.
-
In the Look In list box, click the folders and/or libraries you want to search in.
You might need to click the plus sign (+) next to your user folder to expand the folder structure.
-
Click OK to begin the Find.
Use Advanced Find to make your search more specific. For example, you might want to search for messages from two or three users at once.
Select the Find Only Official Document Versions check box to locate only the official document version of a document with multiple versions.
Your folders and library are marked for search by default with a check in the box. To speed up your search, unmark any folders you don't want to search.
Narrowing a Find
The following list explains how to narrow your search using Find.
- In the first text box of the Find dialog box, type the uncommon words you've noticed in the item. If you search using common words, the results of your search will likely be too large to be very helpful.
- To increase the speed of your search, deselect the folders and/or libraries you know do not contain the item you are looking for. For example, if you know your document is not in Library C, click the plus (+) sign next to All Libraries in the Look In box, then click Library C to deselect it.
- If you are searching for more than one word or want to search for words in a particular field of an item (like the Subject field), click Advanced Find to set up your search properly. The words you type can be combined with operators to further narrow the search.
- If you cannot find the document or message, check your search criteria for misspelled words. Also, check the syntax of your search to make sure you are telling Find to search for exactly what you want.
Saving the Results of a Find
-
Click
 on the toolbar.
 -
Perform a Find.
-
In the GroupWise Find Results dialog box, click File, then click Save As Folder.

-
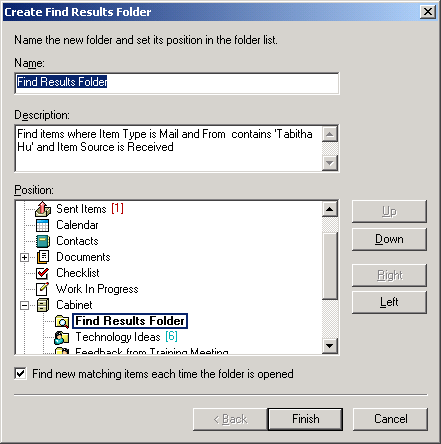
Type a name for the folder, type a description for the folder, click Up, Down, Right, or Left to place your folder where you want it to display in your Folder List, then click Finish.
To see your Find results at any time, select the folder. For more information about Find Results folders, see Understanding Find Results Folders.
You can update a Find folder each time you open it. Make sure Find New Matching Items Each Time the Folder Is Opened is selected.
Finding a Document and Creating a Reference to It in Your Mailbox
-
Click File, click New, then click Document Reference.
-
Click Find.
-
On the Find by Example tab, click Document from the Item Type drop-down list.
-
Specify the information about the document you want to search for.
-
Click OK to begin the Find.
-
In the GroupWise Find Results dialog box, click the document for which you want to create a document reference, then click OK.
The GroupWise Find Results dialog box displays only the documents to which you have at least View rights. GroupWise creates a document reference in the current folder.
Finding an Item Using Advanced Find
-
Click
 on the toolbar.
 -
Click Advanced Find.
-
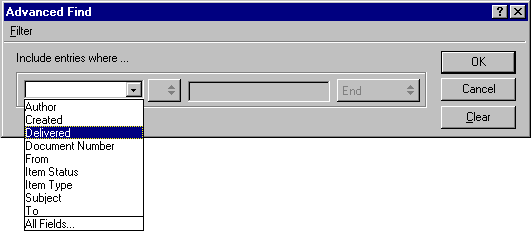
Select a field in the first drop-down list, click an operator, then type or select a condition.

-
Click the last drop-down list, click And, Or, Insert Row, or New Group, add more criteria for your filter, click End from the last drop-down list, then click OK.
Insert Row makes your filter more specific. Additional rows narrow your search criteria even further. For example, to search for items from John Smith that were carbon-copied to Mary Jones, use the first row to search for John Smith and the second row to search for Mary Jones.
New Group creates a new row for a filter whose first group of rows contains several parameters for one column. For example, to create a filter to display all opened items from John Smith and Mary Jones, click From in the first drop-down list, click the = Matches operator, type John Smith as the parameter, then click Or in the last drop-down list. A second row appears. Click From in the first drop-down list, click the = Matches operator, type Mary Jones as the parameter, then click New Group. Click Item Status in the first drop-down list, click the [ ] Includes operator, click Opened in the third box, then click OK.
Delete Row removes a row from your filter definition. You cannot delete a one-row filter.
-
Click OK when your filter is complete.
Find searches all folders and libraries selected in the Look In box. To narrow your Find, deselect unnecessary folders and libraries.
Narrowing an Advanced Find Using Filter Operators
When you click Advanced Find, the Advanced Find dialog box appears. Select the operator from the Operator drop-down list ![]() .
.
The list of available operators changes depending on the selection you make. Some operators, such as [ ], have two or more distinct names. Although the name may change, the purpose of the operator remains the same.
For example, the [ ] operator in the table below finds all items containing John in the From box or including a Sound file in the Attachment List. Click All Fields to see a list of all available fields, including user-defined fields.