Filtering Items
Basic Filtering
If your Mailbox or Calendar contains many items, you might have a difficult time finding just one of them. Filter lets you display items according to specific criteria. For example, a filter can display only items that have a certain word in the subject. You can also use a filter to hide items that you want to get out of your way.
Filter does not actually move or delete items; it displays certain items based on the criteria you specify. When you clear the filter, all the items reappear. Filters you create affect all folders.
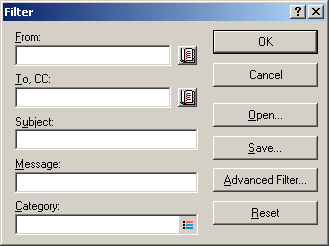
The basic Filter dialog box lets you filter on the following information: From, To, CC, Subject, Message, and Category. If you want to filter on additional fields, click Advanced Filter.
Limiting an Advanced Filter
You may want to limit an advanced filter by specifying additional criteria. For more information, see Narrowing Your Filter.
This section contains the following topics:
- Creating a New Filter
- Creating a New Filter Using Advanced Filter
- Selecting a Filter
- Clearing a Filter
- Deleting a Filter
- Narrowing Your Filter
- Using Filter and Rule Wildcard Characters and Switches
- Using Filter and Rule Operators
- Understanding Filter and Rule Fields
Creating a New Filter
-
Click a folder (such as Mailbox, Trash, or a folder you have created).
Filters affect all folders. By clicking a folder, you can see the filter results immediately.
or
Click the Appointments, Reminder Notes, or Tasks List in a calendar view.
The filter applies to all lists in the calendar view. For example, if you click the Reminder Notes List, the Appointments and Tasks Lists are also affected by the filter.
-
In the upper-right corner of the Main Window or calendar view, double-click
 .
.
-
In most folders, the following fields display. Fill in one or more of the following fields:
From: To display items from a specific person, type a name in the From field. Click
 to select a name from a list.
To, CC: To display items to a specific person, type a name in the To, CC field. Click
 to select a name from a list.
Subject: To display items containing specific text in the subject, type text in the Subject field. Text you type is not case sensitive.
Message: To display items containing specific text in the message, type text in the Message field. Text you type is not case sensitive.
Category: To display items that have been assigned a category, click
 , then select a category name.
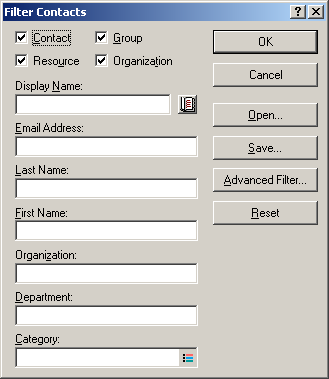
If you are creating a filter in the Contacts folder, the Filter Contacts dialog box fields include Display Name, E-Mail Address, Last Name, Organization, Department, and Category. Type or select information in one or more fields to filter for contacts.

To specify other information you want to filter on, click Advanced Filter. For more information, see Creating a New Filter Using Advanced Filter.
-
Click OK.
The filter icon changes to
 indicating that a filter is on.
 -
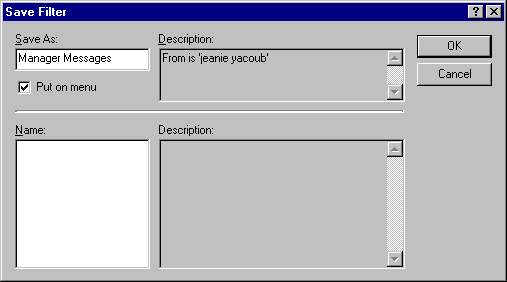
To save the filter for future use, click
 , click Filter, click Save, type a name, then click OK.
Creating a New Filter Using Advanced Filter
-
Click a folder (such as Mailbox, Trash, or a folder you have created).
Filters affect all folders. By clicking a folder, you can see the filter results immediately.
or
Click the Appointments, Reminder Notes, or Tasks List in a calendar view.
The filter applies to all lists in the calendar view. For example, if you click the Reminder Notes List, the Appointments and Tasks Lists are also affected by the filter.
-
In the upper right corner of the Main Window or calendar view, double-click
 .
. -
Click Advanced Filter.
-
In the first drop-down list, click the field you want to filter.
For example, click From if you want to display items from a specific person. To find out what the fields represent, see Understanding Filter and Rule Fields.
-
Click the operator drop-down list
 , then click an operator.
 To find out more about the operators, see Using Filter and Rule Operators.
-
Type the criteria for the filter.
or
If provided, click the drop-down list, then click existing criteria.
If you type criteria, such as a person's name or a subject, you can include wildcard characters such as an asterisk (*) or a question mark (?). Text you type is not case sensitive. To find out more about wildcard characters and switches, see Using Filter and Rule Wildcard Characters and Switches.
-
Click the last drop-down list, then click End.
or
Click the last drop-down list, then click And or Or to narrow your filter by adding more filter criteria.
-
Read the text in the Filter dialog box beginning with "Include entries where..." as you create your filter. This summarizes how your filter will work.
-
Click OK, then click OK.
The filter icon changes to
 indicating that a filter is on.
 -
To save the filter for future use, click
 , click Filter, click Save, type a name, then click OK.
Selecting a Filter
-
In the upper-right corner of your Mailbox or Calendar view, click
 , then click the filter.
You can select one of the predefined filters to filter for received items, sent items, posted items, or draft items.
If you have a long list of filters, click
 , click More, then click the filter.
To see a description of a filter before you select it, double-click
 , click Open, then click the filter. Click OK after clicking the filter you want.
Narrowing Your Filter
You may want to limit an advanced filter by specifying additional criteria. Each filter criteria is displayed in a separate row. The options in the drop-down list let you expand your filter criteria. The ways to add and delete rows to narrow your filter are explained below.
This section contains the following topics:
And
Creates a new row. The filter will display items that match the conditions in each row joined by And.
Or
Creates a new row. The filter will display items that match the conditions in either row joined by Or. The items don't have to match the conditions in both rows.
Insert Row
Inserts a new row below the current row and pushes the remaining rows down. Insert Row is useful if you've already created a filter, and you want to add more criteria in the middle.
Using Filter and Rule Wildcard Characters and Switches
These wildcard characters and switches are available in the Filter dialog box and the Define Conditions dialog box only when you've selected certain fields that require you to type additional text. They are applicable only when you select the [ ] Contains operator.
Using Filter and Rule Operators
The available operators depend on the field you have selected in the first drop-down list.
Understanding Filter and Rule Fields
The following table explains many of the fields available to you when you're creating a filter or a rule. Other user-defined fields might also be available.
For information about the fields that are available when you filter the Contacts folder, see Contact Fields.
Contact Fields
If you filter from within the Contacts folder, you can filter by any of the information in a contact record, for example, department, middle name, title, and so forth. You can also filter by the post office, domain, or Internet domain of the contact. If your Contacts folder shows contacts from the Frequent Contacts address book, you can filter by Last Reference (the last date you received an item from this contact) and Reference Count (the total number of times you have received items from this contact).