41.3 Configuring Specialized Routing
As you create each new domain in your GroupWise system, you link it to another domain. You can view and modify the links between domains using the Link Configuration Tool. See Section 10.0, Managing the Links between Domains and Post Offices. The following topics help you configure the MTA to customize routing through your GroupWise system:
41.3.1 Using Routing Domains
As an alternative to configuring individual links between individual domains throughout your GroupWise system, you can establish a system of one or more routing domains under the following circumstances.
-
Domains must connect to the routing domains with TCP/IP links.
-
GroupWise 5.5 and later domains can be part of the routing domain system. Domains and MTAs that are still at a 5.2 or earlier version cannot participate and must use links as provided in the Link Configuration Tool.
A routing domain can serve as a hub in the following situations:
-
Messages that are otherwise undeliverable can be automatically sent to a single routing domain. This routing domain can be set up to perform DNS lookups and route messages out across the Internet. See
Using Dynamic Internet Links
inConnecting to Other GroupWise Systems
in the GroupWise 8 Multi-System Administration Guide. -
All messages from a domain can be automatically routed through another domain, regardless of the final destination of the messages. This provides additional control of message flow through your GroupWise system.
You can set up routing domains on two levels:
Selecting a System Default Routing Domain
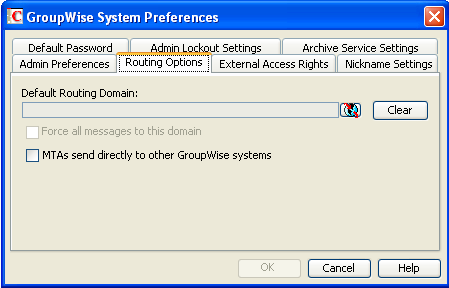
You can establish a single default routing domain for your entire GroupWise system. This provides a centralized routing point for all messages. It takes precedence over specific links established when domains were created or links modified with the Link Configuration Tool.
To set up a system default routing domain:
-
In ConsoleOne, click to display the tab.
-
In the field, browse to and select the domain you want to serve as the default routing domain for your entire GroupWise system.
-
If you want all GroupWise messages to pass through the default routing domain regardless of the destination of the message, select .
or
If you want only undeliverable GroupWise messages to be routed to the default routing domain, deselect .
If you do not force all messages to the system default routing domain, then you have the option of allowing selected MTAs to provide routing domain services in addition to the system default routing domain.
-
Select if you want all MTAs in your GroupWise system to perform DNS lookups and route messages out across the Internet.
or
Deselect if you want to individually designate which MTAs should perform eDirectory lookups and route messages out across the Internet.
-
Click to save the routing options you have specified for the system default routing domain.
Selecting a Specific Routing Domain for an Individual Domain
As long as you are not forcing all messages to the system default routing domain, you can override the system default routing information for an individual domain.
-
In ConsoleOne, browse to and right-click the MTA object, then click .
-
Click to display the Routing Options page.
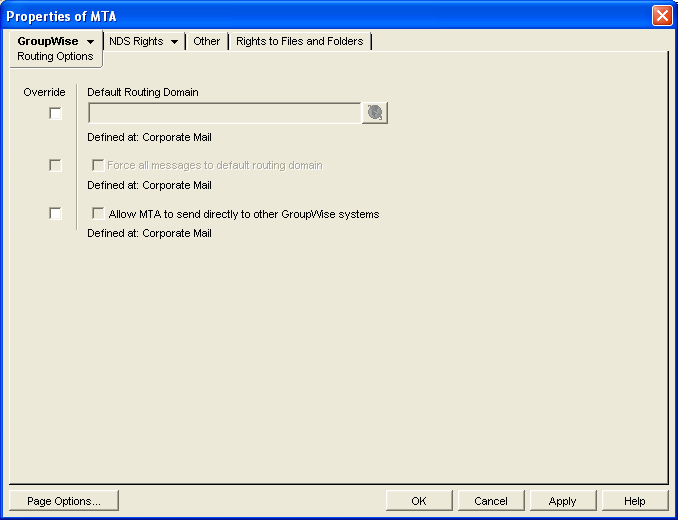
System default routing information displays if it has been set up. See Selecting a System Default Routing Domain.
-
Select Override beside the default information you want to change for the selected domain.
-
Set the routing options as needed for the selected domain.
-
Click to save the specialized routing information for the selected domain.
ConsoleOne then notifies the MTA to restart so the routing information can be put into effect.
MTA Web Console You can check routing information on the Configuration page under the heading.
41.3.2 Scheduling Direct Domain Links
When domains link across an expensive medium such as long-distance phone lines, you can reduce the cost of the link by controlling when it is open. You can choose to have some types of messages wait in the message queues for the lowest phone rate. You can collect messages in the message queues until a specified time or size limit is reached, then open the link, rather than opening the link for each message as it arrives in the queue. You can design as many link profiles as you need, to schedule the transfer of various types of GroupWise messages in the most efficient and cost-effective manner.
To create a schedule for a link between domains:
-
In ConsoleOne, click .
-
In the drop-down list, select the domain to schedule a link for.
-
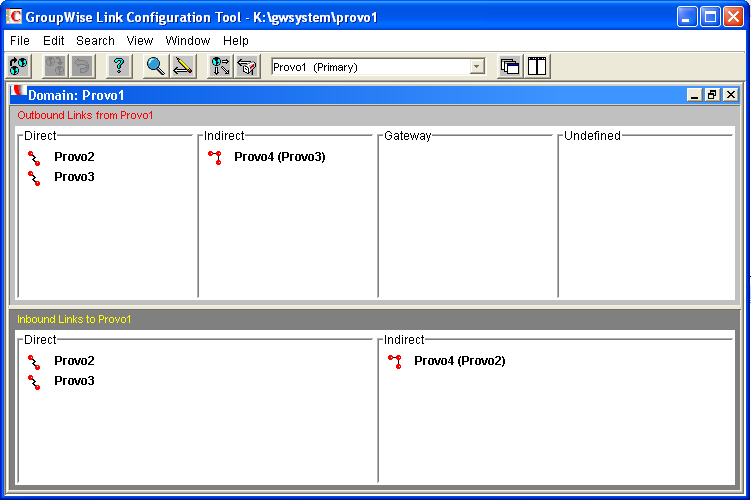
Click to display domain links.
-
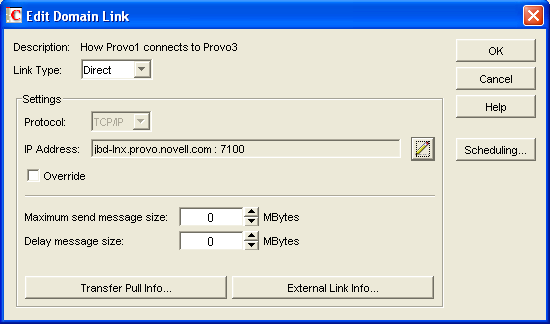
Double-click the domain you want to create a link schedule for.
Only direct links can be scheduled.
-
Click .
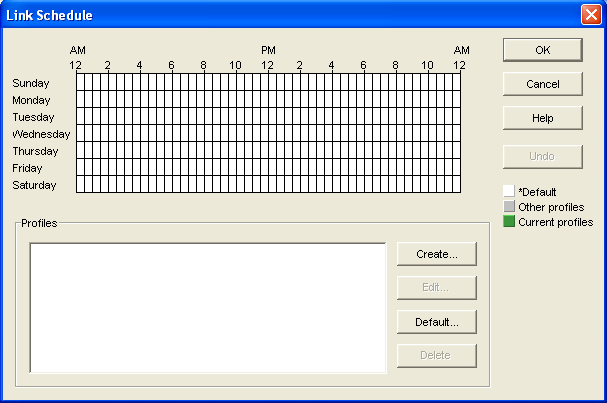
The link schedule grid displays the current schedule for the selected direct link. The grid consists of half-hour time slots showing the link profile assigned to each time slot. Available link profiles are listed below the link schedule grid.
Each link profile defines the following values to set the conditions under which the link opens:
-
Which message queues to monitor
-
Maximum wait time for any message in any monitored queue
-
Maximum number of waiting messages allowed in all monitored queues
-
Maximum total size of waiting messages allowed in all monitored queues
The default profile shows as white in the link schedule grid. The default profile is in effect at all times when no other profile has been selected. Any other defined profiles show as gray. The currently selected link profile shows as green.
-
-
To create a new link profile, click .
or
To edit an existing link profile, select it in the profile list, then click .
or
To edit the default link profile, click .
-
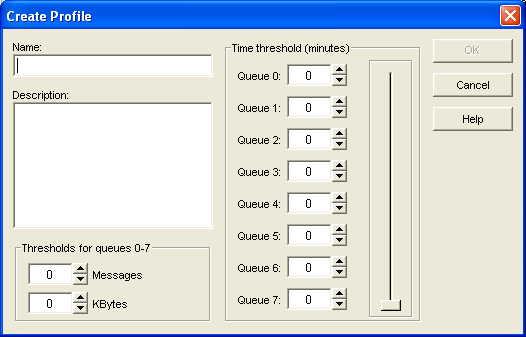
If you are creating a new link profile, provide a unique name for the link profile in the field.
If you are editing an existing link profile, you cannot change the name.
-
In the field, provide whatever additional information is necessary to describe the purpose of the link profile.
-
Use the scroll bar in the box to select which queues to monitor and process when this link profile is in effect.
Queue
Purpose
0
Busy Search requests
1
Requests from GroupWise Remote users
2
High priority user messages; administrative messages
3
High priority status messages
4
Normal priority user messages
5
Normal priority status messages
6
Low priority user messages
7
Low priority status messages
The contents of deselected queues are not monitored but are processed when the link opens.
-
For each selected queue, specify the maximum number of minutes a message must wait in each queue before the link opens.
If you want the link to open immediately when a message arrives in the queue, specify 0 (zero).
-
In the field, specify the total number of messages waiting in all selected queues that will trigger the link to open.
-
In the field, specify the total size in kilobytes of all messages waiting in all selected queues that will trigger the link to open.
-
Click to save the link profile and return to the Link Scheduling dialog box.
-
Select the new or modified link profile in the profile list.
-
Click a time slot or drag to select a range of time slots.
Time slots assigned to the selected link profile display as green.
-
Select all the time slots you want governed by the selected link profile.
-
Select a different link profile to assign to time slots.
or
Create or edit another link profile.
or
Click to save the schedule for the current link.
-
When the schedule is saved, click to close the Edit Domain Link dialog box.
-
To exit the Link Configuration Tool, click .
ConsoleOne then notifies the MTA to restart using the new link schedule.
41.3.3 Using a Transfer Pull Configuration
Typically for a mapped or UNC link, the MTA for the sending domain writes (or “pushes”) message files into the input queue subdirectories of the receiving domain. However, it is possible to change this configuration so the MTA for the receiving domain picks up (or “pulls”) message files from the sending domain.
The transfer pull directory is a location in the sending domain where the MTA for the receiving domain can pick up message files (that is, “pull” them from the sending domain). It represents the only configuration where an MTA processes messages outside its own domain directory structure.
NOTE:The transfer pull configuration does not apply to the Linux MTA because the Linux MTA does not use mapped or UNC links.
To set up a transfer pull configuration between domains:
-
Manually create a transfer directory with input queue subdirectories from which outgoing message files are pulled.
The transfer directory must contain a wpcsin subdirectory, with standard priority 0 through 7 subdirectories beneath. The transfer directory must be placed where both the sending and receiving MTAs have rights.
-
In ConsoleOne, modify the outgoing link from the sending domain so the MTA for the sending domain writes message files to the transfer directory, rather than directly to the receiving domain. See Modifying the Outgoing Transfer Pull Link.
-
In ConsoleOne, modify the incoming link to the receiving domain so the MTA for the receiving domain actively pulls message files from the transfer directory, rather than waiting for them to be delivered. See Modifying the Incoming Transfer Pull Link.
-
Stop and restart the MTAs for both domains.
Modifying the Outgoing Transfer Pull Link
-
In ConsoleOne, connect to the sending domain:
-
Click .
-
Browse to and select the domain database (wpdomain.db) in the sending domain.
-
Click .
-
Click .
-
-
Click .
-
In the drop-down list, select the sending domain.
-
Click to view outbound and inbound links for the sending domain.
-
In the list box, double-click the receiving domain.
-
If you are using a UNC path, click to display the field.
-
In the or field (depending on the selected protocol), specify the full path to the transfer directory you created.
You can use a UNC path for the NetWare and Windows MTA; you can use a mapped drive path for the Windows MTA only.
-
Click .
-
Click to save the link changes for the sending domain and return to the main ConsoleOne window.
-
Continue with Modifying the Incoming Transfer Pull Link.
Modifying the Incoming Transfer Pull Link
-
In ConsoleOne, connect to the receiving domain:
-
Click
-
Browse to and select the domain database (wpdomain.db) in the receiving domain.
-
Click .
-
Click .
-
-
Click .
-
In the drop-down list, select the receiving domain.
-
Click to view outbound and inbound links for the receiving domain.
-
In the list box, double-click the sending domain.
-
Verify that the information displayed in the Edit Domain Link dialog box is correct.
-
Click .
-
Specify the full path to the transfer directory you created.
You can use a UNC path for the NetWare and Windows MTA; you can use a mapped drive path for the Windows MTA only.
-
Specify the number of seconds after which the MTA checks the transfer directory for message files to pull.
-
Specify the command needed to reestablish the connection with the transfer directory, if that connection should be broken for any reason.
-
Click until you return to the Link Configuration dialog box.
-
Click to save the link changes for the receiving domain and return to the main ConsoleOne window.
-
Stop and restart the MTAs for both domains.