9.1 Receiving Proxy Rights
Two steps must be completed before you can act as someone’s proxy.
When these two steps are complete, you can open your Proxy List and click the name of the person you’re proxying for whenever you need to manage his or her Mailbox or Calendar.
9.1.1 Adding and Removing Proxy Names and Rights in the Mailbox Owner’s Access List
Before you can act as a proxy for someone, that person must give you proxy rights in his or her Access List. As a mailbox owner, you can assign each user different rights to your calendaring and messaging information. For example, if you want to let users view specific information about your appointments when they do a busy search on your Calendar, give them Read access for appointments.
-
On the main WebAccess page, click in the upper right corner.
-
Click .
-
To add a user to the list, click .
-
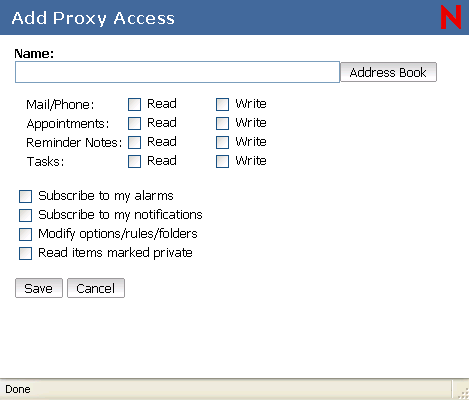
Type a user in the field or use the to select a user.

-
Select the rights you want to give to the user.
Read: Read items you receive. Proxies cannot see your Contacts folder with this or any other proxy right.
Write: Create and send items in your name, including applying your signature (if you have one defined). Assign categories to items, change the subject of items, and perform tasklist options on items.
Subscribe to my alarms: Receive the same alarms you receive. Receiving alarms is supported only if the proxy is on the same post office you are.
Subscribe to my notifications: Receive notification when you receive items. Receiving notifications is supported only if the proxy is on the same post office you are.
Modify options/rules/folders: Change the options in your Mailbox. The proxy can edit any of your Options settings, including the access given to other users. If the proxy also has Mail rights, he or she can create or modify folders.
Read items marked Private: Read the items you marked Private. If you don’t give a proxy Private rights, all items marked Private in your Mailbox are hidden from that proxy.
-
Click .
-
Repeat Step 3 through Step 6 to add each user.
You can select in the Access List and assign rights to all users in the Address Book. For example, if you want all users to have rights to read your mail, you would assign Read rights to All User Access.
-
To delete a user from the Access List, click next to the user’s name.
-
Click .
9.1.2 Adding and Removing Users in Your Proxy List
Before you can act as a proxy for someone, that person must give you proxy rights in his or her Proxy Access List in , and you must add that person’s name to your Proxy List. The amount of access you have depends on the rights you have been given.
-
On the main WebAccess page, click on the toolbar.
-
To remove a user, select the name, then click .
-
To add a user, type the name, then click .
The user’s Mailbox is opened. The name of the person for whom you are acting as proxy is displayed at the top of the Folder List.
-
To return to your own Mailbox, click .
Removing a user from your Proxy List does not remove your rights to act as proxy for that user. The user whose Mailbox you access must change your rights in his or her Proxy Access List.