3.2 Policy Builder Tasks in iManager
This section contains instructions on performing common tasks in the Policy Builder:
3.2.1 Opening The Policy Builder
-
In iManager, expand the Role, then click .
-
Specify a driver set.
-
Click the driver for which you want to manage policies. The Identity Manager Driver Overview opens:
Figure 3-1 Identity Manager Driver Overview
Policies are managed from the Identity Manager Driver Overview.
3.2.2 Creating a Policy
-
Open the for the driver you want to manage.
-
Click the icon representing the policy you want to define.
 represents an undefined policy.
 represents a defined policy.
-
Click .
-
Enter a name for the new policy, then select the Policy Builder.
-
The policy is displayed. To define one or more rules for this policy, click , then follow the instructions in Section 3.2.3, Defining Individual Rules within a Policy.
3.2.3 Defining Individual Rules within a Policy
Rules are defined in the Rule Builder window of the Policy Builder:
Figure 3-2 Rule Builder Window of Policy Builder
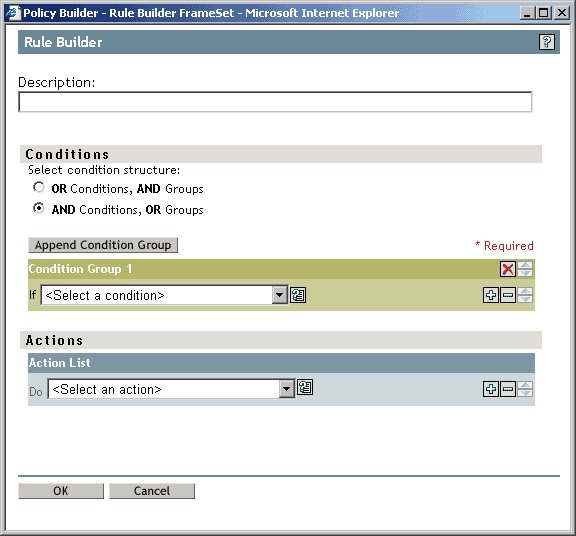
The Rule Builder interface enables you to quickly create and modify rules using intelligent drop-down menus.
In the Rule Builder, you define a set of conditions that must be met before a defined action occurs.
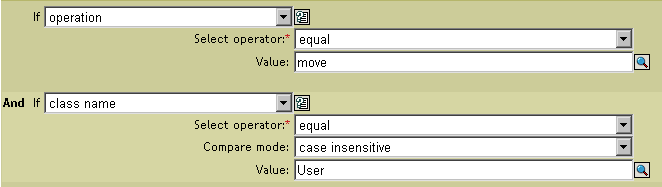
For example, if you needed to create a rule that disallowed any new objects from being added to your environment, you might define this rule similar to the following: When an add operation occurs, veto the operation.
To implement this logic in the Rule Builder, you could select the following condition:
Figure 3-3 Move User Condition in the Rule Builder Interface
And the following action:
Figure 3-4 Veto Action in the Rule Builder Interface

See Section 3.5, Conditions and Section 3.6, Actions or a detailed reference on the conditions and actions available in the Rule Builder.
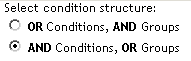
Tips
To create more complex conditions, you can join conditions and groups of conditions together with and/or statements. You can modify the way these are joined by selecting the condition structure:
Figure 3-5 Condition Structure Radio Buttons
-
Click the
 icon to see a list of values for a field. In the example above, this icon opens a list of valid class names.
-
Click the
 icon to use the Argument Builder interface to construct an argument.
-
Click the
 icon to disable a policy, rule, condition, or action. Click the
 icon to re-enable it.
-
Click the
 icon to add a comment to a policy or rule. Comments are stored directly on the policy or rule, and can be as long as necessary.
-
Use the Cut/Copy/Paste icons,
 to use the Policy Builder clipboard. The Paste icon is disabled if the current content on the clipboard is invalid at that location.
-
Use the
 icons to add, remove, and position conditions.
-
Use the
 button to add condition groups.
-
Use the
 icons to remove and position condition groups.
3.2.4 Defining Individual Arguments within a Rule
The Argument Builder provides a dynamic graphical interface that enables you to construct complex argument expressions for use within the Rule Builder. To access the Argument Builder, see Argument Builder.
Arguments are dynamically used by actions and are derived from tokens that are expanded at run time.
Tokens are broken up into two classifications: nouns and verbs. Noun tokens expand to values that are derived from the current operation, the source or destination data stores, or some external source. Verb tokens modify the concatenated results of other tokens that are subordinate to them.
Figure 3-6 Default Argument Builder Interface
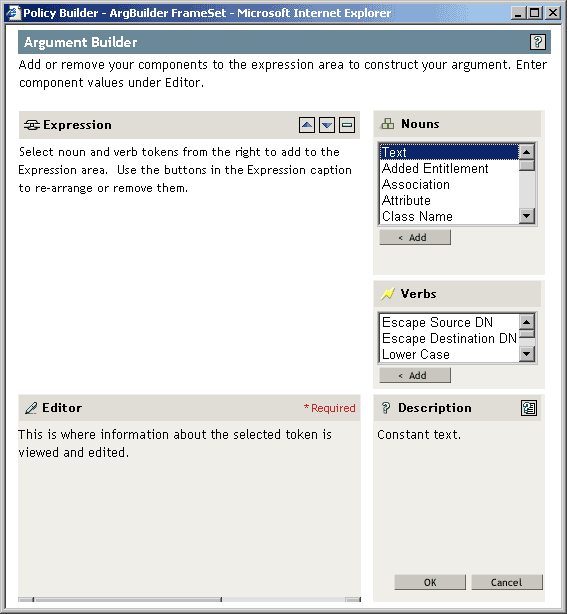
To define an expression, select one or more nouns tokens (values, objects, variables, etc.), and combine then with verb tokens (substring, escape, uppercase, and lowercase) to construct arguments. Multiple tokens are combined to construct complex arguments.
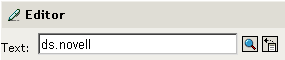
For example, if you want the argument set to an attribute value, you select the attribute token, then select the attribute name:
Figure 3-7 Editor Displaying ds.novell as a Text Argument
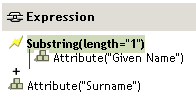
If you only want a portion of this attribute, you can combine the attribute token with the substring token:
Figure 3-8 Expression Displaying a Substring of Length 1 on the Give Name Attribute, Combined with the Surname Attribute.
After you add a token, you can edit its fields in the editor.
See Section 3.7, Noun Tokens and Section 3.8, Verb Tokens for a detailed reference on the nouns and verbs available in the Argument Builder.
Tips
-
To create more complex conditions, you can join conditions or groups of conditions together with and/or statements.
-
Use the
 icons to move and delete noun tokens and verb tokens.
-
Click the
icon to see a list of values for a field.
-
After you add a noun token or a verb token, you can provide values in the editor, then immediately add another noun token or verb token. You do not need to refresh the Expression pane to apply your changes; they appear when the next operation is performed.
Although you define most arguments using the Argument Builder, there are several more builders that are used by the Condition Editor and Action Editor in the Policy Builder. Each builder can recursively call anyone of the builders in the following list:
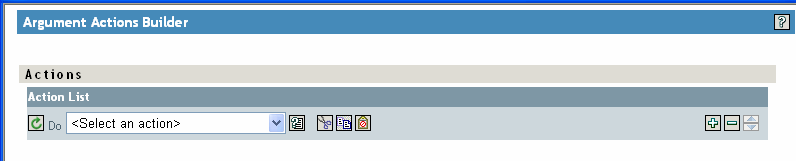
Argument Actions Builder
The Argument Actions Builder enables you to set the action that is required by the For Each action and the Implement Entitlement action.
In the following example, the add destination attribute value action is performed for each Group entitlement that is being added in the current operation.
Figure 3-9 Argument Actions Builder

To define the action of add destination attribute value, click the icon that launches the Argument Actions Builder. In the Argument Actions Builder, you define the desired action. In the following example, the member attribute is added to the destination object for each added Group entitlement.
Figure 3-10 Argument Actions Builder
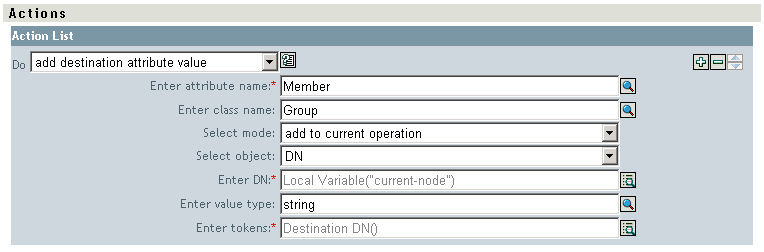
Figure 3-11 Argument Actions Builder
Argument Builder
Launch the Argument Builder from the following actions by clicking the Edit Arguments icon.
-
Clear Destination Attribute Value When the selected object is DN or Association.
-
Clear Source Attribute Value When the selected object is DN or Association.
-
Delete Destination Object When the selected object is DN or Association.
-
Delete Source Object When the selected object is DN or Association.
-
Rename Destination Object When the selected object is DN or Association and Enter String.
-
Rename Source Object When the selected object is DN or Association and Enter String.
-
Set Destination Attribute ValueWhen the selected object is DN or Association and Enter Value type is not structured.
Match Attribute Builder
The Match Attribute Builder enables you to select attributes and values used by the Section 3.6.17, Find Matching Object action to determine if a matching object exists in a data store.
For example, if you want to match users based on a common name and a location, you would select the following condition:
Figure 3-12 Find Matching Object

You then click the Edit Arguments icon next to the Enter Match Attributes field to launch the Match Attribute Builder interface:
Figure 3-13 Match Attribute Builder

Select the icon to browse to and select the attributes you want to match. In this example they are L and CN.
The second column allows you to match the current value stored in the attribute by selecting . You can match against another value by selecting . You can create any value you want to match. Select the value type, and the appropriate builder is available through the field.
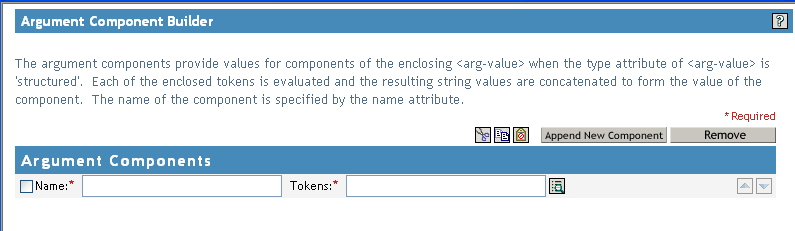
Action Argument Component Builder
Launch the Action Argument Component Builder by selecting the following actions when the Enter Value Type selection is the Structured selection.
Figure 3-14 Action Argument Component Builder

Figure 3-15 Action Argument Component Builder
Argument Value List Builder
The Argument Value List Builder enables you to construct default argument values for the Set Default Attribute Value action.
For example, if you want to set a default location of Unknown, you select the following action:
Figure 3-16 Argument Value List Builder

You then click the icon next to the Enter Values field to launch the Argument Value List Builder interface, and construct an argument similar to the following:
Figure 3-17 Argument Value List Builder

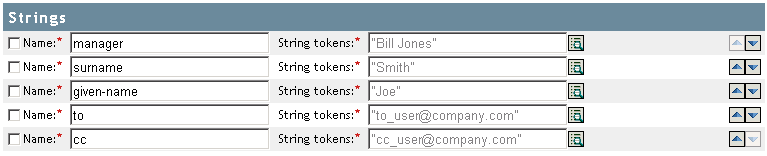
Named String Builder
The Named String Builder enables you to construct name/value pairs for use in certain actions such as Generate Event, Send Email and Send Email from Template.
For a Generate Event action, the named strings correspond to the custom value fields you can provide with an event:
Figure 3-18 Named String Builder
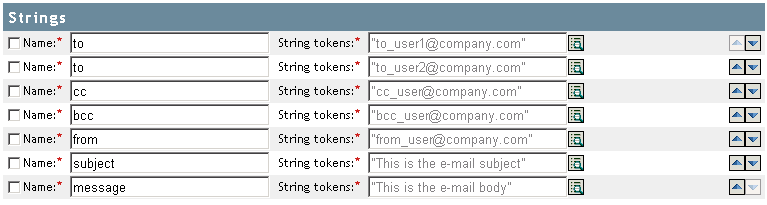
For a Send Mail action, the named strings correspond to the elements of the e-mail:
Figure 3-19 Send Mail Action
A complete list of possible values is contained in the help file corresponding to the action that launches the Named String Builder.
Condition Argument Component Builder
Launch the Condition Argument Component Builder by clicking the Edit Arguments Icon.
In order to see the icon, you must select the Structured selection for Mode with the following conditions:
Figure 3-20 Structured Option
Figure 3-21 Condition Argument Component Builder
3.2.5 Modifying a Policy
-
Open the for the driver you want to manage.
-
Click the icon representing the policy you want to modify.
-
Select the policy you want to modify, then click .
3.2.6 Removing a Policy
Removes the policy from the selected Policy Set but doesn’t delete the policy.
-
Open the for the driver you want to manage.
-
Click the icon representing the policy you want to remove.
To view a policy that is not associated with a policy set:
-
Open the for the driver you want to manage.
-
Click the
 .
.
To add the removed policy back to the policy set:
-
Open the for the driver you want to manage.
-
Click the policy set where you want to add the policy.
-
Click .
-
Select , then click the browse button.
-
Browse to the policy you want to add.
HINT:Make sure you are in the proper container to see the policy.
-
Click .
-
Click .
3.2.7 Renaming a Policy
-
Open the for the driver you want to manage.
-
Click the icon representing the policy you want to rename.
-
Click and rename the policy.
-
Click .
-
Click .
3.2.8 Deleting a Policy
-
Open the for the driver you want to manage.
-
Click the icon representing the policy you want to delete.
-
Select the policy you want to delete, then click .
3.2.9 Importing a Policy from an XML File
-
Open the for the driver you want to manage.
-
Click the icon representing the policy you want to import.
-
Select the policy, then click .
-
Click the button, then select
-
Browse to and select the policy file to import, then click .
3.2.10 Exporting a Policy to an XML File
-
Open the for the driver you want to manage.
-
Click the icon representing the policy you want to export.
-
Select the policy, then click .
-
Click the button, then select a location to save the DirXML Script XML file.
-
Click
3.2.11 Creating a Policy Reference
A policy reference enables you to create a single policy, and reference it in multiple locations. If you have a policy that is used by more than one driver or policy, creating a reference simplifies management of this policy.
-
Open the for the driver you want to manage.
-
Click the icon representing the policy you want to add as a reference.
-
Select the policy, then click .
-
Click the button, and select .
-
Browse to and select the policy object to reference, then click .
3.2.12 Using Predefined Rules
iManager includes twenty predefined rules. You can import and use these rules as well as create your own rules. These rules include common tasks that administrators use. You need to provide information specific to your environment to customize the rules.
To access the predefined rules:
-
Open the for the driver you want to manage.
-
Click the icon representing the policy where you want to add the predefined rule.
-
Select a policy, then click .
-
Click and select the predefined rule you want to use.
Command Transformation - Create Departmental Container - Part 1 and Part 2
Creates a department container in the destination data store, if one does not exist. Implement the rule on the Subscriber Command Transformation policy or Publisher Command Transformation policy in the driver.
There are two steps involved in using the predefined rules: creating a policy in the Command Transformation policy set, and importing the predefined rule. If you already have a Command Transformation policy that you want to add this rule to, skip to Importing the Predefined Rule.
Creating a Policy
-
Open the for the driver you want to manage.
-
Click the Command Transformation Policy object on the Publisher or Subscriber channel.
-
Click .
-
Name the policy, make sure to implement the policy with the Policy Builder, then click .
The Rule Builder is launched.
Importing the Predefined Rule
-
In the Rule Builder, click .
-
Select .
-
Click .
-
Select .
-
Click .
There is no information to change in the rules that is specific to your environment.
IMPORTANT:Make sure that the rules are listed in order. Part 1 must be executed before Part 2.
How the Logic in the Rule Works
The rule is used when the destination location for an object does not exist. Instead of getting a veto because the object cannot be placed, this rule creates the container and places the object in the container.
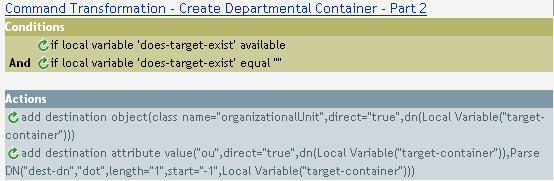
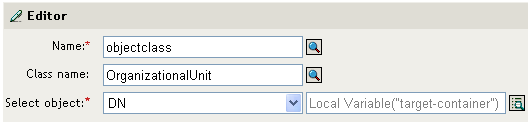
Part 1 looks for any Add operation. When the Add operation occurs, two local variables are set. The first local variable is named target-container. The value of target-container is set to the destination DN. The second local variable is named does-target-exist. The value of does-target-exist is set to the destination attribute value of objectclass. The class is set to OrganizationalUnit. The DN of the OrganizationalUnit is set to the local variable of target-container.
Figure 3-22 Create Container
Part 2 checks to see if the local variable does-target-exist is available. It also checks to see if the value of the local variable does-target-exist is set to a blank value. If the value is blank, then an Organizational Unit object is created. The DN of the organizational unit is set to the value of the local variable target-container. It also adds the value for the OU attribute. The value of the OU attribute is set to the name of the new organizational unit, which is obtained by parsing the value of the local variable target-container.
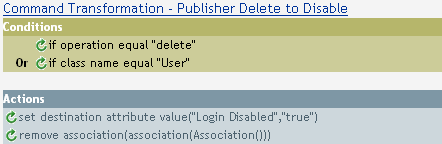
Command Transformation - Publisher Delete to Disable
Transforms a Delete operation for a User object into a Modify operation that disables the target User object in eDirectory™. Implement the rule on the Publisher Command Transformation policy in the driver.
There are two steps involved in using the predefined rules: creating a policy in the Command Transformation policy set, and importing the predefined rule. If you already have a Command Transformation policy that you want to add this rule to, skip to Importing the Predefined Rule.
Creating a Policy
-
Open the for the driver you want to manage.
-
Click the Command Transformation Policy object on the Publisher channel.
-
Click .
-
Name the policy, make sure to implement the policy with the Policy Builder, then click .
The Rule Builder is launched.
Importing the Predefined Rule
-
In the Rule Builder, click .
-
Select .
-
Click OK.
There is no information to change in the rule that is specific to your environment.
How the Logic in the Rule Works
The rule is used when a Delete command is going to be sent to the Identity Vault, usually in response to a Delete event that occurred in the connected system. Instead of the User object being deleted in the Identity Vault, the User object is disabled. When a Delete command is processed for a User object, the destination attribute value of Login Disabled is set to true, the association is removed from the User object, and the Delete command is vetoed. The User object can no longer log in into the Novell eDirectory tree, but the User object was not deleted.
Creation - Require Attributes
Prevents User objects from being created unless the required attributes are populated. Implement the rule on the Subscriber Creation policy or the Publisher Creation policy in the driver.
There are two steps involved in using the predefined rules: creating a policy in the Creation policy set, and importing the predefined rule. If you already have a Creation policy that you want to add this rule to, skip to Importing the Predefined Rule.
Creating a Policy
-
Open the for the driver you want to manage.
-
Click the Creation Policy object on the Publisher or Subscriber channel.
-
Click .
-
Name the policy, make sure to implement the policy with the Policy Builder, then click .
The Rule Builder is launched.
Importing the Predefined Rule
-
In the Rule Builder, click .
-
Select .
-
Click in the Rule Builder, to edit the rule.
-
Delete from the .
-
Click the browse icon, then browse to and select the attribute you require for a User object to be created.
-
(Optional) If you want more than one required attribute, click the to add a new action.
-
Select and browse to the additional required attribute.
-
Click .

How the Logic in the Rule Works
The rule is used when your business processes require that a user has specific attributes populated in the source User object before the destination the User object can be created. When a User object is created in the source data store, the rule vetoes the creation of the object in the destination data store unless the required attributes are provided when the User object is created. You can have one or more required attributes.
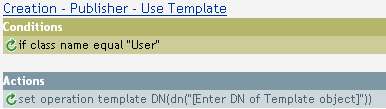
Creation - Publisher - Use Template
Allows for the use of a Novell eDirectory template object during the creation of a User object. Implement the rule on the Publisher Creation policy in the driver.
There are two steps involved in using the predefined rules: creating a policy in the Creation policy set, and importing the predefined rule. If you already have a Creation policy that you want to add this rule to, skip to Importing the Predefined Rule.
Creating a Policy
-
Open the for the driver you want to manage.
-
Click the Creation Policy object on the Publisher or Subscriber channel.
-
Click .
-
Name the policy, make sure to implement the policy with the Policy Builder, then click .
The Rule Builder is launched.
Importing the Predefined Rule
-
In the Rule Builder, click .
-
Select .
-
Click in the Rule Builder, to edit the rule.
-
Delete from the .
-
Click the to launch the Argument Builder.
-
Select in the Noun list, then click .
-
In the Editor, click the browse icon and browse to and select the template object, then click .
-
Click .
How the Logic in the Rule Works
The rule is used when you want to create a user in the Identity Vault based on a template object. If you have attributes that are the same for users, using the template saves time. You fill in the information in the template object and when the User object is created, Identity Manager uses the attribute values from the template to create the User object.
During the creation of User objects, the rule does the action of the set operation template DN, which instructs the Identity Manager to use the referenced template when creating the object.
Creation - Set Default Attribute Value
Allows you to set default values for attributes that are assigned during the creation of User objects. Implement the rule on the Subscriber Creation policy or Publisher Creation policy in the driver.
There are two steps involved in using the predefined rules: creating a policy in the Creation policy set, and importing the predefined rule. If you already have a Creation policy that you want to add this rule to, skip to Importing the Predefined Rule.
Creating a Policy
-
Open the for the driver you want to manage.
-
Click the Creation Policy object on the Publisher or Subscriber channel.
-
Click .
-
Name the policy, make sure to implement the policy with the Policy Builder, then click .
The Rule Builder is launched.
Importing the Predefined Rule
-
In the Rule Builder, click .
-
Select .
-
Click in the Rule Builder, to edit the rule.
-
Delete from the .
-
Click the browse icon, then browse to and select the attribute you want to have created.
-
Delete from the .
-
Click the to launch the Argument Values List Builder.
-
Select the type of data you want the value to be.
-
Click the icon to launch the Argument Builder.
-
Create the value you want the attribute to be through the Argument Builder, then click .
-
Click .
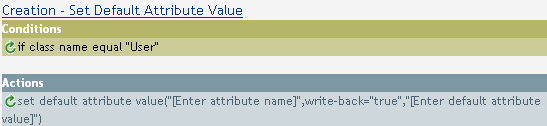
How the Logic in the Rule Works
The rule is used when you want to populate default attribute values when creating a User object. When a User object is created, the rule adds the specified attribute values if and only if the attribute has no values supplied by the source object.
If you want more than one attribute value defined, right-click the action and click > . Select the action, set the default attribute value, and follow the steps above to assign the value to the attribute.
Creation - Set Default Password
During the creation of User objects, it sets a default password for User objects. Implement the rule on the Subscriber Creation policy or Publisher Creation policy in the driver.
There are two steps involved in using the predefined rules: creating a policy in the Creation policy set, and importing the predefined rule. If you already have a Creation policy that you want to add this rule to, skip to Importing the Predefined Rule.
Creating a Policy
-
Open the for the driver you want to manage.
-
Click the Creation Policy object on the Publisher or Subscriber channel.
-
Click .
-
Name the policy, make sure to implement the policy with the Policy Builder, then click .
The Rule Builder is launched.
Importing the Predefined Rule
-
In the Rule Builder, click .
-
Select .
-
Click OK.
There is no information to change in the rule that is specific to your environment.

How the Logic in the Rule Works
The rule is used when you want User objects to be created with a default password. During the creation of a User object, the password that is set for the User object is the Given Name attribute plus the Surname attribute of the User object.
You can change the value of the default password by editing the argument. You can set the password to any other value you want through the Argument Builder.
Event Transformation - Scope Filtering - Include Subtrees
Excludes all events that occur outside of the specific subtrees. Implement the rule on the Subscriber Event Transformation policy or the Publisher Event Transformation policy in the driver.
There are two steps involved in using the predefined rules: creating a policy in the Event Transformation policy set, and importing the predefined rule. If you already have an Event Transformation policy that you want to add this rule to, skip to Importing the Predefined Rule.
Creating a Policy
-
Open the for the driver you want to manage.
-
Click the Event Transformation Policy object on the Publisher or Subscriber channel.
-
Click .
-
Name the policy, make sure to implement the policy with the Policy Builder, then click .
The Rule Builder is launched.
Importing the Predefined Rule
-
In the Rule Builder, click .
-
Select .
-
Click in the Rule Builder, to edit the rule.
-
Delete in the .
-
Click the browse button to browse the Identity Vault for the part of the tree you were you want events to synchronize, then click .
-
Click .

How the Logic in the Rule Works
The rule is used when you only want to synchronize specific subtrees between the Identity vault and the connected system.When an event occurs anywhere but in that specific part of the Identity Vault, it is vetoed. You can add additional subtrees to be synchronized by copying and pasting the Section 3.5.15, If Source DN condition.
Event Transformation - Scope Filtering - Exclude Subtrees
Excludes all events that occur in a specific subtree. Implement the rule on the Subscriber Event Transformation or the Publisher Event Transformation policy in the driver.
There are two steps involved in using the predefined rules: creating a policy in the Event Transformation policy set, and importing the predefined rule. If you already have an Event Transformation policy that you want to add this rule to, skip to Importing the Predefined Rule.
Creating a Policy
-
Open the Identity Manager Driver Overview for the driver you want to manage.
-
Click the Event Transformation Policy object on the Publisher or Subscriber channel.
-
Click .
-
Name the policy, make sure to implement the policy with the Policy Builder, then click .
The Rule Builder is launched.
Importing the Predefined Rule
-
In the Rule Builder, click .
-
Select .
-
Click in the Rule Builder, to edit the rule.
-
Delete in the .
-
Click the browse button to browse the Identity Vault for the part of the tree you want to exclude events from synchronizing, then click .
-
Click .

How the Logic in the Rule Works
The rule is used when you want to exclude part of the Identity Vault or connected system from synchronizing. When an event occurs in that specific part of the Identity Vault, it is vetoed. You can add additional subtrees to be excluded by copying and pasting the if source DN condition.
Input or Output Transformation - Reformat Telephone Number from (nnn) nnn-nnnn to nnn-nnn-nnnn
Converts the format of the telephone number. Implement the rule on the Input or Output Transformation policy in the driver. Typically, if this rule is used on an Input Transformation, you would you then use the rule Reformat Telephone Number from nnn-nnn-nnnn to (nnn) nnn-nnnn on the Output Transformation and vice versa to convert the format back and forth.
There are two steps involved in using the predefined rules: creating a policy in the Input or Output Transformation policy set, and importing the predefined rule. If you already have an Input or Output Transformation policy that you want to add this rule to, skip to Importing the Predefined Rule.
Creating a Policy
-
Open the for the driver you want to manage.
-
Click the Input or Output Transformation Policy object on the Publisher or Subscriber channel.
-
Click .
-
Name the policy, make sure to implement the policy with the Policy Builder, then click .
The Rule Builder is launched.
Importing the Predefined Rule
-
In the Rule Builder, click .
-
Select .
-
Click in the Rule Builder, to edit the rule.
-
Define the condition you want to have occur when the telephone number is reformatted.
-
Click .
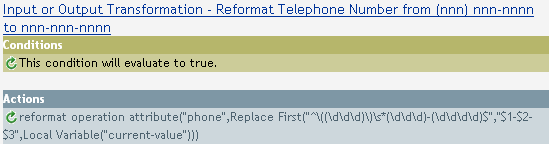
How the Logic in the Rule Works
The rule is used when you want to reformat the telephone number. It finds all the values for the attribute phone in the current operation that match the pattern (nnn) nnn-nnnn and replaces each with nnn-nnn-nnnn.
Input or Output Transformation - Reformat Telephone Number from nnn-nnn-nnnn to (nnn) nnn-nnnn
Transforms the format of the telephone number. Implement the rule on the Input or Output Transformation policy. Typically, if you use this rule on an Output Transformation, you would use the rule Reformat Telephone Number from (nnn) nnn-nnnn to nnn-nnn-nnnn on the Input Transformation and vice versa to convert the format back and forth.
There are two steps involved in using the predefined rules; creating a policy in the Input or Output Transformation policy set, and importing the predefined rule. If you already have an Input or Output Transformation policy that you want to add this rule to, skip to Importing the Predefined Rule.
Creating a Policy
-
Open the for the driver you want to manage.
-
Click the Input or Output Transformation Policy object on the Publisher or Subscriber channel.
-
Click .
-
Name the policy, make sure to implement the policy with the Policy Builder, then click .
The Rule Builder is launched.
Importing the Predefined Rule
-
In the Rule Builder, click .
-
Select .
-
Click in the Rule Builder, to edit the rule.
-
Define the condition you want to have occur when the telephone number is reformatted.
-
Click .
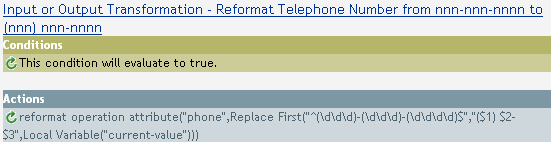
How the Logic in the Rule Works
The rule is used when you want to reformat the telephone number. It finds all the values for the attribute phone in the current operation that match the pattern (nnn) nnn-nnnn and replaces each with nnn-nnn-nnnn.
Matching - Publisher Mirrored
Finds matches in the Identity Vault for objects in the connected system based on their name and location. Implement the rule on the Publisher Matching policy in the driver.
There are two steps involved in using the predefined rules: creating a policy in the Matching policy set, and importing the predefined rule. If you already have a Matching policy that you want to add this rule to, skip to Importing the Predefined Rule.
Creating a Policy
-
Open the for the driver you want to manage.
-
Click the Matching Policy object on the Publisher channel.
-
Click .
-
Name the policy, make sure to implement the policy with the Policy Builder, then click .
The Rule Builder is launched.
Importing the Predefined Rule
-
In the Rule Builder, click .
-
Select .
-
Click in the Rule Builder, to edit the rule.
-
Delete from the .
-
Browse to the container in the source hierarchy where you want the matching to start, then click .
-
Click .
-
Delete from the .
-
Click on the to launch the Argument Builder.
-
Select in the Noun list, then click .
-
In the Editor, click the browse icon and browse to and select the container in the destination hierarchy where you want the source structure to be matched, then click .
-
Click .

How the Logic in the Rule Works
When an Add event occurs on an object in the connected system that is located within the specified source subtree, the rule constructs a DN that represents the same object name and location within the Identity Vault relative to the specified destination subtree. If the destination objects exists and is of the desired object class then it is considered a match. You must supply the DN's of the source (connected system) and destination (Identity Vault) subtrees.
Matching - Subscriber Mirrored - LDAP Format
Finds matches in a connected system that uses LDAP format DN's for objects in the Identity Vault based on their name and location. Implement the rule on the Subscriber Matching policy in the driver.
There are two steps involved in using the predefined rules: creating a policy in the Matching policy set, and importing the predefined rule. If you already have a Matching policy that you want to add this rule to, skip to Importing the Predefined Rule.
Creating a Policy
-
Open the for the driver you want to manage.
-
Click the Matching Policy object on the Subscriber channel.
-
Click .
-
Name the policy, make sure to implement the policy with the Policy Builder, then click .
The Rule Builder is launched.
Importing the Predefined Rule
-
In the Rule Builder, click .
-
Select .
-
Click in the Rule Builder, to edit the rule.
-
Delete from the .
-
Browse to the container in the source hierarchy where you want the matching to start, then click .
-
Click .
-
Delete from the .
-
Click on the to launch the Argument Builder.
-
Select in the Noun list, then click .
-
In the Editor, click the browse icon and browse to and select the container in the destination hierarchy where you want the source structure to be matched, then click OK.
-
Click OK.
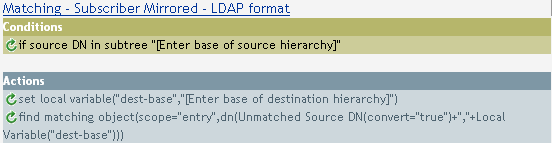
How the Logic in the Rule Works
When an Add event occurs on an object in the Identity Vault that is located within the specified source subtree, the rule constructs a DN that represents the same object name and location within the connected system relative to the specified destination subtree. If the destination objects exists and is of the desired object class then it is considered a match. You must supply the DN's of the source (Identity Vault) and destination (connected system) subtrees. The connected system must use an LDAP formatted DN.
Matching - By Attribute Value
Finds matches for objects by specific attribute values. Implement the rule on the Subscriber Matching policy or the Publisher Matching policy in the driver.
There are two steps involved in using the predefined rules; creating a policy in the Matching policy set, and importing the predefined rule. If you already have a Matching policy that you would like to add this rule to, skip to Importing the Predefined Rule.
Creating a Policy
-
Open the for the driver you want to manage.
-
Click the Matching Policy object on the Publisher channel.
-
Click .
-
Name the policy, make sure to implement the policy with the Policy Builder, then click .
The Rule Builder is launched.
Importing the Predefined Rule
-
In the Rule Builder, click .
-
Select .
-
Click in the Rule Builder, to edit the rule.
-
Delete from the .
-
Click the to launch the Argument Builder.
-
Select in the Noun list, then click .
-
In the Editor, click the browse icon and browse to and select the container where you want the search to start, then click .
-
Delete from the .
-
Click the to launch the Match Attributes Builder.
-
Click the browse icon and select the attributes you want to match. You can select one or more attributes to match against, then click .
-
Click .
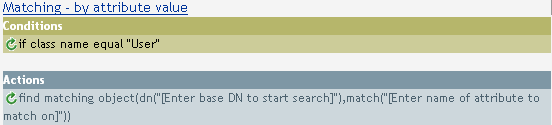
How the Logic in the Rule Works
When an Add event occurs on an object in the source data store, rule searches for an object in the destination data store that has the same values for the specified attribute. You must supply the DN of the base of the subtree to search in the connected system and the name of the attribute to match on.
Placement - Publisher Mirrored
Places objects in the Identity Vault by based on the name and location from the connected system. Implement the rule on the Publisher Placement policy in the driver.
There are two steps involved in using the predefined rules: creating a policy in the Placement policy set, and importing the predefined rule. If you already have a Placement policy that you would like to add this rule to, skip to Importing the Predefined Rule.
Creating a Policy
-
Open the for the driver you want to manage.
-
Click the Placement Policy object on the Publisher channel.
-
Click .
-
Name the policy, make sure to implement the policy with the Policy Builder, then click .
The Rule Builder is launched.
Importing the Predefined Rule
-
In the Rule Builder, click .
-
Select .
-
Click in the Rule Builder, to edit the rule.
-
Delete from the .
-
Browse to and select the container in the source hierarchy where you want the object to be acted upon, then click .
-
Delete from the .
-
Click the to launch the Argument Builder.
-
Select in the Noun list, then click .
-
In the Editor, click the browse icon and browse to and select the container in the destination hierarchy where you want the object to be placed, then click .
-
Click .
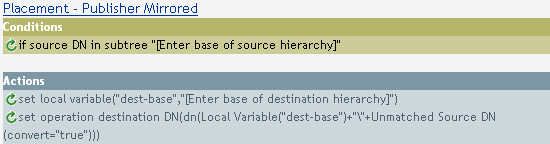
How the Logic in the Rule Works
If the User object resides in the specified source subtree in the connected system, then the object is placed at the same relative name and location within the Identity Vault. You must supply the DN's of the source (connected system) and destination (Identity Vault) subtrees.
Placement - Subscriber Mirrored - LDAP Format
Places objects in the data store by using the mirrored structure in the Identity Vault from a specified point. Implement the rule on the Placement policy in the driver. You can implement the rule only on the Subscriber channel.
There are two steps involved in using the predefined rules: creating a policy in the Placement policy set, and importing the predefined rule. If you already have a Placement policy that you want to add this rule to, skip to Importing the Predefined Rule.
Creating a Policy
-
Open the for the driver you want to manage.
-
Click the Placement Policy object on the Subscriber channel.
-
Click .
-
Name the policy, make sure to implement the policy with the Policy Builder, then click .
The Rule Builder is launched.
Importing the Predefined Rule
-
In the Rule Builder, click .
-
Select .
-
Click in the Rule Builder, to edit the rule.
-
Delete from the .
-
Browse to and select the container in the source hierarchy where you want the object to be acted upon, then click .
-
Delete from the .
-
Click the to launch the Argument Builder.
-
Select in the Noun list, then click .
-
In the Editor, click the browse icon and browse to and select the container in the destination hierarchy where you want the object to be placed, then click .
-
Click .
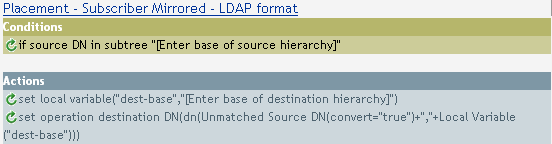
How the Logic in the Rule Works
If the User object resides in the specified source subtree, then the object is placed at the same relative name and location within the Identity Vault. You must supply the DN's of the source (Identity Vault) and destination (connected system) subtrees. The connected system must use an LDAP formatted DN.
Placement - Publisher Flat
Places objects from the data store into one container in the Identity Vault. Implement the rule on the Publisher Placement policy in the driver.
There are two steps involved in using the predefined rules: creating a policy in the Placement policy set, and importing the predefined rule. If you already have a Placement policy that you want to add this rule to, skip to Importing the Predefined Rule.
Creating a Policy
-
Open the for the driver you want to manage.
-
Click the Placement Policy object on the Publisher channel.
-
Click .
-
Name the policy, make sure to implement the policy with the Policy Builder, then click .
The Rule Builder is launched.
Importing the Predefined Rule
-
In the Rule Builder, click .
-
Select .
-
Click in the Rule Builder, to edit the rule.
-
Delete from the .
-
Click the to launch the Argument Builder.
-
Select in the Noun list, then click .
-
In the Editor, click the browse icon and browse to and select the destination container were you want all of the user objects to be placed, then click .
-
Click .

How the Logic in the Rule Works
The rule places all User objects in the destination DN. The rule sets the DN of the destination container as the local variable dest-base. The rule then sets the destination DN to be dest-base\CN attribute. The CN attribute of the User object is the first two letters of the Given Name attribute plus the Surname attribute as lowercase. The rule uses slash format.
Placement - Subscriber Flat - LDAP Format
Places objects from the Identity Vault into one container in the data store. Implement the rule on the Subscriber Placement policy in the driver.
There are two steps involved in using the predefined rules: creating a policy in the Placement policy set, and importing the predefined rule. If you already have a Placement policy that you want to add this rule to, skip to Importing the Predefined Rule.
Creating a Policy
-
Open the for the driver you want to manage.
-
Click the Placement Policy object on the Subscriber channel.
-
Click .
-
Name the policy, make sure to implement the policy with the Policy Builder, then click .
The Rule Builder is launched.
Importing the Predefined Rule
-
In the Rule Builder, click .
-
Select .
-
Click in the Rule Builder, to edit the rule.
-
Delete from the .
-
Click the to launch the Argument Builder.
-
Select in the Noun list, then click .
-
In the Editor, add the destination container were you want all of the User objects to be placed. Make sure the container is specified in LDAP format, then click .
-
Click .
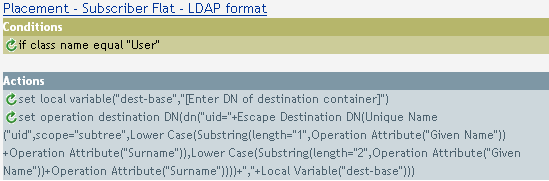
How the Logic in the Rule Works
The rule places all User objects in the destination DN. The rule sets the DN of the destination container as the local variable dest-base. The rule then sets the destination DN to be uid=unique name, dest-base. The uid attribute of the User object is the first two letters of the Given Name attribute plus the Surname attribute as lowercase. The rule uses LDAP format.
Placement - Publisher By Dept
Places objects from one container in the data store into multiple containers in the Identity Vault based on the value of the OU attribute. Implement the rule on the Publisher Placement policy in the driver.
There are two steps involved in using the predefined rules: creating a policy in the Placement policy set, and importing the predefined rule. If you already have a Placement policy that you want to add this rule to, skip to Importing the Predefined Rule.
Creating a Policy
-
Open the for the driver you want to manage.
-
Click the Placement Policy object on the Publisher channel.
-
Click .
-
Name the policy, make sure to implement the policy with the Policy Builder, then click .
The Rule Builder is launched.
Importing the Predefined Rule
-
In the Rule Builder, click .
-
Select .
-
Click to edit the rule.
-
Delete from the .
-
Click the to launch the Argument Builder.
-
Select in the Noun list, then click .
-
In the Editor, click the browse icon and browse to and select the parent container in the Identity Vault. Make sure all of the department containers are child containers of this DN, then click .
-
Click .
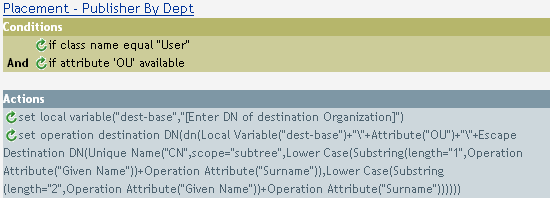
How the Logic in the Rule Works
The rule places User objects in proper department containers depending upon what value is stored in the OU attribute. If a User object needs to be placed and has the OU attribute available, then the User object is placed in the dest-base\value of OU attribute\CN attribute.
The dest-base is a local variable. The DN must be the relative root path of the department containers. It can be an organization or an organizational unit. The value stored in the OU attribute must be the name of a child container of the dest-base local variable.
The value of the OU attribute must be the name of the child container. If the OU attribute is not present, this rule is not executed.
The CN attribute of the User object is the first two letters of the Given Name attribute plus the Surname attribute as lowercase. The rule uses slash format.
Placement - Subscriber By Dept - LDAP Format
Places objects from one container in the Identity Vault into multiple containers in the data store base on the OU attribute. Implement the rule on the Placement policy in the driver. You can implement the rule only on the Subscriber channel.
There are two steps involved in using the predefined rules: creating a policy in the Placement policy set, and importing the predefined rule. If you already have a Placement policy that you want to add this rule to, skip to Importing the Predefined Rule.
Creating a Policy
-
Open the for the driver you want to manage.
-
Click the Placement Policy object on the Subscriber channel.
-
Click .
-
Name the policy, make sure to implement the policy with the Policy Builder, then click .
The Rule Builder is launched.
Importing the Predefined Rule
-
In the Rule Builder, click .
-
Select .
-
Click in the Rule Builder, to edit the rule.
-
Delete from the .
-
Click the to launch the Argument Builder.
-
Select in the Noun list, then click .
-
In the Editor, add the parent container in the data store. The parent container must be specified in LDAP format. Make sure all of the department containers are child containers of this DN, then click .
-
Click .
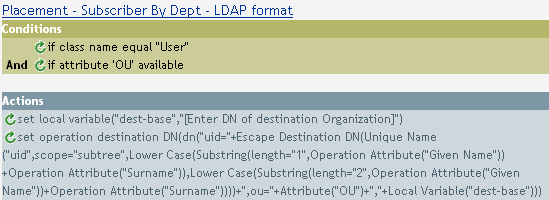
How the Logic in the Rule Works
The rule places User objects in proper department containers depending upon what value is stored in the OU attribute. If a User object needs to be placed and has the OU attribute available, then the User object is place in the uid=unique name,ou=value of OU attribute,dest-base.
The dest-base is a local variable. The DN must be the relative root path of the department containers. It can be an organization or an organizational unit. The value stored in the OU attribute must be the name of a child container of the dest-base local variable.
The value of the OU attribute must be the name of the child container. If the OU attribute is not present, then this rule is not executed.
The uid attribute of the User object is the first two letters of the Given Name attribute plus the Surname attribute as lowercase. The rule uses LDAP format.