6.4 Applications For Configuration
Novell provides two application interfaces to support the installation and configuration of the Fan-Out driver:
-
iManager, which is a live Web interface for real-time administration
-
Designer, which is a planning tool for deployment modeling, testing and implementation
A Fan-Out Driver application plug-in exists for each of these interfaces.
In recent versions of iManager, the Fan-Out Driver plug-in comes installed as a standard feature. If you have an older version of iManager, you can use a copy of the plug-in that comes with your Fan-Out Driver software. To add it to iManager, see Installing the iManager Plug-In (If not Preinstalled).
In Designer, the plug-in is included as part of the Designer installation.
See the following topics for more about these two interfaces:
6.4.1 Using iManager With the Fan-Out Driver Plug-In
For detailed information about using iManager, refer to the iManager Administration Guide for your version of the product at the Novell Documentation site.
You configure and administer the Identity Manager Fan-Out Driver using iManager Roles and Tasks. The left side of the display lists actions you can take. Information pertaining to the action you select is displayed on the right side.
Rights Required for Web Application Use
To use iManager and the Fan-Out Driver Web application, a user must have greater than normal user rights as shown in the following table.
Accessing the Web Application
To access the Web application, log in to iManager, click the Roles and Tasks icon at the top of the iManager screen, and click the desired Fan-Out Driver Configuration or Fan-Out Driver Utilities task.
Logging Out
To log out of the Web application, click the exit door icon at the top of the iManager screen.
Obtaining Additional Information
Figure 6-1 Additional Information Icon

Additional information is available for the items and procedures in the Web application. To display this information, click the Additional Information icon.
Maintaining Lists
Figure 6-2 List of Items

Many items in the Fan-Out Driver Web application are grouped into lists.
To add an item to a list, click the button.
To view or change the attributes of an item, click its name in the list.
To remove an item from a list, click the button for that item. A confirmation page is displayed. Click to confirm removal, or click your Web browser’s button to abort.
6.4.2 Using Designer With the Fan-Out Driver Plug-In
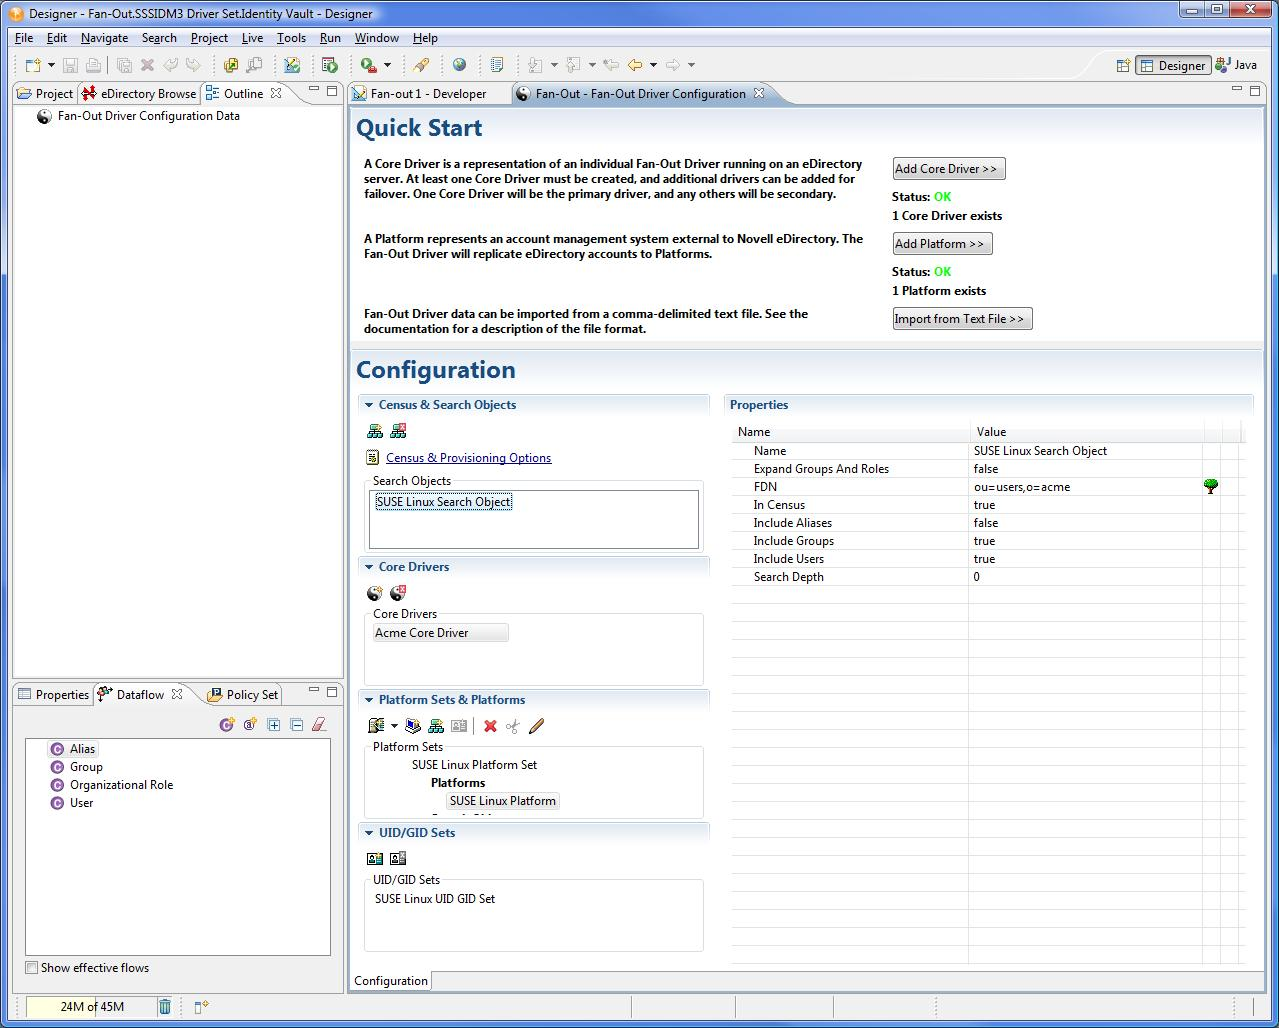
Novell Designer is a graphical user interface tool that allows you to model and deploy Identity Manager installations. Designer includes a Fan-Out Driver plug-in that enables you to configure Fan-Out data (such as Search Objects, Platforms, and Platform Sets) before deploying the Driver to eDirectory. With Designer you can also perform mass imports much more efficiently than with iManager.
Figure 6-3 Identity Manager Designer Interface with Fan-Out Driver Plug-in.

Getting Started
Refer to the Identity Manager 3.6.1 Documentation site for detailed information about using Designer.
To get started in using the Fan-Out Driver plug-in in Designer:
-
Create an Identity Vault and Driver Set.
-
Drag-and-drop a from the section of the Palette from the right.
-
Select the Fan-Out Driver configuration file and create the Driver.
-
Right-click the Driver line and select .
The plug-in application will open. Consult the Fan-Out Driver Plug-In section of the Designer online help for more information on modeling and deploying your Fan-Out Driver installation.