3.2 Logging to a Novell Audit or Sentinel Server
To log to a Novell Audit or Sentinel server:
-
Add the Identity Manager application schema to the Novell Audit server as a log application
-
Configure the Novell Audit platform agent on your application server
The Platform Agent is required on any client that reports events to Novell Audit or Sentinel. You configure the platform agent through the logevent configuration file. This file provides the configuration information that the platform agent needs to communicate with the Novell Audit server. The default location for this file, on the application server, is:
-
Linux: /etc/logevent.conf
-
Windows: / <WindowsDir> /logevent.cfg (Usually c:\windows)
Specify the following four properties:
Loghost: The IP address or DNS name of your Novell Audit or Sentinel server. For example:
LogHost=xxx.xxx.xxx.xxx
LogJavaClassPath: The location of the lcache jar file NauditPA.jar. For example:
LogJavaClassPath=/opt/novell/idm/NAuditPA.jar
LogCacheDir: Specifies where lcache stores cache files. For example:
LogCacheDir=/opt/novell/idm/naudit/cache
LogCachePort: Specifies on which port lcache listens for connections. The default is 288, but in a Linux server, set the port number greater than 1000. For example:
LogCachePort=1233
BigData Specifies the maximum number of bytes that the client will allow. Larger amounts of logging data will be truncated. The default value is 3072 bytes, but you should change this to at least 8192 bytes to handle a typical form that has approximately 15 fields on a half page.
LogMaxBigData=8192
IMPORTANT:If your data is very large, you may want to increase this value. If you are logging events that include digital signatures, it is critical that the value of LogMaxBigData be large enough to handle the data being logged.
Specify any other settings needed for your environment.
NOTE:You must restart the Platform Agent any time you change the configuration.
For more information about the structure of the logevent configuration file, see the section on configuring platform agents in the section on the logging system in the Novell Audit Administration Guide.
-
-
Enable Novell Audit logging. For more information, see Section 3.2.2, Enabling Audit Logging.
3.2.1 Adding the Identity Manager Application Schema to your Novell Audit Server as a Log Application
To configure Audit to use the Identity Manager User Application as a log application:
-
Locate the following file:
dirxml.lsc
This file is located in the Identity Manager User Application installation directory after the install, for example /opt/novell/idm.
-
Use a Web browser to access an iManager with the Novell Audit plug-in installed, and log in as an administrator.
-
Go to and select .
-
Browse to the Logging Services container in your tree and select the appropriate Audit Secure Logging Server. Then click .
-
Go to the tab, select the appropriate Container Name, and click the link.
-
When the New Log Application dialog box displays, specify the following:
For this setting
Do this
Type any name that is meaningful for your environment
Use the button to select the dirxml.lsc file
Click . The tab displays the added application name.
-
Click to complete your Novell Audit server configuration.
-
Make sure the status on the Log Application is set to ON. (The circle under the status should be green. If it is red, click it to switch it to ON.)
-
Restart the Novell Audit server to activate the new log application settings.
3.2.2 Enabling Audit Logging
To enable Novell Audit logging in your Identity Manager User Application:
-
Log in to the User Application as the User Application Administrator.
-
Select the tab.
-
Select the link.
-
Select the check box (near the bottom of the page).
-
To save the changes for any subsequent application server restarts, make sure is selected.
-
Click .
NOTE:To enable logging for Role events, the Role Service driver Generate audit events property must be selected. For more information on this property, see Section 2.9.1, Role Service Driver Configuration.
3.2.3 Events That Are Logged
The Identity Manager User Application logs a set of events automatically from workflow, search, detail, and password requests. By default, the Identity Manager User Application automatically logs the following events to all active logging channels:
Table 3-1 Logged Events
3.2.4 Log Reports
If you log events to the Novell Audit database channel, you can run reports on the data. There are several ways to generate reports against data logged to a Novell Audit database:
-
Use the Novell Audit Report application to run your own reports or to run the predefined reports described in Predefined Log Reports.
-
Write queries against the logged data by using iManager to select .
-
Write your own SQL queries against the logged data.
-
Produce Identity Manager reports in Sentinel (see Sentinel Reports).
The default Novell Audit table is called NAUDITLOG.
Predefined Log Reports
The following predefined log reports are created in Crystal Reports ( .rpt) format for filtering data logged to the Novell Audit database:
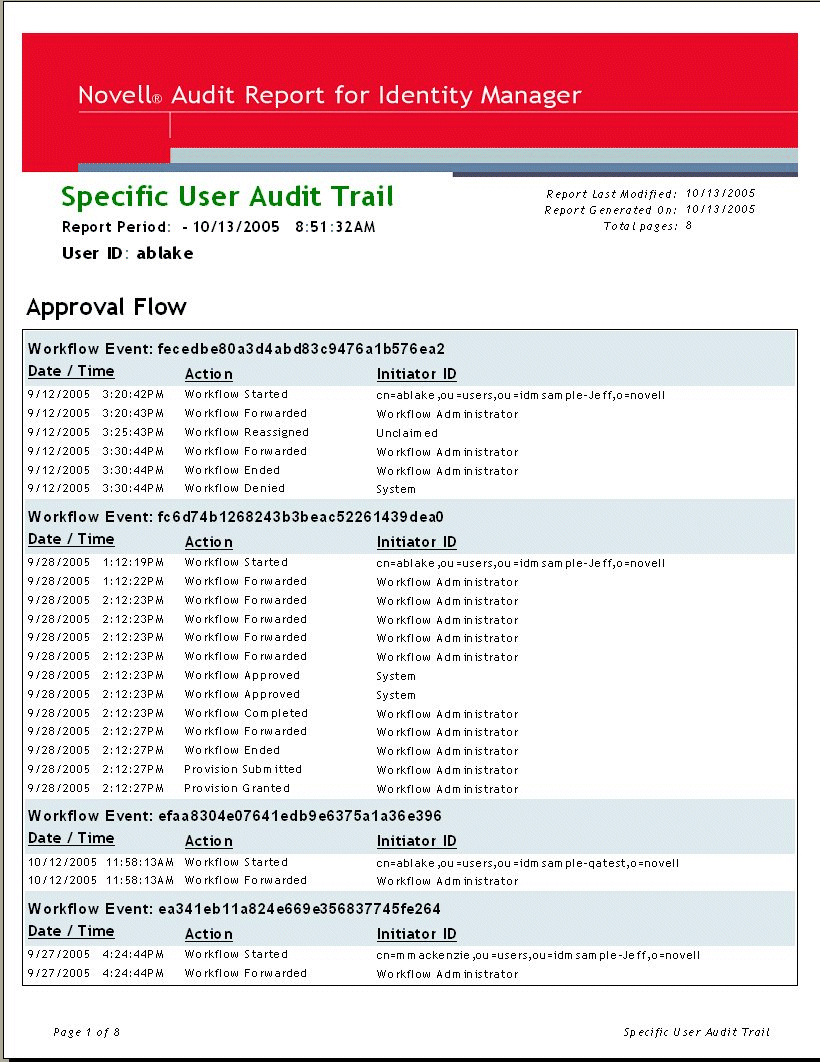
The following graphic shows an example of the Specific User Audit Trail report:
Figure 3-1 Sample Audit Trail Report

The report files are in the following locations:
You can use these reports as templates for creating custom reports in the Crystal Reports Designer or you can run the reports using Audit Report ( lreport.exe), a Windows program supplied with Novell Audit. The predefined reports query data from the default Novell Audit log database named naudit and a database table named nauditlog. If your Novell Audit log database has a different name, use the menu item in Crystal Reports Designer to replace the naudit database name with the one in your environment.
For more information, see the section on working with reports in the Novell Audit documentation.
Sentinel Reports
If you have configured the platform agent to send events to Sentinel, you can produce the following reports about Identity Manager events in Sentinel:
-
IDM_Administrative_Action_Report.rpt
-
IDM_Historical_Approval_Flow_Report.rpt
-
IDM_Password-Management.rpt
-
IDM_Provisioning_Report_by_Top_10_DHNs.rpt
-
IDM_Provisioning_Report_by_Top_10_DIPs.rpt
-
IDM_Resource_Provisioning_Report.rpt
-
IDM_Specific_User_Audit_Trail_Report.rpt
-
IDM_Specific_User_Provisioning_Report.rpt
-
IDM_Sync-vs-Reset.rpt
-
IDM_User_Provisioning_Report.rpt
-
IDM_Workflow_Stats_by_Top_10_DHNs.rpt
-
IDM_Workflow_Stats_by_Top_10_DIPs.rpt
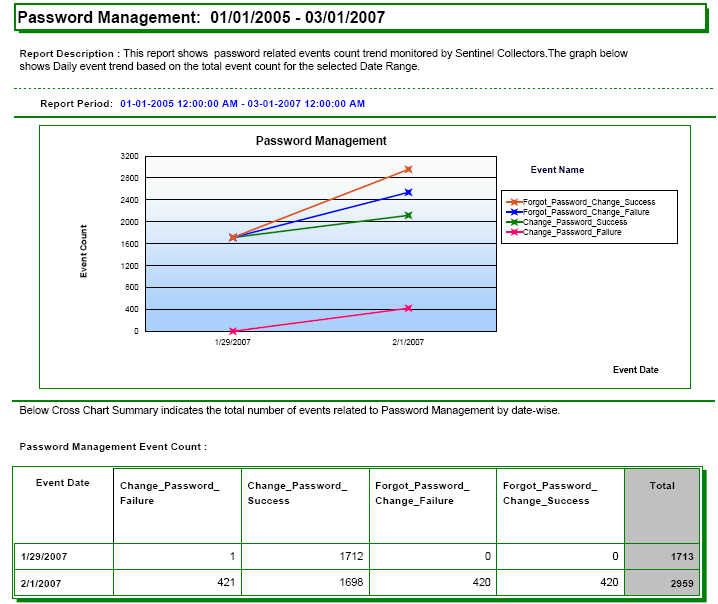
For more information about Sentinel reports, see the Sentinel User’s Guide. The following is a sample Sentinel report on Password Management:
Figure 3-2 Sample Sentinel Report
