Site-to-Site Configuration
This utility helps you configure VPN site-to-site services on your network. You can modify or delete the existing site-to-site services. With a single master server you can configure single site-to-site service at a time.
Prerequisites for the Master:
- Master Trusted Root Container (referred to as Trusted Root on the pages and in eDirectory): Contains the TROs for the master and all the slaves. This was created while you were configuring the master server as a VPN server. See VPN Server Configuration.
- Trusted Root Object for each of the members (contained in the Trusted Root Container mentioned as above):
- TROs of the master server. You created this during VPN server configuration.
- TROs of the slave server. You need to export the TRO from the slave's server certificate using the steps in Exporting Root Certificates from the Server Certificate and create the TROs in the Trusted Root container using the steps in Creating the Trusted Root Object.
Prerequisites for the Slave:
- Slave Trusted Root Container (referred to as Trusted Root on the pages and in eDirectory): Contains the TRO for the master.This was created while you were configuring the slave server as a VPN server. See VPN Server Configuration
- Trusted Root Object for the master (contained in the Trusted Root container mentioned above). You need to export the TRO from the master's server certificate using the steps in Exporting Root Certificates from the Server Certificate and create the TROs in the Trusted Root container using the steps in Creating the Trusted Root Object.
The following topics are discussed here:
- Configuring a VPN Server As a Master Server
- Configuring a VPN Server As a Slave Server
- Modifying a Site-to-Site Service
- Removing Site-to-Site Members
Configuring a VPN Server As a Master Server
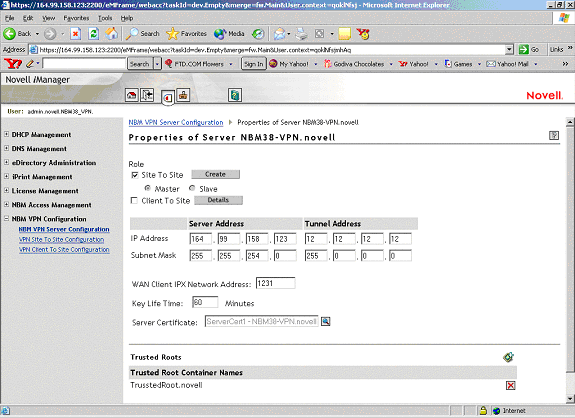
A new site-to-site service can be created either while a new VPN master server is created or by modifying an already configured VPN server. To create a site-to-site service, you need to configure a VPN server as a master server. Because no site-to-site service is currently attached to this server, the site-to-site check box is deselected.
Figure 61Site-to-Site Configuration
-
To create and attach a site-to-site service to a VPN server, select the site-to-site check box and select the Master option button, then click Create.
-
In the next page, specify the details of the master member of the site-to-site service.
Issuer: The eDirectory Distinguished Name of theTrusted Root object that has issued the certificate for the master member of the site-to-site service. Use the default value that you see on the page if you haven't already created a Trusted Root object for this server and you want to use the automatic TRO creation facility for this server. If you already have a TRO created for this server using the steps mentioned in Creating the Trusted Root Object, browse and select the Trusted Root object that you have imported into the trusted root container.
Subject Name: The subject name of the X.509 Server Certificate issued for the master member. The certificate subject name should be in the format shown in the following example: cn=nbm38.o=novell or o=novell.cn=nbm38. For exact subject name, view the certificate subject name from the server certificate. The certificate subject name should be exactly the same as the one that appears in the certificate.
NOTE: To view the certificate subject name, go to iManager > eDirectory Administration > Modify Object > select the Key Material Object (server certificate that you have created). Select the certificate from the list and click Details.
Alternative Subject Name: These can be of three types: DNS, Mail, or IPv4. One of these three is applicable. If you choose one of these, you must provide the corresponding type of alternative subject name. For example, Mail means xxx@novell.com.
Protected IP Network and Hosts: This is the list of networks or hosts that would be protected by this site-to-site master member.
Enable IP RIP: The enabled RIP filter exceptions are added on the member server to restrict advertising routes via the VPTUNNEL Virtual Interface.
-
Click Apply to save this information temporarily. Click Add to add Protected Networks/Hosts, then click OK to save this protected network.
-
The next page shows the Issuer and Subject Name information. It also shows the configured protected networks.
-
Click Apply to save the changes temporarily.
-
In the next page, click OK to save changes to eDirectory.
-
After you create a site-to-site service as above, deselect the site-to-site check box to delete and detach the service from the server and Novell eDirectory.
If the certificate issue path is server_certificate > intermediate_certificate > trusted_root_certificate, the intermediate server certificate along with the certificate chain (the public key certificate as well as the trusted root certificate of the intermediate certificate) should be imported into the TRO, and this should be configured as the issuer. The same holds for the client issuer name list, which is specified in the authentication rules.
The following page shows the status of the server after it attached to a site-to-site service. Because the server has been configured as a master server, the page shows Master in the VPN server list entry.
Figure 62Server Attached to a Site-to-Site Service
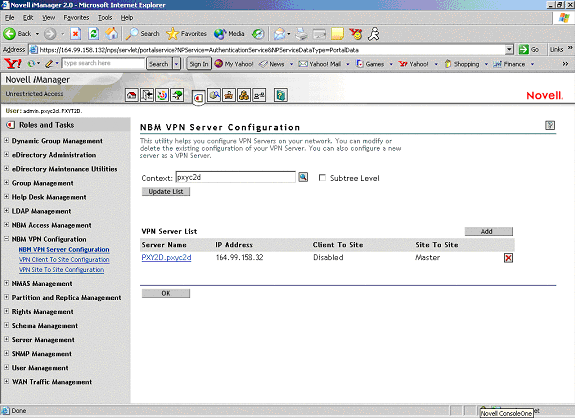
This example shows a server PXY2D.pxyc2d with public IP address 164.99.158.32 configured as a VPN server with client-to-site services disabled and site-to-site services enabled. This VPN server is a master of the site-to-site service to which it belongs.
Configuring a VPN Server As a Slave Server
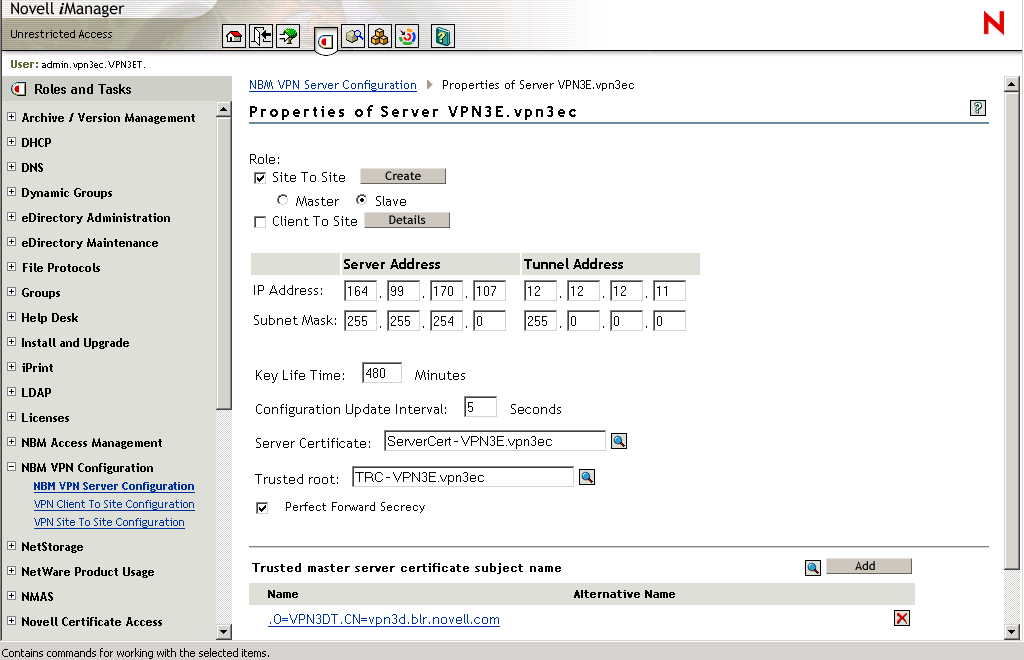
If you want to make a VPN server a slave member of a site-to-site service, first configure the server as a VPN server using the steps in VPN Server Configuration. In the left pane, click NBM VPN Server Configuration, then click the configured server. Select the site-to-site service and click the Slave option button. Specify the certificate subject name of the trusted master. If the master is in the same tree as the slave, browse to select the master's certificate instead of entering the certificate subject name. If the master certificate is not in the same tree go to ConsoleOne and log into both master and slave. Go to the master server trusted root container and create a trusted root object. Provide the slave's root certificate which will be present in the sys:public directory. Repeat the process for the slave and you would have created slave trusted root object in the master, and the master trusted root object in the slave.
Figure 63Configuring a VPN Server as a Slave
-
Click OK after entering the Subject Name if you have clicked the Add button to manually add the trusted master's server certificate subject name. If the master is in a different tree, go to ConsoleOne and then go to the master server certificate > right-click properties and see the certificate subject name. Copy and paste this name to the Add > Certificate Subject Name field.
-
Click OK on the main Server Modification page.
The following page shows the status of the server after it has been configured as a slave of a site-to-site service. Because the server has been configured as a slave server, the page shows Slave in the VPN server list entry.
Figure 64Sample Page
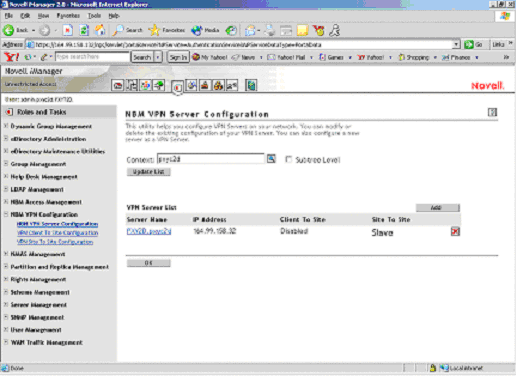
This example shows a server PXY2D.pxyc2d with public IP address 164.99.158.32 configured as a VPN server with both client-to-site and site-to-site services enabled. This VPN server is a slave of the site-to-site service to which it belongs.
After the VPN server is configured as a slave, add this slave server's information in the member list of the site-to-site service (in the master VPN server) of which you want to make this server a slave. See Member List.
NOTE: A VPN server can be a slave of only one site-to-site service. A site-to-site service can have only one master.
After the Server configuration is completed on the slave, and site-to-site configuration is completed on the master, the master distributes the site-to-site configuration information to all the Slaves.
To verify whether the configuration information has reached the slaves:
- Use callmgr.nlm from the companion CD to verify that a WAN call was established with the master on the slave machines. This NLM can be used to find the status of IP/IPX WAN calls between VPN servers. To use this NLM, copy it to the sys:\system directory and load callmgr.nlm from the system console. Use the screen that pops up to check the details of existing WAN calls.
- The sys:\etc\ipwan.cfg file contains information about the master and all slaves for Mesh topology, and information about the master for Star topology.
- The VPN Monitoring NetWare Remote Manager snap-in shows the status of all the slaves as Up-to-Date.
- Data communication between the master and slaves is happening. Test this with a ping from the master to the slave.
If any of the above has not happened, you might need to force a resynchronization from the master.
-
Go to the VPN Monitoring snap-in in NetWare Remote Console on the master.
For more information, see Monitoring Virtual Private Networks.
You will see the list of members.
-
Click Synchronize All.
Modifying a Site-to-Site Service
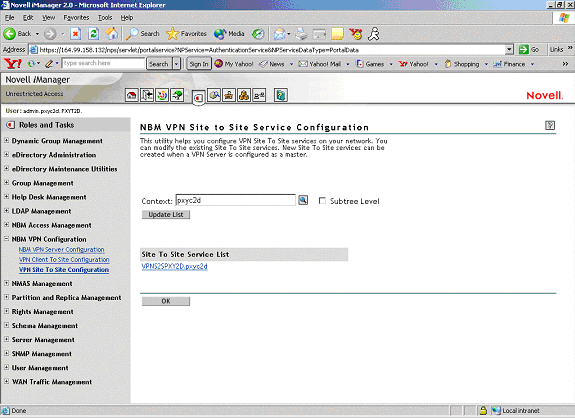
Click VPN site-to-site Configuration in the left panel to view a list of the configured site-to-site services. The following page shows the example site-to-site service that was created earlier.
Figure 65Configured Site-to-Site Service
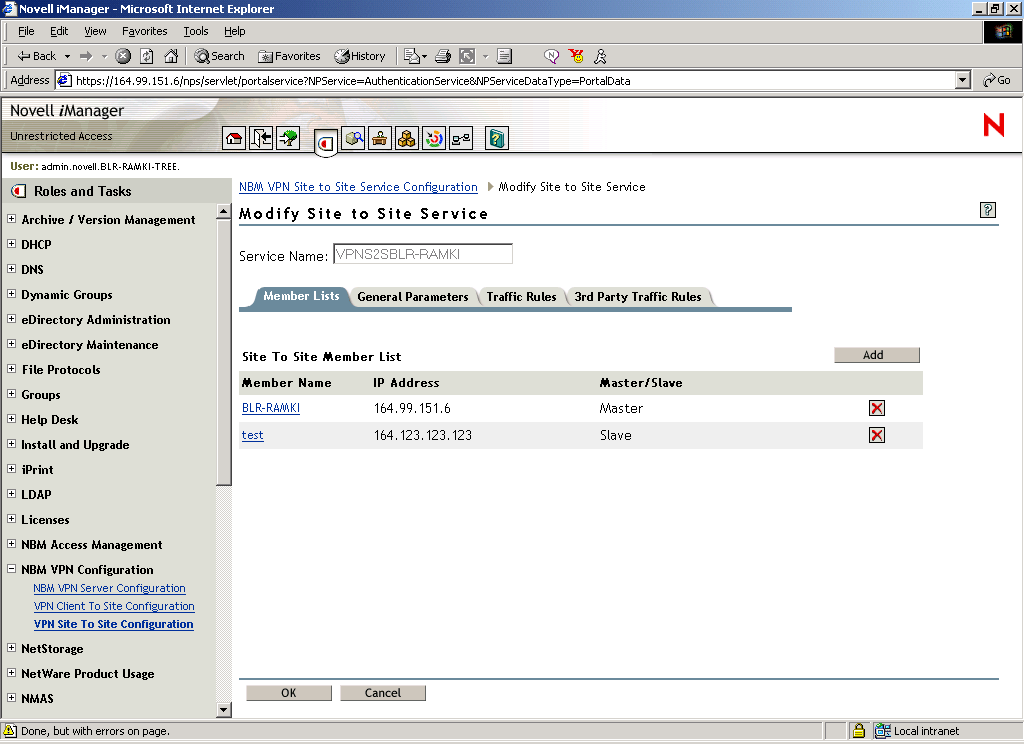
Click the name of the site-to-site service.
Use the next pages to configure the following:
Member List
The member list shows the master server that was configured during the creation of the site-to-site service.
-
Click the server name to view and modify master server details.
-
To add a slave server to this site-to-site service, click New.
-
Fill the details in the next page.
Figure 66
Site-to-Site Slave Configuration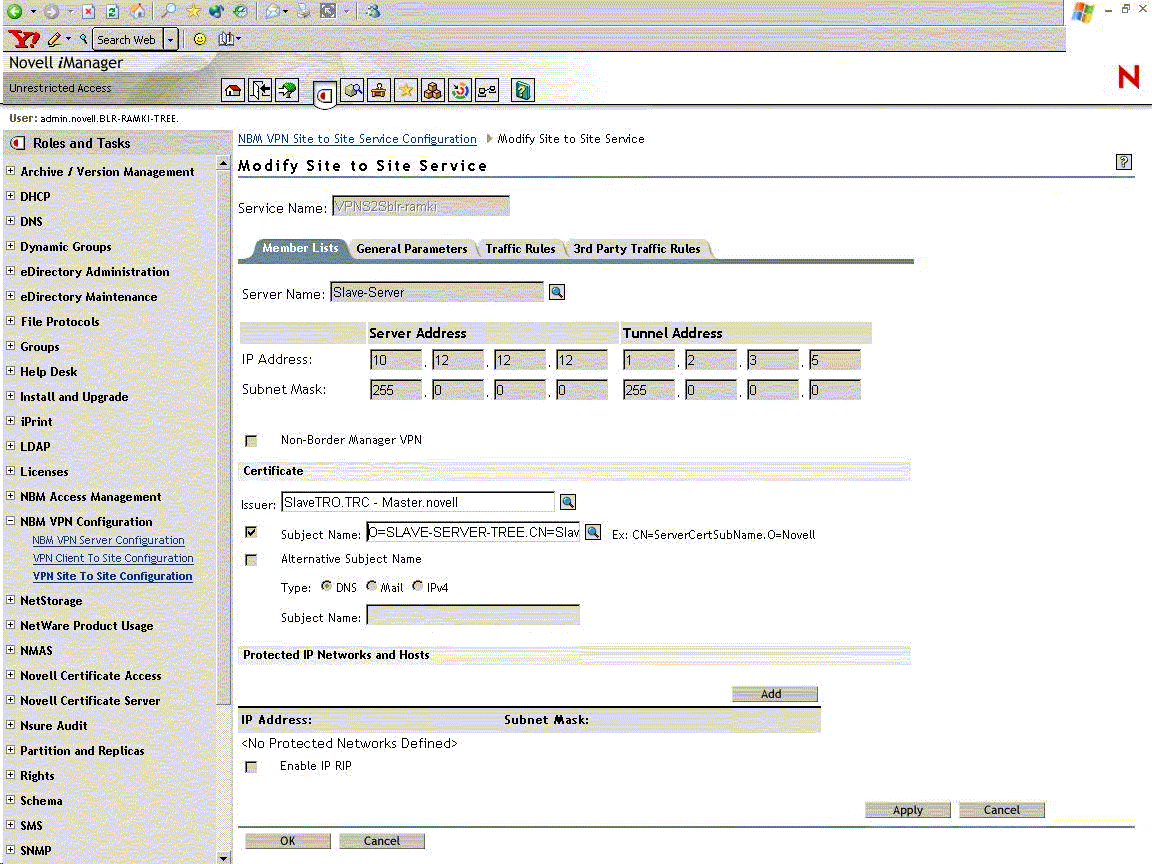
NOTE: The slave server that you are adding to this member list should have been already configured as a slave VPN server as mentioned Configuring a VPN Server As a Slave Server
Server Name: If the server is on the same tree, click Browse and select the server object, or specify the name of the slave server. The name you specify could be any name with which you identify the slave server.
Issuer: The Novell eDirectory Distinguished Name of the Trusted Root object that has issued the certificate for the master or slave member of the site-to-site service. Browse and select the Trusted Root object that you have imported into the master's Trusted Root container.
Subject Name: The subject name of the X.509 Server Certificate issued for the master or slave member. The subject name of the certificate should be in the following format: cn=nbm38.o=novell or o=novell.cn=nbm38. For the exact subject name, view the certificate subject name from the server certificate. The certificate subject name should be exactly the same as the one that appears in the certificate.
To view the certificate subject name, go to ConsoleOne and right-click on the Key Material Object (server certificate that you have created) > Properties > Security > Certificate. Select the certificate from the list and click Details.
3rd Party/Non-BorderManager VPN: You can also add a third-party site-to-site member using this option. Select the check box to add a third-party member. For a third-party member, both the Preshared Key and Certificate modes of authentication are supported. Choose the appropriate authentication method. If Preshared Key is chosen, a Preshared Key secret must be specified. If Certificate is chosen, the issuer name and subject name must be specified.
Alternative Subject Name: These can be of three types: DNS, Mail or IPv4. One of these three is applicable. If you choose one of these, you must provide an alternative subject name.
Protected IP Network and Hosts: This is the list of networks or hosts to be protected by this site-to-site master member.
Enable IP RIP: The enabled RIP filter exceptions are added on the member server to restrict advertising routes via VPTUNNEL Virtual Interface.
Trusted Master Server Certificate: The certificate subject name of master server that you have configured as the Master Member.
-
Click Browse if the server that you're adding a slave is on the same tree as the master. If the slave server is on a different tree, specify the name. Specify other slave details.
-
Click Apply to temporarily save the slave server information.
-
The next page will show both the servers in the member list.
-
You can click OK to exit after saving the member list changes to Novell eDirectory, or you can configure General Parameters/Traffic Rules for the site-to-site service.
General ParametersThe General Parameters page has the following fields:
Topologies: Two topologies are supported:
Full Mesh: This is the default topology. All servers are interconnected to form a web or mesh, with only one hop to any VPN member. There is communication between every member in the VPN, whether required or not. This topology is the most fault-tolerant. If a VPN member goes down, only the connection to that member's protected network is lost. Also, after the encryption keys have been established, the master server is no longer required. However, if RIP is enabled for the VPN tunnel, this topology has more routing traffic because each VPN member must send updates to every other member. Also, routing loops in a mesh topology can require a significant amount of time to be resolved. Choose the trusted root container for this site-to-site service. This trusted root container is the master's trusted root container. The illustration above shows the default values automatically assigned during the creation of the site-to-site service.
Star: In this topology, all the slaves are connected only to the master, and all the communication is routed through the master. This topology has the advantage that the routing traffic is far less than the mesh topology and the connection between two slaves is not required. This topology is not fault tolerant. If the master goes down, the VPN communication between the slaves is also affected.
NOTE: A ping between two slaves does not go through in a star topology unless the slave address is added to protected networks.
Update Interval: A synchronization parameter that specifies how long the master server waits between attempts to update a slave server with the newest topology and encryption information. If the first attempt fails, the master server retries at set intervals until it updates the slave server. The default value is 15 minutes.
Connect Timeout: A synchronization parameter that specifies how long the master server tries to connect to a slave server during a synchronization update. The default value is two minutes.
Response Timeout: A synchronization parameter that specifies how long the master server waits for a response from a slave server before terminating the connection during a synchronization update. The default value is two minutes.
-
Click Apply to save the changes temporarily.
Traffic Rules
Traffic Rules are policies that govern what traffic can go through a VPN connection. You can add, modify, or delete traffic rules for the site-to-site service. You can also change the priority of a traffic rule by moving it up or down the list. The traffic rule at the top of the list has the highest priority. A default traffic rule is automatically created. The default action of this traffic rule is to encrypt all packets (Encryption algorithm: 3DES, Authentication algorithm: HMAC-MD5).
-
Click New to add a new traffic rule.
-
On the next page, click Define Services. Specify the details.
-
Click OK to save changes temporarily.
-
Click Define Action to configure the traffic rules.
-
Click Apply to save changes temporarily.
-
On the next page click OK to save changes to Novell eDirectory.
HINT: The service provides the facility to configure and store your entries as profiles that can be used later when you log in to the service.
Third-Party Traffic Rules
Third-party traffic rules are policies that govern accessibility for a site-to-site connection to a third-party member. You can add, modify, or delete traffic rules for the site-to-site service. You can also change the priority of a traffic rule by moving it up or down the list. The traffic rule at the top of the list has the highest priority. A default traffic rule is automatically created for each third-party server that is configured as a slave. This rule can not be modified. To create a new third-party traffic rule:
-
Click Add to add a new third-party traffic rule.
-
On the next page, click third-party Server Configuration or Novell BorderManager Server Protected Network. Specify the details.
-
Click OK to save changes temporarily.
-
Click Define Action to configure the 3rd-party traffic rules.
-
Click Apply to save changes temporarily.
-
On the next page click OK to save changes to eDirectory.
HINT: The service provides the facility to configure and store your entries as profiles that can be used later when you log in to the service.
Removing Site-to-Site Members
The following scenarios are possible while removing site-to-site members:
Removing Slave
-
Verify that the master and slaves are up and communicating with one another.
-
Remove the slave member from iManager. Go to Site-to-Site, select the Members tab, and delete the member you intend to remove.
-
The change in configuration is synchronized to all the slaves. You can check this in Novell Remote Manager or from the ipwan.cfg file. Otherwise, use Synchronize All on the monitoring pages to get the changes across.
-
After the slave removal is synchronized and the WAN call for the slave is removed on the master, remove the server configuration on the slave server from iManager.
-
When the server configuration is removed, the vpslave NLM is unloaded on the slave.
Forcefully Removing the Slave
When one or more slaves has a hardware or a network problem that prevents the master from synchronizing the changes to the slave to do a clean removal you might need to remove the slave forcefully.
-
Remove the slave member physically from the VPN network. If the slave is up, use iManager to remove the server configuration on the slave.
-
Using iManager, remove the slave member from the site-to-site members list on the Master.
-
Enter stopvpn to stop the VPN services on the master.
-
Remove the file sys:\system\vpn\member.dat, sys:\system\vpn\member.bak and sys:\etc\ipwan.cfg on the Master.
-
Start the VPN services on the Master, enter startvpn.
Removing a Master
-
Normally the master can be removed only if all the slaves are removed. Please remove all the slaves using the steps mentioned in Removing Slave, and verify that the changes are synchronized.
-
Using iManager remove the VPN site-to-site configuration.
Forcefully Removing a Master
Ocasionally, because of a problem with the master's hardware or with the network, it might be essential to replace a master from the network with another master.
-
Remove the existing master from the network.
-
From iManager, add the server configuration for the new master. Add site-to-site configuration, but don't add the other slaves to site-to-site.
-
For each existing slave:
- Stop the VPN services on the slave using stopvpn.
- Remove all the files in sys:/system/vpn/ on the slave server
-
Change the certificate subject names in the server configuration of all slaves to point to the new Master's server certificate. If the master server is reinitialized, you might need to configure new TRCs and TROs for all the slaves and put them under the same TRC.
-
In iManager, go to the new master server and add all the slaves as members in the site-to-site configuration.
