10.2 Specifying Net Folder Servers
The first step in creating Net Folder is to set up Net Folder Servers.
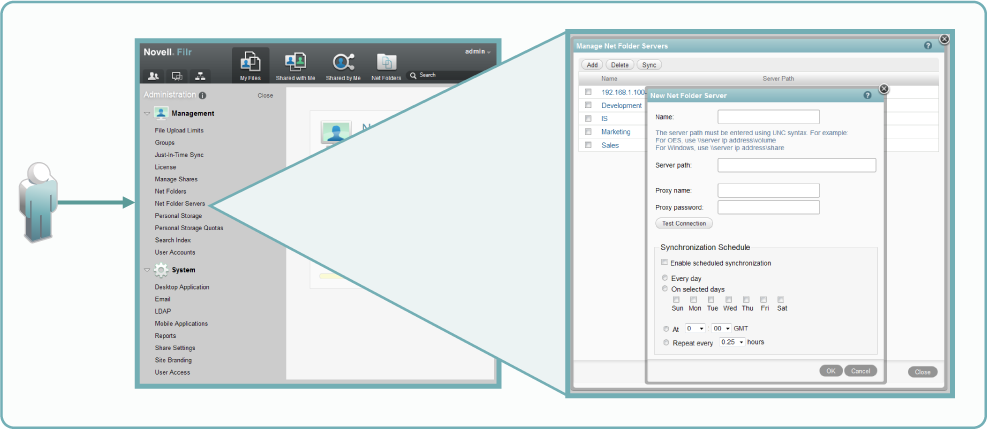
Figure 10-3 Net Folder Server Creation

As illustrated in Figure 10-3, adding a Net Folder Server includes the following:
-
Name: Net Folder users don’t see this name, so use a name that makes sense from an administrative perspective. For example, you might include the IP address or DNS name of the server, or you could use a location name, such as Third_Floor_Server.
-
Server Path: This is the full UNC path to the root of the NSS volume or NTFS share where your Net Folders are located.
-
Proxy Name: This is the name of the Net Folder proxy user that provides access to this volume. For more information, see Section 10.4, Net Folder Proxy Users.
IMPORTANT:When specifying the proxy user for a Net Folder Server that points to an OES server, always use a fully qualified name, such as cn=admin,o=myorganization.
If you specify only a simple name, such as admin, then Filr accesses the Net Folders for the server using CIFS rather than NCP.
When you test the connection, the test succeeds and data synchronizes using CIFS.
Unfortunately, when Filr attempts to determine a user’s effective rights, the request fails because that function requires NCP and the simple name doesn’t provide enough information to the NCP process.
-
Proxy Password: This is the password of the Net Folder proxy user. If the password changes in the identity store, it must be updated here.
-
Test Connection: This lets you test the path and the credentials of the proxy user that you have specified.
-
Synchronization Schedule: This lets you create a synchronization schedule for this Net Folder Server. Any Net Folders for this server that don’t have their own synchronization schedules will be synchronized according to this schedule.
For more information about Net Folder Server creation, see Configuring and Managing Net Folder Servers
in the Novell Filr 1.0 Administration Guide.