3.4 Setting User Policies
As an administrator, you can set user policies to control how some Messenger client features work and to establish defaults for some Messenger client functionality. You can configure user policies to apply to all Messenger users or to selected Messenger users.
3.4.1 Editing the Default User Policy
If you use the same policy for all Messenger users, editing the default user policy affects all users. If you have multiple user policies, editing the default user policy affects those users who are not governed by another policy.
-
In ConsoleOne, browse to and expand the Messenger Service object.
-
Select the Policy Container object, right-click the Default Policy object, then click Properties.
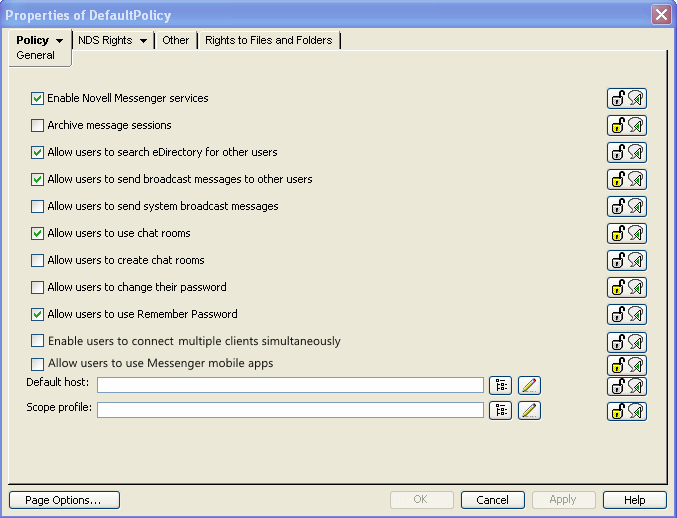
-
Continue with the type of customization you want to perform:
Policy Property Page
Policy Options
Enable Novell Messenger services, Archive message sessions, Allow users to search eDirectory for other users, Allow users to send broadcast messages to other users, Allow users to send system broadcast messages, Allow users to use chat rooms, Allow users to create chat rooms, Allow users to change their password, Allow users to use Remember Password, Enable users to connect multiple clients simultaneously, Allow users to use Messenger mobile apps, Default host, Scope profile
Allow users to print and save conversations, Allow users to use Personal History
Maximum number of contacts, Maximum number of folders, Contact List
Allowed/Blocked
Selected Attributes
Custom Status List
Reference List
-
Click OK.
-
After you modify the Default Policy object, stop and then start the Messenger agents to put the new default policy into effect throughout your Messenger system.
3.4.2 Creating a User Policy
If you want to provide different policies for different users, you need to create multiple Policy objects.
-
In ConsoleOne, browse to and expand the Messenger Service object.
-
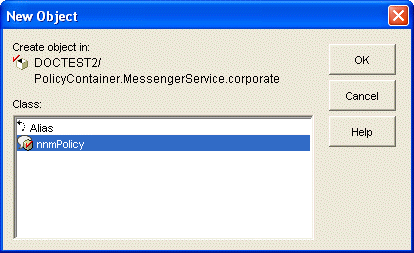
Right-click the Policy Container object, then click New > Object.
-
Select nnmPolicy, then click OK.

-
Specify a descriptive name for the new policy, browse to and select the Novell Messenger system that this policy belongs to, then click OK.
-
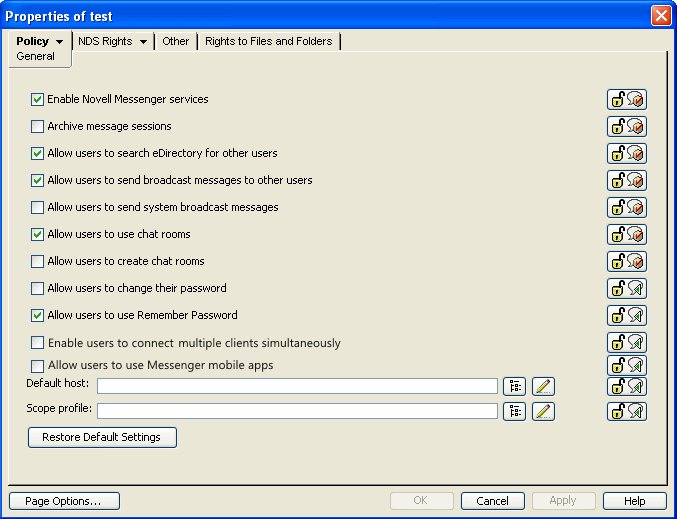
In the Policy Container, right-click the new policy object, then click Properties.
-
Continue with the type of policy customization you want to perform:
Policy Property Page
Policy Options
Enable Novell Messenger services, Archive message sessions, Allow users to search eDirectory for other users, Allow users to send broadcast messages to other users, Allow users to send system broadcast messages, Allow users to use chat rooms, Allow users to create chat rooms, Allow users to change their password, Allow users to use Remember Password, Enable users to connect multiple clients simultaneously, Allow users to use Messenger mobile apps, Default host, Scope profile
Allow users to print and save conversations, Allow users to use Personal History
Maximum number of contacts, Maximum number of folders, Contact List
Allowed/Blocked
Selected Attributes
Custom Status List
Reference List
-
Click OK.
After you create a new policy, you do not need to restart the Messenger agents in order for the updated policy to be in effect. The new policy is in effect the next time users governed by the policy log in to Messenger, as described in Applying a Policy to Specific Users.
3.4.3 Customizing Messenger Client Features
The options on the General page of the Policy object customize how the Messenger client works for users governed by the policy you are creating or editing. You can set these options to enable or disable certain functionality and to provide some settings that override comparable settings on the Messenger Service object.
-
Click Policy > General.

-
Fill in the following fields:
Enable Novell Messenger services: Use this option to enable or disable the Messenger client for the users governed by this policy. It is enabled by default.
Archive message sessions: Use this option to enable or disable conversation archiving for users governed by this policy. It is disabled by default. If you want to enable archiving, see Section 5.0, Enabling and Managing Archiving.
Allow users to search eDirectory for other users: Use this option to allow or prevent Messenger users from building their contact lists by searching for users in eDirectory. It is enabled by default. If you disable this option, users governed by this policy can only add known eDirectory user IDs to their contact lists.
Allow users to send broadcast messages to other users: Use this option to enable or disable users to send broadcast messages to other users. It is enabled by default. If you disable this option, users governed by this policy cannot send broadcast messages to other users.
Allow users to send system broadcast messages: Use this option to enable or disable users to send system broadcast messages to all users who are online. It is disabled by default. If you enable this feature, users governed by this policy can send broadcast messages to all online users.
Allow users to use chat rooms: Use this option to enable or disable users to use Messenger chat rooms. It is enabled by default. If you disable this feature, users governed by this policy cannot join Messenger chat rooms.
Allow users to create chat rooms: Use this option to enable or disable users to create Messenger chat rooms. It is disabled by default. If you enable this option, users governed by this policy can create Messenger chat rooms.
Allow users to change their password: Use this option to enable or disable users to change their eDirectory passwords from the Messenger client. It is disabled by default because Messenger authenticates users by using their eDirectory passwords and you might not want users changing their eDirectory passwords in the Messenger client. If you enable this option, users governed by this policy have a Change Password item on the Tools menu in the Messenger client where they can change their eDirectory passwords.
Allow users to use remember password: Use this option to enable or disable users to use Remember Password. It is enabled by default. If you disable this option, users governed by this policy cannot use Remember Password in the client.
Enable users to connect multiple clients simultaneously: Use this option to allow users in this policy to connect to multiple Messenger clients simultaneously. If this option is not selected, users are logged out of the first client when they log in to a second client.
Allow users to use Messenger mobile apps: Use this option to allow users in this policy to use the Messenger mobile apps. If this option is not selected, users cannot log in to Messenger from the mobile app.
Default host: If you have set up multiple hosts in your Messenger system, as described in Section 3.3, Providing User Searches Based on Email Addresses, browse to and select the host that applies to the users governed by this policy.
Scope profile: To override the scope profile defined on the General page of the Messenger Service object for users governed by this policy, browse to and select the scope profile that lists the contexts where users governed by the policy can search for User objects.
-
If you do not want an option to be changeable for individual Messenger users, click the Lock button next to it.
Each option is accompanied by a Lock button. When an option is unlocked, it can be overridden by changing the option setting on the Novell Messenger General page of individual User objects.
-
Click Apply to save the general policy settings.
-
Continue with Section 3.4.4, Customizing Personal History Features.
or
If you are finished configuring the policy and you are not modifying the Default Policy, skip to Applying a Policy to Specific Users.
3.4.4 Customizing Personal History Features
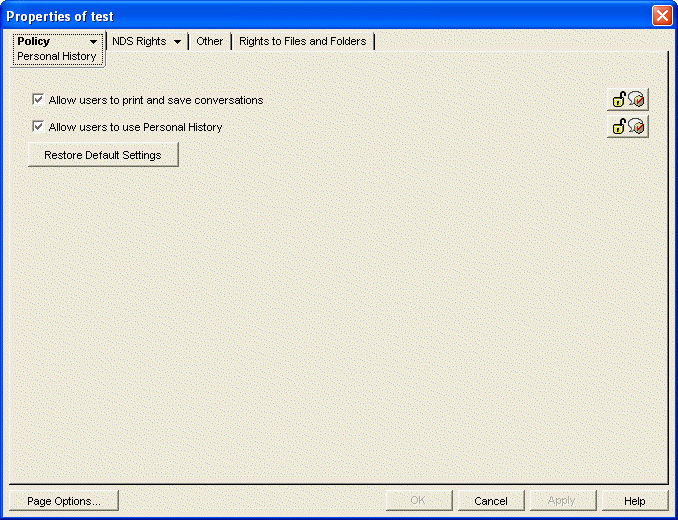
The options on the History page of the Policy object customize how the Messenger client works for users governed by the policy you are creating or editing. You can set these options to enable or disable certain functionality and to provide some settings that override comparable settings on the Messenger Service object.
-
Click Policy > Personal History.
-
Fill in the following fields:
Allow Users to Print and Save Conversations: Use this option to enable or disable users to print or save their conversations. It is enabled by default. If you disable this feature, users governed by this policy cannot print or save their conversations.
Allow Users to Use Personal History: Use this option to enable or disable users to use Personal History. It is enabled by default. If you disable this feature, users governed by this policy cannot use Personal History.
-
If you do not want an option to be changeable for individual Messenger users, click the Lock button next to it.
-
Click Apply to save the general policy settings.
-
Continue with Controlling Users' Contact Lists.
or
If you are finished configuring the policy and you are not modifying the Default Policy, skip to Applying a Policy to Specific Users.
3.4.5 Controlling Users' Contact Lists
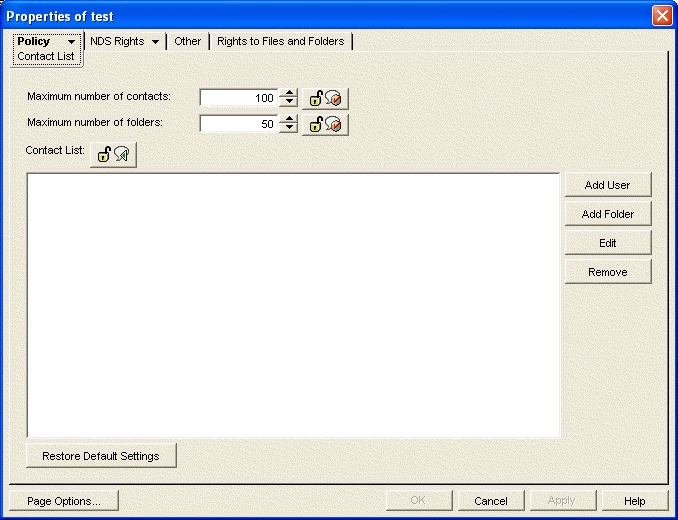
By default, users build their own contact lists in the Messenger client and they can add as many as 100 contacts. As an administrator, you can control the size of the contact list and you can create a default contact list for Messenger users, so that users governed by this policy have something to start with when they first use the Messenger client.
-
Click Policy > Contact List.
-
Fill in the following fields to control the size of users' contact lists:
Maximum Number of Contacts: Specify the maximum number of users that users governed by this policy can add to their contact lists. The default is 100. Users' contact lists are stored on their User objects in your Messenger system. Therefore, you might want to limit the amount of space occupied by contact lists in eDirectory.
Maximum Number of Folders: Specify the maximum number of folders that users governed by this policy can create in their contact lists. The default is 50.
-
If you want to create a default contact list for the users governed by this policy:
-
To add users to the default contact list, click Add User, browse to and select one or more User objects, then click OK.
-
To add a folder in the default contact list, click Add Folder, select the new folder, click Edit, specify the name of the folder, then click OK.
-
To add users to a folder, select the folder, click Add User, browse to and select one or more User objects, then click OK.
You cannot drag and drop users into a folder.
-
To expand or collapse the list of users in a folder, double-click the folder.
-
To change the way a user name displays in the default contact list, select the user, click Edit, specify the user name that you want to appear in the contact list, then click OK.
This does not rename the eDirectory User object.
-
To delete a user or folder from the default contact list, select the user or folder, then click Remove.
Folders do not need to be empty to be deleted. You are not prompted for confirmation. There is no undo.
-
If you are creating an extensive default contact list, click Apply occasionally to save your work.
New Messenger users see the default contact list when they first start the Messenger client. Existing Messenger users who already have their own contact lists are not affected by your default contact list.
Each contact list option is accompanied by a Lock button. When an option is unlocked, it can be overridden by changing the option setting on the Novell Messenger General page of individual User objects, or in the case of the contact list, by Messenger users themselves.
-
-
If you do not want an option to be changeable for individual Messenger users, click the Lock button next to it.
IMPORTANT:If you lock the contact list, users cannot change their contact lists in the Messenger client.
-
Click Apply to save the contact list settings.
-
Continue with Setting Up a Default Privacy List.
or
If you are finished configuring the policy and you are not modifying the Default Policy, skip to Applying a Policy to Specific Users.
3.4.6 Setting Up a Default Privacy List
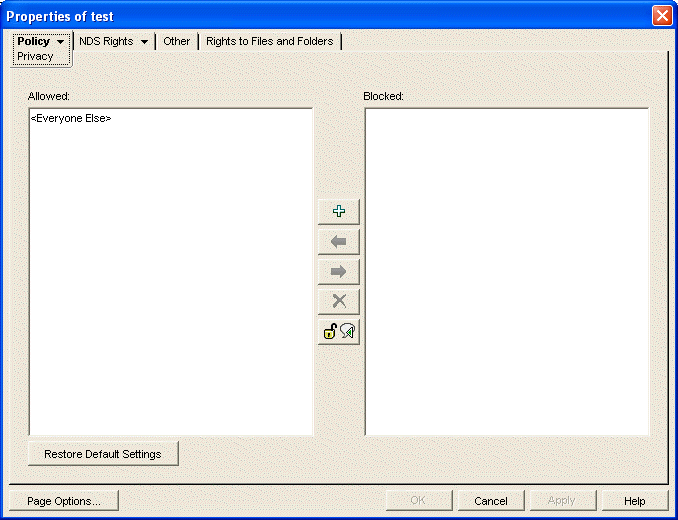
By default, all users whose User objects are located in a context listed in a scope profile have access to Messenger. Users control who can see their online status and who can send them messages. As an administrator, you can establish a default privacy list for users governed by the policy you are creating or editing.
-
Click Policy > Privacy.
-
To add users to the Allowed list, click in the Allowed list, then click the + button.
or
To add users to the Blocked list, click in the Blocked list, then click the + button.
-
Browse to and select one or more users.
-
To move users from one list to the other, select one or more users, then click the right-arrow or left-arrow button.
-
To delete users from either list, select one or more users, then click the Remove button.
New Messenger users see the default privacy list when they first start the Messenger client. Existing Messenger users who already have their own privacy lists are not affected by your default privacy list.
The privacy list option is accompanied by a Lock button. When an option is unlocked, it can be overridden by changing the option setting on the Novell Messenger General page of individual User objects, or in the case of the privacy list, by Messenger users themselves.
-
If you do not want the default privacy list to be changeable for individual Messenger users, click the Lock button.
IMPORTANT:If you lock the privacy list, users cannot change their privacy lists in the Messenger client.
-
Click Apply to save the default privacy list.
-
Continue with Selecting Default Display Attributes.
or
If you are finished configuring the policy and you are not modifying the Default Policy, skip to Applying a Policy to Specific Users.
3.4.7 Selecting Default Display Attributes
When Messenger users display contact property information in their Messenger contact lists, the following information is displayed if it is available in eDirectory:
-
First Name
-
Last Name
-
Department
-
Title
-
Email Address
-
Description
You can make more or less eDirectory information available for display in the Messenger client to meet the needs of your users.
-
Click Policy > Information List.
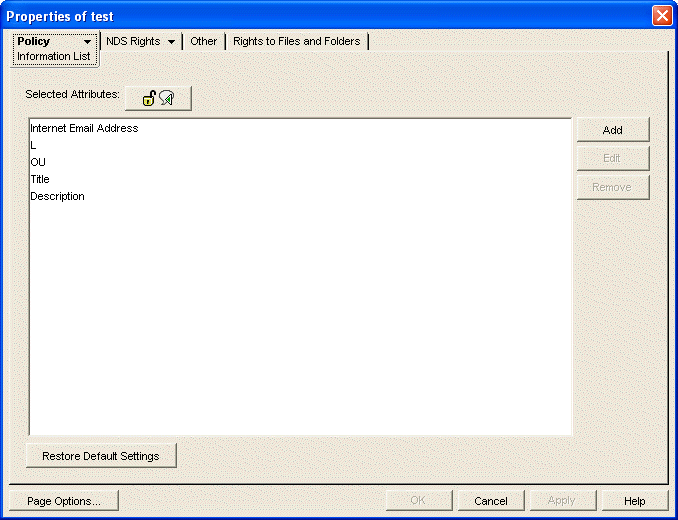
The information is listed according to its eDirectory attribute name. For example, L stands for Location. The Messenger client automatically translates OU into Department and Internet Email Address into Email Address, but any other attribute name changes must be made manually.
-
If the list includes information that you do not want users to be able to see, select an attribute, then click Remove.
-
If you want to add more attributes to the list:
-
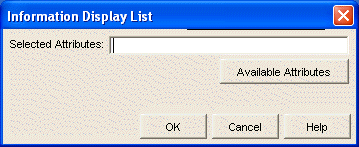
Click Add.
-
If you want to add eDirectory attributes, click Available Attributes.
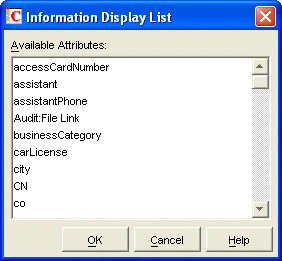
All eDirectory attributes of type STRING or DN are listed.
-
Select one or more attributes, then click OK twice to return to the Information List page.
or
If you want to add LDAP attributes, specify one or more LDAP attributes, separating the attributes with semicolons (;), then click OK to return to the Information List page.
-
If you are using LDAP access to eDirectory and if you want to add telephone numbers and fax numbers (which are not attributes of type STRING or DN in eDirectory), specify telephoneNumber and/or faxNumber as attributes, then click OK to return to the Information List page.
The information list option is accompanied by a Lock button. When an option is unlocked, it can be overridden by changing the option setting on the Novell Messenger General page of individual User objects.
-
-
If you do not want the default information list to be changeable for individual Messenger users, click the Lock button.
-
Click Apply to save the information list.
-
Continue with Creating A Custom Status.
or
If you are finished configuring the policy and you are not modifying the Default Policy, skip to Applying a Policy to Specific Users.
3.4.8 Creating A Custom Status
By default, the Messenger client provides the following selectable user statuses that indicate user presence in the Messenger system:
|
Icon |
Status |
|---|---|
|
|
Online |
|
|
Busy |
|
|
Away |
|
|
Appear Offline |
In the Messenger client, users can create their own custom statuses to indicate their presence. As an administrator, you can create custom statuses to be available to all users governed by this policy.
-
Click Policy > Custom Status.
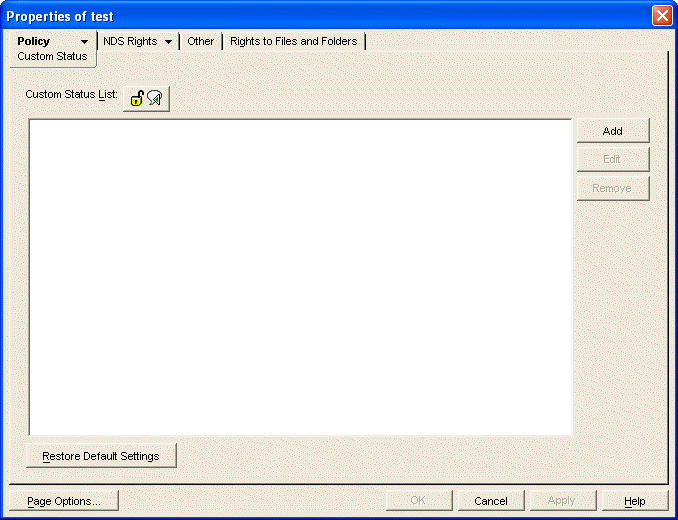
Any existing custom status is listed.
-
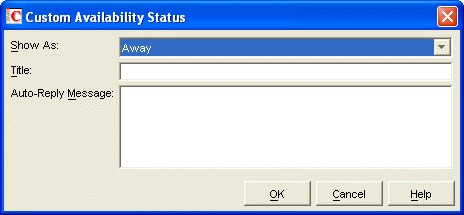
Click Add to create a new custom status.
-
Fill in the following fields:
Show As: Select Online, Away, or Busy to determine the icon to accompany the custom status.
Title: Specify a descriptive name for the new status.
Auto-Reply Message: (Optional) Specify a message for the Messenger Agent to return automatically whenever the new status is selected in the Messenger client.
-
Click OK to add the new custom status to the list.
-
Repeat Step 3 through Step 5 to create additional custom statuses.
New Messenger users see your custom statuses when they first start the Messenger client. Existing Messenger users who might have created their own custom statuses are not affected by your custom statuses.
The custom status list option is accompanied by a Lock button. When an option is unlocked, it can be overridden by changing the option setting on the Novell Messenger General page of individual User objects, or in the case of the custom status list, by Messenger users themselves.
-
If you do not want the custom statuses to be changeable for individual Messenger users, click the Lock button.
IMPORTANT:If you lock the custom status list, users cannot create their own custom statuses in the Messenger client.
-
Click Apply to save the custom statuses, then continue with Applying a Policy to Specific Users.
or
If you are modifying the Default Policy, click OK to save it.
3.4.9 Applying a Policy to Specific Users
After you have set the needed policy options, you select the Messenger users to be governed by the policy.
-
Click Policy > Used By.
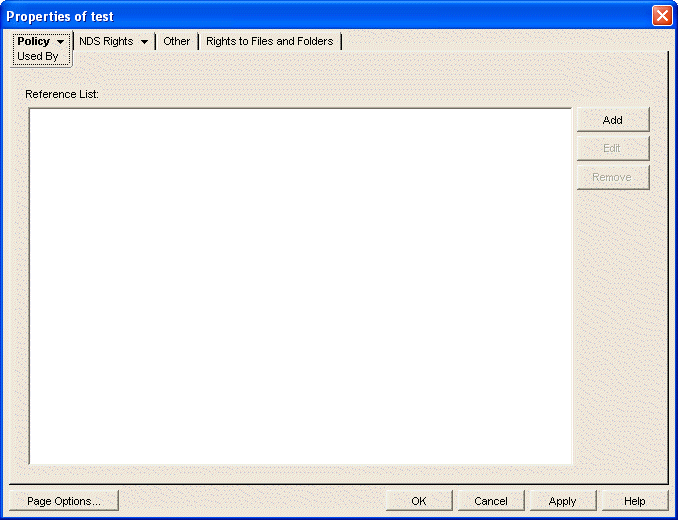
Any users currently governed by the policy are listed.
-
Click Add, then browse to and select those users that you want to be governed by this policy.
You can select only User objects. You cannot select container objects, Group objects, Organizational Role objects, GroupWise Distribution List objects, and so on.
The reference list option is accompanied by a Lock button. When an option is unlocked, it can be overridden by changing the option setting on the Novell Messenger General page of individual User objects.
-
Repeat Step 3 for each context where User objects are located.
-
If you do not want the reference list to be changeable for individual Messenger users, click the Lock button.
-
Click OK to save the user policy.
You do not need to restart the Messaging Agent in order for the new policy to be in effect. The new policy takes effect for users governed by the policy the next time they log in to Messenger.


