13.4 Configuring Protected Resources
A protected resource configuration specifies the directory (or directories) on the Web server that you want to protect. The protected resource configuration specifies the authorization contract and the policies that should be used to enforce protection. The authentication contract and the policies (Authorization, Identity Injection, and Form Fill) enable the single sign-on environment for the user. The type of protections a resource requires depends upon the resource, the Web server, and the conditions you define for the resource.
You can select from the following types of protection:
Authentication Contract: Specifies the type of credentials the user must use to log in (such as name and password or secure name and password). You can select for the contract, which allows the resource to be a public resource, with no login required.
Authorization Policy: Specifies the conditions a user must meet to be allowed access to a protected resource. You define the conditions, and the Access Gateway enforces the Authorization policies. For example, you can assign roles to your users, and use these roles to grant and deny access to resources.
Identity Injection Policy: Specifies the information that must be injected into the HTTP header. If the Web application has been configured to look for certain fields in the header and the information cannot be found, the Web application determines whether the user is denied access or redirected. The Web application defines the requirements for Identity Injection. The Identity Injection policies allow you to inject the required information into the header.
Form Fill Policy: Allows you to manage forms that Web servers return in response to client requests. Form fill allows you to prepopulate fields in a form on first login and then securely save the information in the completed form to a secret store for subsequent logins. The user is prompted to reenter the information only when something changes, such as a password.
These policies allow you to design a custom policy for each protected resource:
-
Resources that share the same protection requirements can be configured as a group. You set up the policies, and then add the URLs of each resource that requires these policies.
-
A resource that has specialized protection requirements can be set up as a single protected resource. For example, a page that uses Form Fill is usually set up as a single protected resource.
This section describes the following tasks:
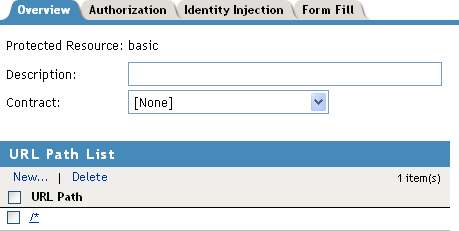
13.4.1 Setting Up a Protected Resource
To configure a protected resource:
-
Click > > > .
-
Either click the name of an existing resource or click , then specify a display name for the resource.
-
(Optional) Specify a description for the protected resource. You can use it to briefly describe the purpose for protecting this resource.
-
Select the type of contract, which determines the information a user must supply for authentication. By default, the Administration Console allows you to select from the following contracts and options when specifying whether a resource requires an authentication contract:
-
None: If you want to allow public access to the resource and not require an authentication contract, select .
-
Any Contract: If the user has authenticated, allows any contract defined for the Identity Server to be valid, or if the user has not authenticated, prompts the user to authenticate, using the default contract assigned to the Identity Server configuration.
-
Name/Password - Basic: Specifies basic authentication over HTTP, using a standard login pop-up provided by the Web browser.
-
Name/Password - Form: Specifies a form-based authentication over HTTP, using the Access Manager login form.
-
Secure Name/Password - Basic: Specifies basic authentication over HTTPS, using a standard login pop-up provided by the Web browser.
-
Secure Name/Password - Form: Specifies a form-based authentication over HTTPS, using the Access Manager login form.
You can configure other types of contracts. For more information, see Section 8.4, Configuring Authentication Contracts.
If these default contracts are not available, you have not configured a relationship between the Access Gateway and the Identity Server. See Section 13.1, Creating a Reverse Proxy and Proxy Service.
-
-
Configure the .
The default path is /*, which indicates everything on the Web server. Modify this if you need to restrict access to a specific directory on your Web server. If you have multiple directories on your Web server that require the same authentication contract and access control, add each directory as a URL path.
-
New: To add a path, click , specify the path, then click . For example, to allow access to all the pages in the public directory on the Web server, specify the following path:
/public/*
To allow access to all the files in a directory, but not to the subdirectories and their files, specify the following:
/?
/public/?
The /? allows access to the root directory, but not the subdirectories. The /public/? allows access to the files in the public directory, but not the subdirectories.
To allow access to files of a specific type, specify the following:
/public/*.pdf
This allows access to all the files in the public directory that have a PDF extension. Access to other file types and subdirectories is denied.
To use this protected resource to protect a single page, specify the path and the filename. For example, to protect the login.html page in the /login directory, specify the following:
/login/login.html
This is the type of URL path you want to specify when you create a Form Fill policy for a protected resource. The normally contains only this one entry. If you have multiple pages that the Form Fill policy applies to, list each one separately in the list. For optimum speed, you want the Access Gateway to be able to quickly identify the page and not search other pages to see if the policy applies to them.
For more information on how a user’s request is match to a protected resource, see Section 13.4.2, Understanding URL Path Matching.
-
Modify: To modify a path, click the path link, then modify the .
-
Delete: To delete a path, select the path, then click .
-
-
Click .
-
In the , ensure that the protected resource you created is enabled.
-
(Optional) To add policies for protecting this resource, continue with one of the following:
-
To apply your changes, click the link, then click > .
13.4.2 Understanding URL Path Matching
The URL path determines which protected resource is used for a user request. Suppose you create one protected resource with the following URL paths:
/*
/test/*
/test/
You create a second protected resource with the following path:
/test/*.php
Users then send the following paths in their access requests:
/test/
/test/1/2/3/file.php
/file.php
/test/file.php
/test/file.php?param1=1234
The first three requests (/test/, /test/1/2/3/file.php, and /file.ph) match the first protected resource, and the last two requests (/test/file.php and /test/file.php?param1=1234) match the second protected resource.
You then add the following URL path to the first protected resource:
/path/?
This URL path in the first protected resource causes all the requests to match the first protected resource, and the second protected resource is ignored. The ? wildcard, which matches all content in the current directory, takes precedence over the more specific wildcard (*.php).
URL paths are case insensitive. If your Web server has two paths (/public/current and /public/Current), a URL path of /public/current matches both.
13.4.3 Assigning an Authorization Policy to a Protected Resource
An Authorization policy specifies conditions that a user must meet in order to access a resource. The Access Gateway enforces these conditions. The policy can specify the criteria a user must meet either to allow access or to deny access.
-
Click > > > > > > .

The contains all the Access Gateway Authorization policies that have been created on this Administration Console.
-
Select one of the following:
-
To enable an existing policy, select the policy, then click . Continue with Step 4.
-
To disable an existing policy, select the policy, then click . Continue with Step 4.
-
To edit an existing policy, click the name of the policy. Remember that policies can be assigned to multiple protected resources. If you modify the policy, you are also affecting how this policy protects those resources. For configuration information, see Section 28.2, Creating Access Gateway Authorization Policies.
When you have completed your policy modifications, continue with Step 4.
-
To create a new policy, click . On the Policies page, click , specify a display name, select as the type, then click . For configuration information, see Section 28.2, Creating Access Gateway Authorization Policies.
When you have created your policy, continue with Step 3.
-
-
To enable the policy you just created, select the policy, then click .
Only the policies that are enabled are applied to this resource. All available Authorization policies are listed. If you use the same policy for multiple protected resources, use the policy description field to indicate this.
-
To save your changes to browser cache, click .
-
To apply the changes, click the link, then click > .
13.4.4 Assigning an Identity Injection Policy to a Protected Resource
The Web application defines the requirements for Identity Injection. If a Web application has been configured to look for certain fields in the header and the information cannot be found, the Web application determines whether the user is denied access, granted access, or redirected. You configure an Identity Injection policy to inject into the HTTP header the information that the Web application requires.
-
Click > > > > > > .

The contains all the Identity Injection policies that have been created on this Administration Console.
-
Select one of the following:
-
To enable an existing policy, select the policy, then click . Only the policies that are enabled are applied to this resource. Continue with Step 4.
-
To disable an existing policy, select the policy, then click . Continue with Step 4.
-
To edit an existing policy, click the name of the policy. Remember that policies can be assigned to multiple protected resources. If you modify the policy, you are also affecting how this policy protects those resources. For configuration information, see Section 29.0, Creating Identity Injection Policies.
When you have finished your policy modifications, continue with Step 4.
-
To create a new policy, click . On the Policies page, click , specify a display name, select as the type, then click . For configuration information, see Section 29.0, Creating Identity Injection Policies.
When you have created your policy, continue with Step 3.
-
-
To enable the policy you just created, select the policy, then click .
Only the policies that are enabled are applied to this resource. All available Identity Injection policies are listed. If you use the same policy for multiple protected resources, use the policy description field to indicate this.
-
To save your changes to browser cache, click .
-
To apply your changes, click the link, then click > .
IMPORTANT:If you enable an Identity Injection policy for a protected resource that has been assigned to use a contract that does not prompt the user for a password and the Identity Injection policy injects the user’s password, single sign-on cannot be enabled because the password is not available. To enable single sign-on, you need to use an authentication class that retrieves the user’s password and injects it into the user’s credentials when the user authenticates using a non-password method such as X509, Radius, smart card, or Kerberos. For information about such a class and how to download and configure it, see Access Management Authentication Class Extension to Retrieve Password for Single Sign-on.
13.4.5 Assigning a Form Fill Policy to a Protected Resource
Some client requests cause the Web server to return a form. Sometimes this form contains a request to log in. If you create a Form Fill policy, you can have the Access Gateway fill in the form. When a user first logs in, the Access Gateway prepopulates some fields and prompt the users for the others. The Access Gateway securely saves the information, so that on subsequent logins, the Access Gateway can fill in the form. The user is only prompted to fill in the form when something changes, such as a password expiring.
Form Fill uses two components: the HTML form and the Form Fill policy. The HTML form is created with HTML tags and consists of form elements such as fields, menus, check boxes, and buttons. The Form Fill policy is created by specifying the following:
-
Which information is entered automatically and not displayed to the user.
-
Which information is displayed so that the user, at least the first time, can enter the information.
-
What is done with the information (for example, is it saved so that the user doesn't need to enter it when accessing the form again).
You must create the policy before you can assign it to a resource (see Section 30.0, Creating Form Fill Policies). To assign a Form Fill policy to a protected resource:
-
In the Administration Console, click > > > > > > .
-
Examine the entries in the .
Ideally, the URL to which you are assigning a Form Fill policy should be a single HTML page or a few HTML pages. If at all possible, it should not be a URL that ends in a wildcard (for example, an asterisk) and therefore matches many pages.
WARNING:When the URL ends in a wildcard, the Access Gateway must search each page that matches the URL and check to see if it contains the form. This adds extra processing overhead for all the pages that match the URL, but do not contain the form. For more information on the performance problems this can cause, see Creating a Form Matching Rule.
-
(Conditional) If the URL is not specific, click the name of the path and modify it.
-
Click .

The contains all the Form Fill policies that have been created on this Administration Console.
-
Select one of the following:
-
To enable an existing policy, select the policy, then click . Only the policies that are enabled are applied to this resource. Continue with Step 7.
-
To disable an existing policy, select the policy, then click . Continue with Step 7.
-
To edit an existing policy, click the name of the policy. Remember that policies can be assigned to multiple protected resources. If you modify the policy, you are also affecting how this policy protects those resources. For configuration information, see Section 30.0, Creating Form Fill Policies.
When you have finished the policy modifications, continue with Step 7.
-
To create a new policy, click . On the Policies page, click , specify a display name, select as the type, then click . For configuration information, see Section 30.0, Creating Form Fill Policies.
When you have created your new policy, continue with Step 6.
-
-
To enable the policy you just created, select the policy, then click .
Only the policies that are enabled are applied to this resource. All available Form Fill policies are listed. If you use the same policy for multiple protected resources, use the policy description field to indicate this.
-
To save your changes to browser cache, click .
-
To apply your changes, click the link, then click > .
IMPORTANT:If you enable a Form Fill policy for a protected resource that has been assigned to use a contract that does not prompt the user for a password and the Form Fill policy contains a field for the user’s password, single sign-on cannot be enabled because the password is not available. To enable single sign-on, you need to use an Authentication class that retrieves the user’s password and injects it into the user’s credentials when the user authenticates using a non-password method such as X509, Radius, smart card, or Kerberos. For information about such a class and how to download and configure it, see Access Management Authentication Class Extension to Retrieve Password for Single Sign-on.
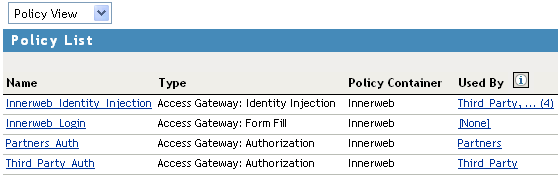
13.4.6 Assigning a Policy to Multiple Protected Resources
If you have created multiple protected resources that need to be protected by the same policy or policies, you can use the policy view to assign a policy to multiple protected resources. The one limitation is that the protected resources must belong to the same proxy service.
-
In the Administration Console, click > > > > > .
-
Select the .
-
Select the link of the policy you want to assign to multiple resources.
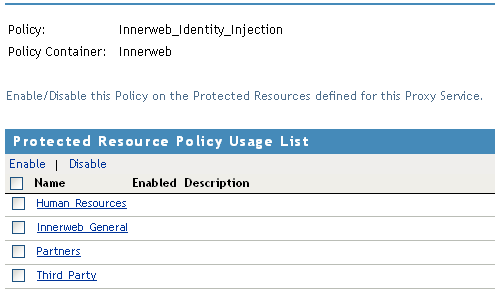
The and fields identify the policy. The displays the protected resources defined for this proxy service and indicates which resources the policy has been enabled on.
-
To enable the policy for multiple resources, either select them one by one or click to select all of them, then click . To disable a policy for a resource, select the resource, then click .
-
To save your changes to browser cache, click .
-
To apply your changes, click the link, then click > .