3.12 Understand Your Installation Options
Before installing OES, you should be aware of the information in the following sections:
3.12.1 OES 2 Linux Installation Overview
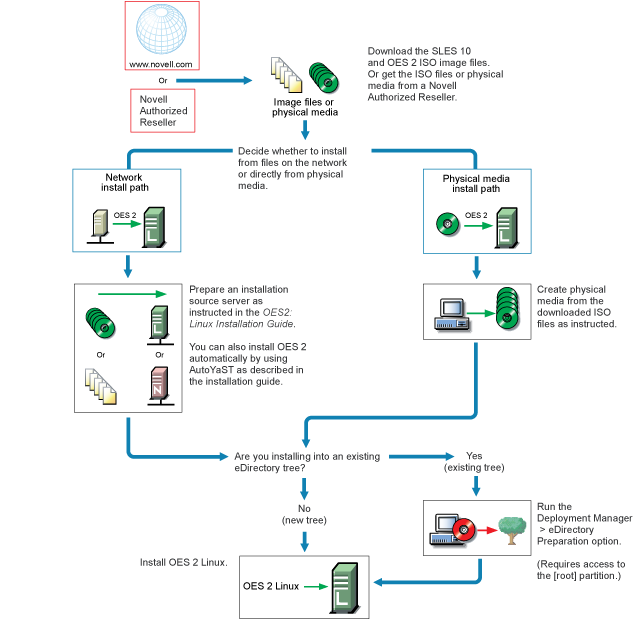
The software and network preparation processes required to install OES 2 Linux are outlined in Figure 3-1.
NOTE:Section 4.0, Getting and Preparing OES 2 Software contains instructions for obtaining the ISO image files and the network install script referred to in the following illustration.
Figure 3-1 OES 2 Linux Install Preparation

For detailed instructions, see Setting Up an Installation Source
in the OES 2 SP2: Installation Guide.
3.12.2 OES 2 NetWare Installation Overview
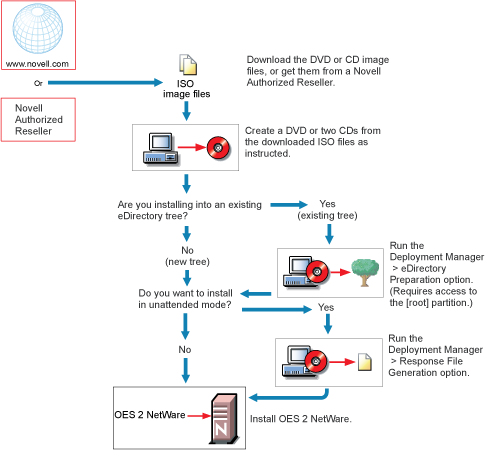
The software and network preparation processes required to install OES 2 NetWare are outlined in Figure 3-2. Specific instructions for the steps shown are referenced in the sections that follow.
NOTE:Section 4.0, Getting and Preparing OES 2 Software contains instructions for obtaining the ISO image files referred to in the following illustration.
Figure 3-2 OES 2 Netware Install Preparation

For detailed instructions, see NW65 SP8: Installation Guide
in the NW65 SP8: Installation Guide.
3.12.3 About Your Installation Options
As illustrated in the two previous sections, OES 2 Linux lets you install from physical media or from files on the network, but NetWare requires physical media.
OES 2 Linux Options
OES 2 Linux includes numerous installation options as documented in the OES 2 SP2: Installation Guide.
-
CD/DVD Install: You can install SLES 10 SP1 by using CDs or a DVD and then install OES 2 Linux from a CD, all of which can be either obtained from a Novell Authorized Reseller or created from downloaded ISO image files.
See
Preparing Physical Media for a New Server Installation or an Upgrade
in the OES 2 SP2: Installation Guide. -
Network Install: You can install from the network by using the NFS, FTP, or HTTP protocol.
Installing from the network saves you from swapping CDs on the server during the installation.
See
Preparing a Network Installation Source
in the OES 2 SP2: Installation Guide. -
Automated Install: You can install from the network by using an AutoYaST file.
This lets you install without providing input during the installation process. It is especially useful for installing multiple servers with similar configurations.
See
Using AutoYaST to Install and Configure Multiple OES Servers
in the OES 2 SP2: Installation Guide.
OES 2 NetWare Options
OES 2 NetWare installation options are documented in the NW65 SP8: Installation Guide.
-
CD/DVD Install: You can install by using CDs or a DVD obtained from a Novell Authorized Reseller, or you can create CDs or a DVD from downloaded ISO image files.
See
Accessing the Installation Files
in the NW65 SP8: Installation Guide.
Virtual Machine Installation Options
Virtual machine installations offer additional options. For more information, see
3.12.4 Use Predefined Server Types (Patterns) When Possible
Both OES 2 Linux and OES 2 NetWare include predefined server installation options that install only the components required to provide a specific set of network services. In the OES 2, these server types are called patterns.
For example, if you want to install an OES 2 server that provides enterprise level print services, you should select the pattern during the installation.
You should always choose a predefined server type if one fits the intended purpose of your server. If not, you can choose to install a customized OES 2 server with only the service components you need.
More information about server patterns is available in the installation guides:
-
OES 2 Linux:
OES Services Pattern Descriptions
in the OES 2 SP2: Installation Guide -
OES 2 NetWare:
Choosing a Server Pattern
in the NW65 SP8: Installation Guide
3.12.5 If You Want to Install in a Lab First
Many organizations prefer to install products on smaller servers for testing in a lab prior to full deployment. The OES 2 SP2: Lab Guide for Linux and Virtualized NetWare walks you through installing and exploring all the basic OES 2 services.
3.12.6 If You Want to Install NSS on a Single-Drive Linux Server
Many are interested in Novell Storage Services (NSS) running on Linux. If you plan to experiment with NSS on a single-drive server, be sure to follow the instructions in Installing with EVMS as the Volume Manager of the System Device
in the OES 2 SP2: Installation Guide.