7.6 Managing Directory Quotas
A directory quota limits the amount of space on an NSS volume that can be consumed by all of the files and folders in that directory. If the value you specify exceeds the volume quota, the volume quota overrides the directory quota. If the current size of the directory exceeds the specified limit, users cannot save data to the directory until space is cleared by removing files from the directory.
Before you can set directory quotas, you must enable the volume’s Directory Quotas attribute. As the administrator user, you can view and configure directory quotas with the Files and Folders plug-in for iManager, NetStorage, and the Novell Client™. For NSS on NetWare, you can also use Novell Remote Manager for NetWare.
This section describes the following:
7.6.1 Enabling or Disabling the Directory Quotas Attribute for an NSS Volume
Before setting directory quotas on an NSS volume, you must enable the Directory Quotas attribute for the volume. You can set the attribute at create time or at any time for an existing volume.
To set the Directory Quotas attribute for an existing volume:
-
In iManager, click .
-
Select a server to manage to view a list of NSS volumes on the server.
-
In the list, select a volume that you want manage.
Wait for the volume details to be displayed before you continue.
-
Click .
The page has three tabs: , , and . It opens to the tab.
-
On the tab, select or deselect the check box, then click .
-
(Linux) If you enabled or disabled the attribute, restart NCP2NSS by entering the following at a terminal console prompt:
/etc/init.d/ncp2nss restart
7.6.2 Configuring Directory Quotas
Adding or Modifying a Directory Quota with iManager
-
In iManager, select .
-
Click the icon, then browse to locate and select the folder you want to manage on an NSS volume.
-
On the tab, select to enable space restrictions for the selected directory.
-
In the field, type the directory quota in KB.
The value must be an increment of 4 KB; that is, it must be divisible by 4 with no remainder.
-
Click or to apply the changes.
Adding or Modifying a Directory Quota with Novell NetStorage
Using Novell NetStorage, you can manage directory quotas for directories in an NSS volume from any computer with a supported Web browser. This requires you to first configure a NetStorage server in the same context. For information, see the following:
To create or modify NSS directory quotas with NetStorage:
-
In a Web browser, connect to NetStorage.
-
Log in to NetStorage with the username and password of the Admin user or equivalent user.
-
Navigate to the directory you want to manage.
-
Right-click the directory, then select .
-
Click the tab.
Use the tab whether your server is OES Linux or NetWare.
-
Do one of the following to configure the directory quota:
-
Space Restriction: Select , then specify the directory quota in KB. The value must be a multiple of 4.
-
No Space Restriction: Deselect to set the directory quota to Unlimited.
-
Complete Space Restriction: Select , then specify the directory quota as 0 KB. If the directory already contains files and subdirectories, the directory cannot grow beyond the current space consumed.
-
-
Click to accept the directory quota configuration.
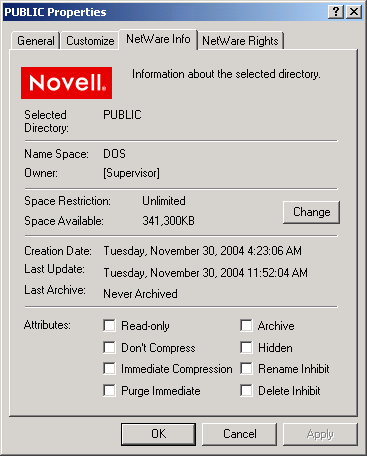
Adding or Modifying Directory Quotas with the Novell Client
The Novell Client for Windows 2000/XP allows the admin user to manage directory quotas for directories in an NSS volume from a Windows computer.
-
In the Novell Client, map a drive to the NSS directory you want to manage, or map to its parent directory.
-
Right-click the icon (the red N icon in the notification area), then select .
-
Specify the network path to the directory. For example: 192.168.1.1/users.
-
Specify the username of the Admin user or equivalent user, then click .
-
When prompted, enter the user’s password.
-
-
In a file browser, locate and right-click the directory you want to manage, then click .
Use the tab whether your server is OES Linux or NetWare.
-
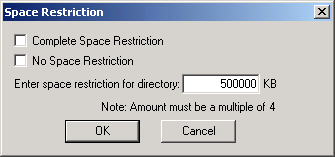
In the field, click to open the dialog box.
-
Do one of the following to configure the directory quota:
-
Space Restriction: Specify the directory quota in KB. The value must be a multiple of 4.
-
No Space Restriction: Select to set the directory quota to Unlimited.
-
Complete Space Restriction: Select to set the directory quota to 0 KB. If the directory already contains files and subdirectories, the directory cannot grow beyond the current space consumed.
-
-
Click to accept the directory quota.
Adding or Modifying a Directory Quota with Novell Remote Manager for NetWare
-
Access Novell Remote Manager for your NetWare server.
-
Click to open the page.
-
Locate the volume where the directory resides, then click the volume name link to view a directory listing for the volume.
-
Locate the directory you want to manage, then click the icon
 to the left of the directory to open the page.
-
In the field, click the link.
Figure 7-1 NetStorage Directory Quota’s File Space Limit Link
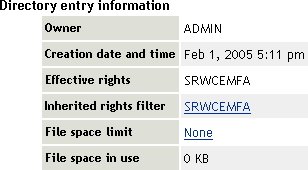
This link is not available if you did not enable the Directory Quotas attribute when you created the parent volume.
-
Do one of the following:
-
Space Restriction: Specify the maximum size (in kilobytes) for the selected directory, then click to apply the setting.
-
No Space Restriction: Click to remove space restrictions for the selected directory.
-
Complete Space Restriction: Specify the maximum size as 0 KB. If the directory already contains files and subdirectories, the directory cannot grow beyond its current space consumed.
-
7.6.3 Removing a Directory Quota
-
In iManager, select .
-
Click the icon, then browse to locate and select the folder you want to manage on an NSS volume.
-
On the tab, deselect to disable space restrictions for the selected folder.
-
Click or to apply the changes.
7.6.4 Removing All Directory Quotas for an NSS Volume
To delete the directory quotas for all directories on an NSS volume without dealing individually with each directory, you can simply disable the Directory Quotas attribute for the NSS volume.
-
In iManager, click .
-
Select a server to manage.
-
In the list, select a volume that you want manage.
-
Click .
The page has three tabs: , , and . It opens to the tab.
-
On the tab, deselect the check box, then click .
-
(Linux) Restart NCP2NSS by entering the following at a terminal prompt:
/etc/init.d/ncp2nss restart