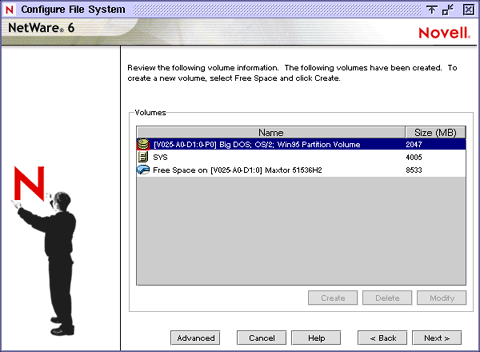
The server should now have a NetWare partition and one volume named SYS:. If you have space available for creating additional partitions and volumes, you can create them now.
NOTE: If you have allocated all available space to volume SYS:, you will not be prompted for NetWare server file system information. You can skip to Installing Networking Protocols .
When installing the NetWare file system, you can
Volumes allow you to subdivide your partitions into more manageable sections. Additional volumes can be created from any available free space on a storage device. Volume names can be between 2 and 15 characters. Valid characters include A through Z, 0 through 9, and characters _ ! - @ # $ % & ( ). The volume name cannot begin with an underscore (_) or have two or more consecutive underscores.
You can create two types of volumes---Novell Storage Services (NSS) volumes or traditional volumes.
NSS volume---NSS is advanced file system technology that enhances the management of large files, large volumes, namespaces, and storage devices. The time required to mount large volumes is significantly reduced with NSS.
Traditional NetWare volume---Although not recommended, Traditional NetWare volumes might be required to use data migration, File Transfer Protocol (FTP), VREPAIR, Network File System (NFS), or file name locks.
Volumes are created from free space. A large disk can be divided into several volumes during installation. Conversely, a volume can be distributed over multiple disks.
WARNING: Creating a volume that spans two or more storage devices is not recommended. If a volume spans disk devices and one of the devices fails, all data on the entire volume could be lost.
To create a volume, select Free Space and click Create. Type the name of the volume and click OK.
To allocate only a portion of the selected free space to the volume, type the amount of space to use and click Apply to Volume.
The size of any existing volume can be increased but not decreased. To decrease the size of an existing volume, the volume must be deleted and re-created.
To add to the size of a volume, select an additional free space, type the amount of space to use, and click Apply to Volume.
You can delete any volume you have created except volume SYS:. When a volume is deleted, all data on the volume is lost.
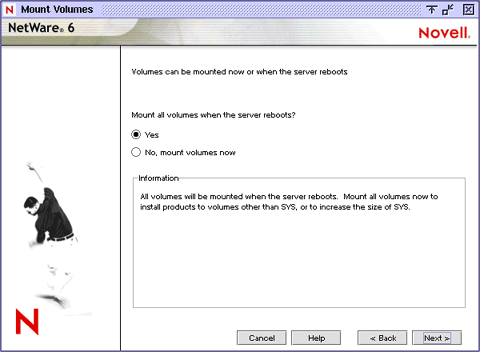
In order for volumes to be accessed by NetWare, they must be mounted. Volumes can be mounted immediately or at the end of installation.

Mount Volumes Now---You should mount volumes now if you plan to install additional products and services, such as documentation, on volumes other than volume SYS:. You should also mount volumes that you might be moving forward from a previous NetWare server so they can be updated.
Mount Volumes after Installation Completes---If you are installing products and services on volume SYS: only, you can wait to mount volumes after the installation program completes.
If you are upgrading a NetWare server with NSS volumes, the NSS volumes will not appear or mount until they are updated. Updating NSS volumes is done after finishing the server upgrade by following the instructions in Updating NSS Volumes .