15.4 Increasing the Size of a Pool
Using the Increase Size option on the Pools page expands the storage capacity of a selected pool by adding new partitions. You can increase the size of your storage pools, but you cannot reduce their size.
-
In iManager, click Storage > Pools.
For instructions, see Section 9.1.5, Accessing Roles and Tasks in iManager.
-
Select a server to manage.
For instructions, see Section 9.1.6, Selecting a Server to Manage.
-
In the Pools list, select the pool that you want to expand.
Wait for the page to refresh. It displays the pools’s details and enables management options.
-
Click Increase Size.
This opens an Expand a Pool Wizard that guides you through the process of adding partitions from available devices.

-
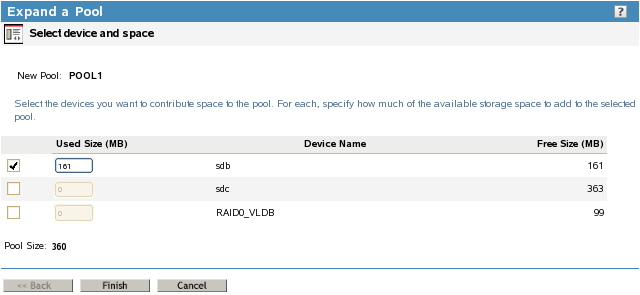
Select the devices you want to use and the amount of space to use from each device.
In the Used Space field, type the amount of space in megabytes (MB) to add, up to the amount of free space available for that device. If any entry exceeds a device’s available space, the pool expansion fails and returns an error message.
Software RAID 1 (mirrored) devices can contain only one pool per device. If you select a RAID 1 device to add a partition to your pool, NSS automatically allocates all of the available space to the pool.
The Total Pool Size is the sum of the partitions you define plus the current pool size. Initially, the Total Pool Size field displays the current size of the pool. To update the Total Pool Size as you enter values in the Used Size field, click anywhere within the Wizard dialog box.
You can obtain space from one or more of the devices listed. Only devices that have free space appear in the list. If no devices are listed, there is no space available to increase the size of the pool. Cancel the Wizard, add more devices to the server or free up space on existing devices, then return to the Pools page to increase the size of this pool.
-
Click Finish, or click Cancel at any time to back out of the process.