19.3 Migration Procedure
-
Install the OES 2 SP3 Linux server as the target server for the Archive and Version Services into the same edirectory tree as the source server.
For more information on installing Novell Archive and Version Services, see
Setting Up Archive and Version Services
in the OES 2 SP3: Novell Archive and Version Services 2.1 Administration Guide for Linux. -
To stop the Archive and Version Services on source server and continue to run the MySQL database, enter
arkstop
-
To stop the Archive Service on the target server, enter
rcnovell-ark stop
This command stops the Archive server and the default instance of the PostgreSQL database.
-
If you have configured the Archive server with the default configuration, restart the PostgreSQL database with the following command:
/opt/novell/arkmanager/bin/pg_restart.sh
-
Migrate data from Archive volume on the NetWare server to the OES 2 SP3 server.
The migration is from the NetWare NSS source volume to the OES 2 SP3 Linux NSS target volume, where the source and target servers are in the same eDirectory tree. For more information, refer to the OES 2 SP3: NSS File System Administration Guide for Linux.
IMPORTANT:You need to migrate the Archive volume before migrating the Archive and Version Service; otherwise, versions of files created on the NetWare server are unusable on OES 2 SP3 Linux server.
-
(Optional) Migrate data from the Primary volume on the NetWare server to the OES 2 SP3 Linux server, using either command line utilities or the GUI interface. For more information, refer to the OES 2 SP3: NSS File System Administration Guide for Linux.
-
Decide how to migrate Archive and Version Services.
The Migration Tool GUI has a plug-in architecture and is made up of command line utilities with a GUI wrapper. You can migrate Archive and Version Services by using either of the following methods:
19.3.1 Using the Migration Tool GUI
-
Click to launch the Migration Tool GUI.
For more information on using the Migration Tool GUI, refer to Section 5.0, Using the Migration Tool GUI.
-
Authenticate to the source and target server. Archive and Version Services is listed in the panel.
Select the as for migrating Archive service, or to Transfer ID for Transfer ID scenario.
-
In the panel, click and select .
The of the service is .
-
Select and click

-
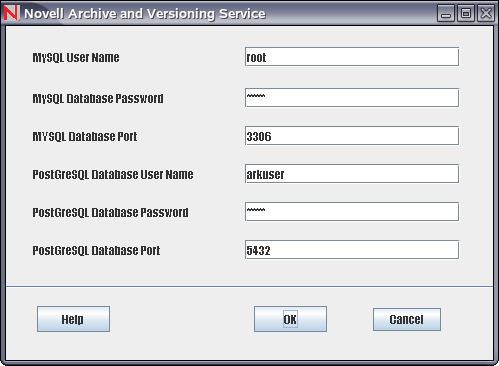
Fill in the fields, using the information in the following table:
Parameter
Description
MySQL User Name
Specify a username for the administrator of the MySQL database on the source server.
MySQL Database Password
Specify a password for the MySQL user.
MySQL Database Port
Specify a port number used for the archive database communications on the source server. Port 3306 is the default.
PostgreSQL Database User Name
Specify a username for the administrator of the archive database (the PostgreSQL database for the archived data) on the OES 2 SP3 Linux server.
IMPORTANT:The Postgres user must be an unprivileged user, not the root user.
PostgreSQL Database Password
Specify a password for the PostgreSQL user.
PostgreSQL Database Port
Specify a port number to use for the archive database communications on the OES 2 SP3 server. Port 5432 is the default.
-
Click .
The of the service is .
-
Click to proceed with migration. The is .
In the pane, tab, you can view the progress of migration. On completion of migration, the changes to .
NOTE:If you encounter any errors during migration, check the tab in the pane. After resolving the errors, execute the migration procedure again.
19.3.2 Using the Command Line
-
To run the Archive and Version migration utility through command line, run /opt/novell/migration/bin/migark.sh with the following details:
Option
Description
--mysqldb-user=<opt>
Specify a username for the administrator of the MySQL database.
--mysqldb-passwd=<opt>
Specify a password for the MySQL user.
--mysqldb-port=<opt>
Specify a port number used for the archive database communications on NetWare server. Port 3306 is the default.
--hostname=<opt>
Specify the host name or IP address of the NetWare server on which Archive and Version Services resides.
--username=<opt>
Specify the fully distinguished eDirectory name and context of the administrator user. For example, cn=admin.o=novell
NOTE:Use the dot (.) format for specifying the eDirectory name and context, not the comma (,) format.
--password=<opt>
Specify a password for the Admin user.
--pg_db-user=<opt>
Specify a username for the administrator of the archive database (the PostgreSQL database for the archived data) on the Novell OES 2 SP3 server.
IMPORTANT:The Postgres user must be an unprivileged user, not the root user.
--pg-db-passwd
Specify a password for the PostgreSQL user.
--pg_db-port=<opt>
Specify a port number to use for the archive database communications on the OES 2 SP3 Linux server. Port 5432 is the default.
For example:
/opt/novell/migration/bin/migark.sh --mysqldb-user=root --mysqldb-passwd=novell --mysqldb-port=3306 --hostname=192.168.1.255 --username=cn=admin.o=novell --password=novell12 --pg_db-user=arkuser --pg_db-passwd=novell12 --pg_db-port=5432
NOTE:If you encounter any errors during migration, check the archive_migration.log file in the /var/opt/novell/log/migration/ folder. After resolving the errors, execute the migration procedure again.