8.2 Creating NSS Volumes to Use in the DST Shadow Volume Pair
In its initial release, DST shadow volumes can be created using only NSS volumes. At least one of the two NSS volumes that you use in the shadow volume pair must be a new volume. This section describes the essentials for creating the NSS volumes. For complete information, see the OES 2 SP2: NSS File System Administration Guide.
8.2.1 Requirements for NSS Volumes
Before you can create a DST shadow volume, you need two existing NSS volumes that have the same configuration of attributes and features. Table 8-3 identifies key NSS requirements for NSS volumes that you use in the DST shadow volume:
Table 8-3 Requirements for the Primary and Secondary Storage Areas
|
NSS Requirements |
Caveats |
|---|---|
|
Devices must be attached to the OES 2 Linux server |
The device type, performance characteristics, size, and storage subsystem can differ for the primary and secondary storage locations. For information about supported devices, see Section 3.1.2, Storage Devices and Section 3.1.3, iSCSI Block Storage Devices. |
|
Devices must be able to be managed by EVMS |
When you create an NSS pool on OES 2 Linux, the NSS management tools automatically configure the device for use with EVMS. If the pool you create is not clustered, an EVMS NetWare Segment Manager is added to the device. If the pool is clustered, an EVMS Cluster Segment Manager is added. For information, see |
|
Pools’ share state must be the same |
Typically, the two NSS volumes exist in different pools. The share state of each pool must be the same:
|
|
Volume attributes and features |
Both volumes must be configured with the same attributes and features. Some limitations apply. For guidelines and caveats for working with NSS volumes in shadow volumes, see in Section 3.3, Guidelines for Using NSS Volumes in DST Shadow Volumes. |
8.2.2 Preparing Devices for NSS Volumes
Table 8-4 provides a quick reference for the tasks needed to prepare devices for NSS volumes. Perform the tasks in the order presented as they apply to your planned storage solution and the current state of your system. For details related to any step, see the referenced sections in the OES 2 SP2: NSS File System Administration Guide, except as otherwise noted.
IMPORTANT:Perform only those tasks that apply for your storage needs.
Table 8-4 Task Quick Reference for Preparing to Create an NSS Volume on OES 2 Linux
|
Task |
Description |
Unshared |
Shared |
|---|---|---|---|
|
Use third-party tools to carve disks to sizes between 20 MB and 2 TB. |
NSS recognizes devices up to 2 TB in size. You can combine multiple devices to create a single NSS pool up to 8 TB in size. |
Required |
Required |
|
If you plan to cluster the pools, make sure you have installed Novell Cluster Services for Linux and that it is running. |
Novell Cluster Services for Linux must be installed before you can create shared NSS pools. For information, see |
Not used |
Required for sharing |
|
If the SAN solution provides multiple paths between the device and the server’s HBA, configure multipathing for the device. |
Use multipath management tools from the hardware vendor, third-party tools, or Linux multipath tools to resolve the multiple I/O paths into a single multipath device that represents the actual device. For information about using Linux multipath management tools, see |
As needed |
As needed |
|
If the disk has not already been initialized, initialize the disk. |
A newly added device must be initialized in order for its free space to be available for creating NSS pools. You cannot initialize the device that contains the operating system. Do not initialize devices that contain data you want to keep, whether the data is stored in NSS file systems or Linux file systems. WARNING: The initialization process destroys all data on the disk. For information, see |
New devices |
New devices |
|
Enable sharing for clustered devices. |
If you plan to cluster the pool, set the device’s share state to Shareable for Clustering. Do this for all devices that you want to contribute space to the pool. If a device is marked as sharable for clustering, all partitions on that device are automatically sharable. For information, see |
Not used |
Required for sharing |
8.2.3 Creating an NSS Pool
-
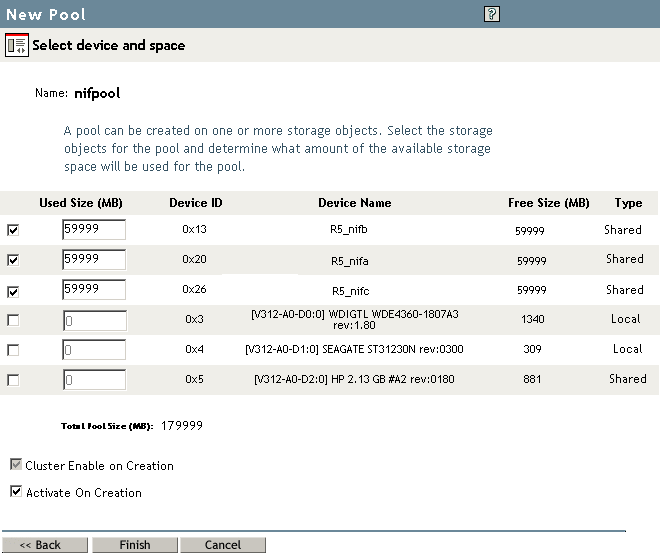
In iManager, click .
-
Click the browser to locate and select the OES 2 Linux server you want to manage.
-
Click to open the to guide you through the pool creation process.
-
Specify a name for the new storage pool, then click .
NSS changes your entry to all capitals when it creates the pool.
-
Specify the following pool configuration settings:

-
Do one of the following:
-
Not Clustered: Click . You are done; continue with Section 8.2.4, Creating and Configuring Unencrypted NSS Volumes.
-
Clustered: If the check box is selected, click to specify cluster parameters for the pool. Continue to the next step.
-
-
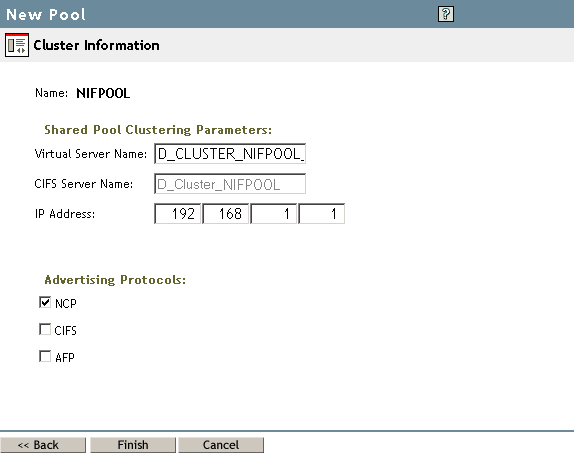
Specify the :

Fill in the following shared pool clustering parameters:
-
Virtual Server Name: The name assigned to the virtual server that represents the shared pool in the cluster.
When you cluster-enable a pool, a virtual Server object is automatically created in Novell eDirectory and given the name of the Cluster object plus the name of the cluster-enabled pool. For example, if the cluster name is cluster1 and the cluster-enabled pool name is pool1, then the default virtual server name is cluster1_pool1_server. You can edit the field to change the default virtual server name.
-
CIFS Virtual Server Name: The name assigned by Novell CIFS to the virtual server for handling CIFS (Common Internet File System) requests. This is the name of the server as it appears in a Windows system.
IMPORTANT:Novell CIFS for OES 2 SP1 Linux has not been tested with DST.
For OES 2 Linux, Windows network access is via Samba. In order to give CIFS/Samba access to users, you must install Novell Samba and configure users for Samba access. For information about configuring Samba services, see the OES2 SP2: Samba Administration Guide.
-
IP Address: The IP address that you want to assign the virtual server.
Each cluster-enabled NSS pool requires its own IP address. The IP address is used to provide access and failover capability to the cluster-enabled pool (virtual server). The IP address you assign to the pool remains assigned to the pool no matter which server node in the cluster that the pool is active.
IMPORTANT:The IP address for the virtual server must be in the same IP subnet as the server nodes in the cluster where you plan to use it.
To specify an IP address, tab between the different entries; no dot is required in the fields. For example, if the IP address is 192.168.1.1, type
192 168 1 1
-
Advertising Protocols: Protocols that give users native file access to data.
Specify the advertising protocol by selecting the check boxes of the protocols you want to enable for data requests to this shared pool.
-
NetWare Core Protocol (NCP) is the Novell networking protocol used by the Novell Client™ and other NCP clients. It is selected by default and is required by NSS, even if your users are accessing the clustered NSS volumes via CIFS/Samba.
Selecting NCP causes commands to be added to the pool-resource load and unload scripts to activate the NCP protocol on the cluster. This lets you ensure that the cluster-enabled pool you are creating is highly available to all NCP clients.
-
CIFS is the Windows networking protocol. Novell CIFS is available on NetWare and on OES 2 SP1 Linux. Use Linux Samba instead. Samba is not configured in this interface.
IMPORTANT:Novell CIFS for OES 2 SP1 Linux has not been tested with DST. Although NSS supports using Novell CIFS for Linux, DST does not support using it with shadow volume pairs.
-
Apple* Filing Protocol (AFP) is the Macintosh networking protocol. Novell AFP is available on NetWare and on OES 2 SP1 Linux.
IMPORTANT:Novell AFP for OES 2 SP1 Linux has not been tested with DST. Although NSS supports using Novell AFP for Linux, DST does not support using it with shadow volume pairs.
-
-
-
Click .
8.2.4 Creating and Configuring Unencrypted NSS Volumes
This section describes how to create an unencrypted volume with iManager. Before you begin, make sure you understand the guidelines and caveats specified in Section 3.3, Guidelines for Using NSS Volumes in DST Shadow Volumes.
IMPORTANT:Shadow volumes are not supported for encrypted NSS volumes.
-
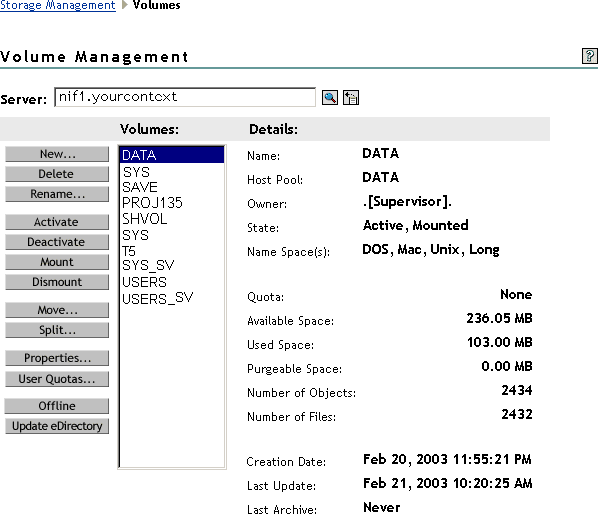
In iManager, click .
-
Select a server to manage.
A list of existing NSS volumes appears in the list, as illustrated in the following figure.

-
To create a new volume, click to open the New Volume Wizard to guide you through the process.
-
Specify a name for the new volume.
If the name you provide is not unique, you receive an error message. NSS volume names are case insensitive. The letters you enter are capitalized when the volume is created.
-
Do one of the following:
-
Select an existing pool from the list where you want the new volume to reside.
-
If no pools exist, click , create a pool to use, select the pool.
-
If existing pools do not have sufficient space for the volume you want to create, click to close the wizard. You must add more segments of free space to the pool, then return to the Volumes page to create the new volume.
-
If no pools exist and no space is available to create one, click to close the Wizard. You must add more devices to the server or free up space on existing pools, then return to the Volumes page to create the new volume.
-
-
Specify the size of the volume:
-
No Volume Quota: Select if you want the volume to expand to the size of the pool. This is the default.
Pools can be overbooked; each volume can potentially grow to the size of the pool. NSS allocates space as it is needed.
-
Volume Quota: Deselect , then type a size in MB for the volume if you want to limit the size of the volume. Valid values are 10 MB to the size of the pool.
-
-
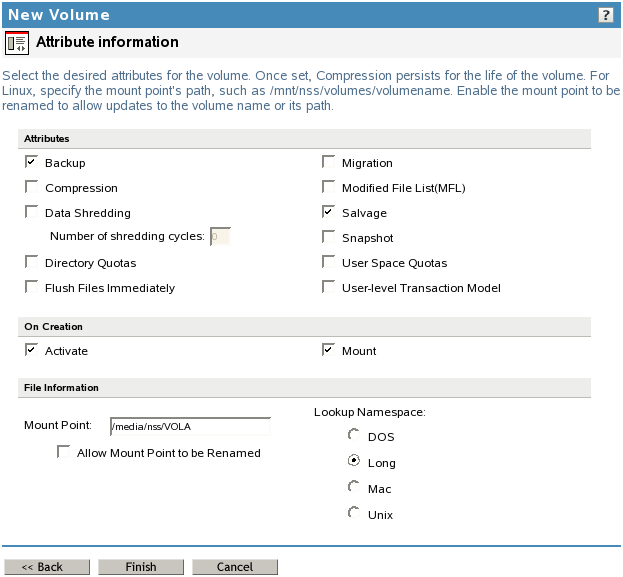
On the Attribute Information page under the section, set the attributes for the new volume you are creating. The and attributes are selected by default.
For information about volume attributes, see
Understanding Volume Properties
in the OES 2 SP2: NSS File System Administration Guide.For guidelines and caveats about using different attributes with Dynamic Storage Technology, see Table 3-3, DST Support for NSS Volume Attributes.

-
On the page under the section, set the following preferences:
-
Activate: Activates logical volumes as soon as you create them.
-
Mount: Mounts logical volumes as soon as you create them.
-
-
On the Attribute Information page under , specify the following parameters:
-
Mount Point (Linux): For a Linux server, specify the mount point for the NSS volume, such as /media/nss/VOLA.
The default mount path for NSS volumes on Linux is /media/nss/volumename, where volumename is the name of the volume.
-
Allow Mount Point to Be Renamed (Linux): For a Linux server, select this option if you want to allow the mount point to be renamed after it has been created.
IMPORTANT:DST does not support renaming mount points.
Renaming a mount point means that you can specify another path as the mount point, such as /media/uservols/volumename, but the volume would continue to be associated with the same Volume object in eDirectory.
-
Lookup Name Space: Select the name space to use when you mount the volume. The name spaces are UNIX, Long, DOS, or Macintosh. For Linux, the default name space is UNIX.
The recommended name space setting is Long. This setting ensures that filenames are case insensitive whether the volume is mounted on a Linux server or NetWare server. It also improves performance, especially if you expect to store millions of files on the volume.
-
-
Click .
-
(Linux) If you enabled the attribute, restart NCP2NSS by entering at a terminal prompt:
/etc/init.d/ncp2nss restart