9.12 Viewing or Modifying the Cluster Master IP Address or Port
The cluster IP address is assigned to the Master IP Address Resource of the cluster when you configure the first node in a Novell Cluster Services cluster. The cluster IP address is separate from the server IP address and is required for some external programs to get cluster status alerts. The IP address is bound to the master node and remains with the master node regardless of which server is the master node.
The cluster IP address normally does not need to be changed, but it can be changed for any reason. For example:
-
A duplicate IP address conflicts with the master IP address.
-
You want to move the cluster to a different IP subnet.
-
You want to reallocate IP addresses in the same subnet.
You normally connect to the master IP address to manage the cluster. If the master IP address has connection problems, the Clusters > My Clusters page in iManager allows you to use the server IP address of a node (preferably the master node) to manage the cluster and fix the problem. For example, the following connection problems can prevent you from connecting to the master IP address to manage the cluster:
-
Another device on the network is using the master IP address, and the Master IP Resource cannot come online.
-
There are underlying communications errors for the SFCB protocol, and you get an error in iManager when you try to connect to the Master IP Resource of the cluster. For example errors, see
iManager errors while trying to manage Cluster, Storage, User Quotas, CIFS or AFP
(Technical Information Document 7010295).
Connecting to a node’s IP address is a temporary measure to allow you to resolve the master IP address problem. It is not intended as an alternative way to manage the cluster. The option is not available from the My Resources page.
The default cluster port number is 7023, and is automatically assigned when the cluster is created. The cluster port number does not need to be changed unless a conflict is created by another resource using the same port number. If there is a port number conflict, change the Port number to any other value that doesn't cause a conflict.
IMPORTANT:After you change the cluster IP address or port number, you must restart Cluster Services, exit iManager, and relaunch iManager before iManager can manage the cluster with the new IP address.
-
In iManager, select Clusters > My Clusters.
-
In your personalized My Clusters list, view the status of the cluster you want to manage.
If the cluster does not appear in your list, add the cluster to your list as described in Section 9.2, Setting Up a Personalized List of Clusters to Manage.
-
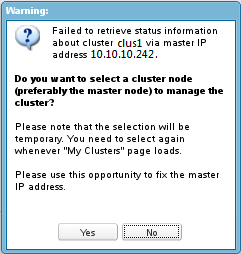
If the master IP address does not respond to the status query, an error message prompts you to temporarily manage the server with the server IP address of the master node (preferred) or of any active node.
The message appears each time that you revisit the My Clusters page until you resolve the IP address conflict on the network or by modifying the cluster’s master IP address.
-
Read the error message, then do one of the following:
-
Use a server node (preferably the master): Click Yes to agree to use the server IP address of a node to temporarily manage the cluster. Continue to Step 3.b.
-
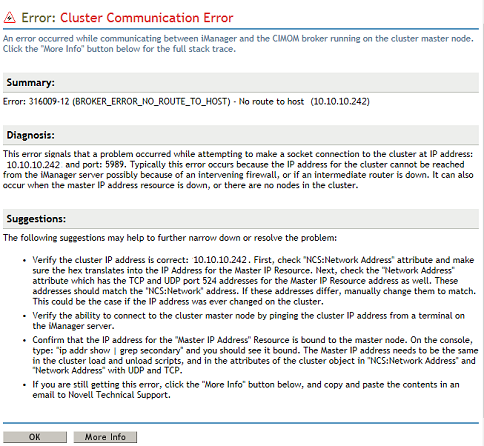
View error details: Click No to view the Cluster Communication Error details. It provides some tips for diagnosing the root cause of the IP address conflict. Click OK to dismiss the message. Try to resolve the conflict on the network, then select Clusters > My Clusters (Step 1) to see if the connection issue is resolved.
-
-
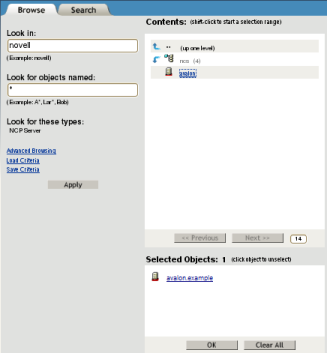
Browse to choose the node (preferably the master node) to use to temporarily manage the cluster, then click OK.
-
-
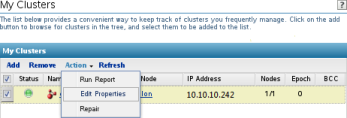
After the clusters connection is made, select the check box next to the cluster, then click Action > Edit Properties to open the Cluster Properties dialog box.
-
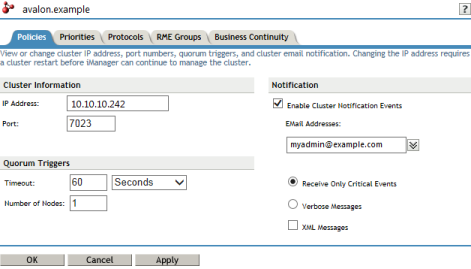
In the Cluster Properties dialog box, click the Policies tab.
Normally, the cluster name (such as clus1.ncs.example) is displayed if you access the cluster properties via the Master_IP_Resource. The server name (such as avalon.example, shown below) is displayed if you access the properties via a server node in Step 3.
-
Under Cluster Information, specify the new value for the IP address or port.

-
Click OK to save and apply your changes. Wait for the success notification before continuing.
A cluster restart is required before iManager can continue to manage the cluster with its new master IP address.

-
Exit iManager and close the web browser.
-
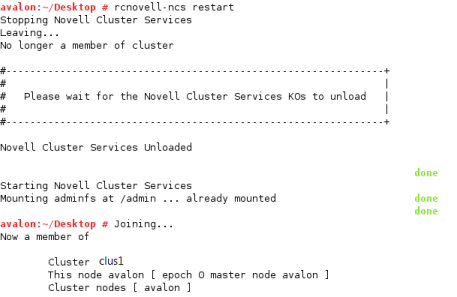
Restart Cluster Services. Open a terminal console as the root user, then enter
rcnovell-ncs restart
-
Launch a web browser and log in to iManager to continue managing the cluster.