7.4 Installing or Upgrading to OES 2015 SP1 with NSS AD Support
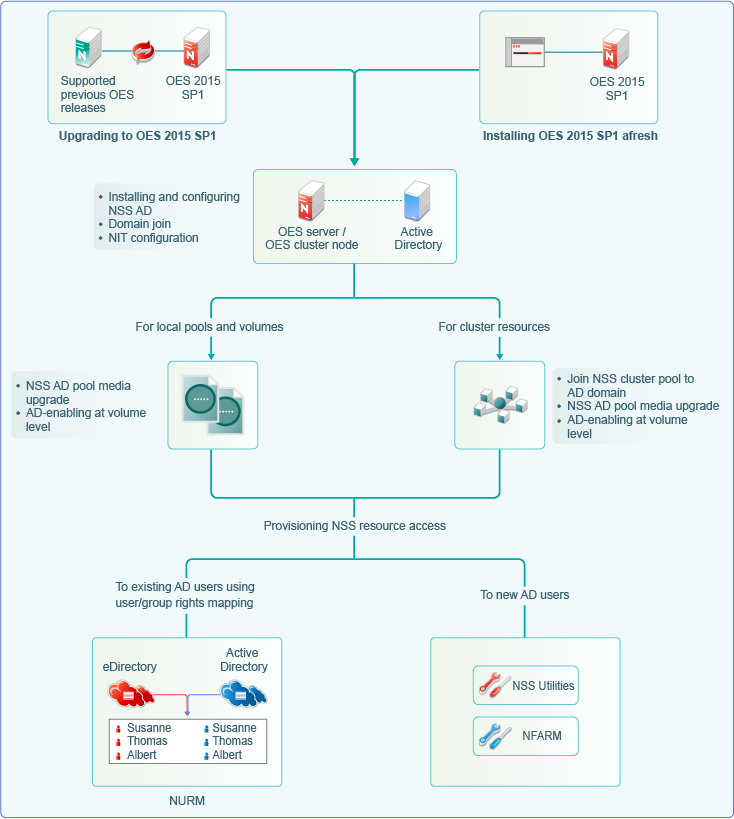
Here’s how you can install and configure NSS AD afresh or after an upgrade to OES 2015 SP1.

-
For information on installing or upgrading to OES 2015 SP1, domain join, and NIT configuration, see Section 7.4.2, Installing and Configuring NSS AD Support.
-
After installing and configuring NSS AD,
-
Media-upgrade the local pools and AD-enable the local volumes to support AD users. For more information on NSS Media upgrade and AD-enabling, see
NSS Media Upgrade Commands
andVolume AD-enabling
in the OES 2015 SP1: NSS File System Administration Guide for Linux. -
Upgrade your cluster resources to support AD users. Join all cluster pools to the AD domain using NSSMU (see
NSS Management Utility (NSSMU) Quick Reference
in the OES 2015 SP1: NSS File System Administration Guide for Linux), upgrade all cluster pools media and AD-enable the volumes. For more information on media upgrade, and AD-enabling, seeNSS Media Upgrade Commands
andVolume AD-enabling
in the OES 2015 SP1: NSS File System Administration Guide for Linux. NSS AD media upgrade is required only for NSS32 bit pools, and AD-enabling of volumes must be done for both NSS32 and NSS64 pools.
-
-
To enable AD users access the NSS resources, they need to be provisioned with sufficient rights. Use the Novell Rights Map utility to map users and rights between eDirectory and Active Directory users. For more information, see
OES User Rights Management (NURM)
in the OES 2015 SP1: NSS File System Administration Guide for Linux. -
To manage AD users’ rights, user quota, owner information, directory quota and so on, use Novell File Access Rights Management or rights utility. For more information, see
OES File Access Rights Management (NFARM)
andrights
in the OES 2015 SP1: NSS File System Administration Guide for Linux.
There is no change with the way you install or upgrade to OES 2015 SP1, except in the Novell Storage Services AD Support Configuration screens.
7.4.1 Resolving the AD DNS Name from OES 2015 SP1
To make OES 2015 SP1 with NSS AD work properly, ensure that AD server and OES 2015 SP1 server are mutually resolvable. If you are not able to resolve, do not proceed with the NSS AD installation. Your Domain Search name and Name Server entries might be incorrect.
7.4.2 Installing and Configuring NSS AD Support
After resolving the AD DNS Name from the OES 2015 SP1 server, under the OES Patterns screen, select Novell Storage Service AD Support pattern and specify the following details:

-
AD Domain Name: Specify the appropriate AD domain name.
-
AD Supervisor Group: Specify the AD supervisor group name. The AD users belonging to this group will have supervisory rights for all the volumes associated with that OES server.
-
AD User Name: Specify the user name that can be used for the domain join operation. This user should have the following privileges: rights to reset password, create computer objects, delete computer objects, and read and write the msDs-supportedEncryptionTypes attribute.
-
Password: Specify the appropriate password of the user who is used for the domain join operation.
-
Container to Create Computer Object: You can specify the container under which the OES 2015 SP1 computer object will be created. The default container is cn=computers. If you have already created a OES 2015 SP1 computer object in the AD server, select Use pre-created computer object, then specify the container name where the pre-created OES computer object exists.
-
NIT - Novell Identity Translator Configuration: If you want NIT to generate UIDs for AD users, select Generate UID for AD users, then specify the UID range. The default range is from 100000 to 200000. If you want NIT to fetch UIDs, do not select the Generate UID for AD users option.
7.4.3 Validating the NSS AD Configuration
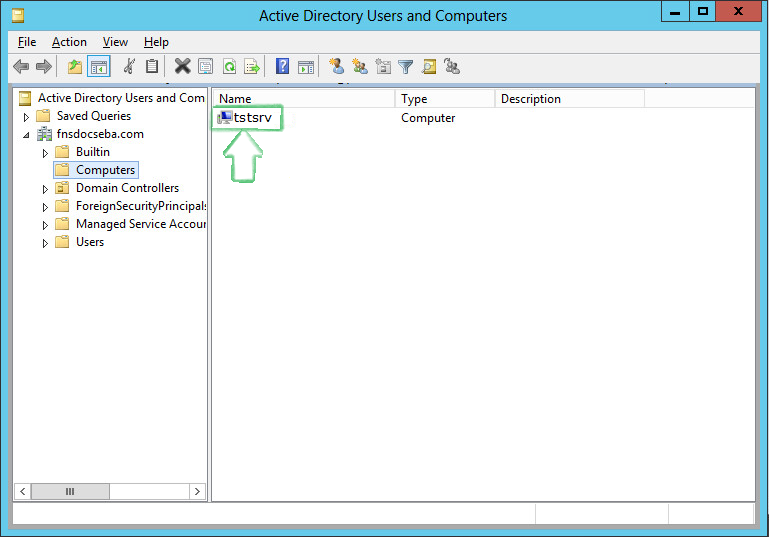
After successfully installing and configuring NSS AD, you should find an entry for the cluster node object created in the Active Directory Users and Computers screen of the AD server as shown in the following image.

You can also execute klist -k command and verify that the default keytab entries are created as shown below.
tstsrv:~/Desktop #klist -k
Keytab name: FILE:/etc/krb5.keytab
KVNO Principal
---- --------------------------------------------------------------------------
   2 tstsrv$@ACME.COM
   2 tstsrv$@ACME.COM
   2 tstsrv$@ACME.COM
   2 cifs/tstsrv.acme.com@ACME.COM
   2 cifs/tstsrv.acme.com@ACME.COM
   2 cifs/tstsrv.acme.com@ACME.COM
   2 cifs/tstsrv@ACME.COM
   2 cifs/tstsrv@ACME.COM
   2 cifs/tstsrv@ACME.COM
   2 host/tstsrv.acme.com@ACME.COM
   2 host/tstsrv.acme.com@ACME.COM
   2 host/tstsrv.acme.com@ACME.COM
tstsrv:~/Desktop #
This command updates the default keytab, /etc/krb5.keytab and /etc/krb5.conf files. OES 2015 SP1 supports three strongest encryption types: AES128, AES256, RC4HMAC. For each encryption type, an entry is made in the default key tab.