5.2 Planning for the Upgrade
5.2.1 Be Sure to Check the Release Notes
The OES 2018 SP2: Release Notes documents issues that Micro Focus plans to address in a future release.
5.2.2 iPrint Advanced (Earlier iPrint for OES) Upgrade Requirements
If you are upgrading to OES 2018 SP2 from an OES 2018 SP1 server that is not fully patched, then database issues are caused by upgrading the iPrint for OES service.
If you have installed iPrint for OES on OES 2018 SP1 server, ensure to apply Update 8 OES 2018 SP1 iPrint for OES - Mandatory patch before upgrading to the OES 2018 SP2 server.
5.2.3 Understanding the Implications of Novell Samba Currently Installed on the Server
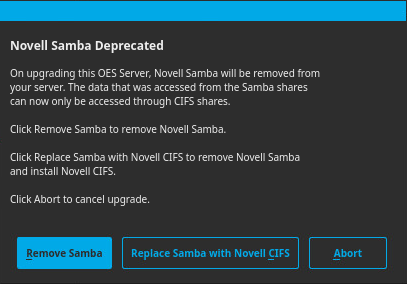
If you are planning to upgrade from an earlier OES version that has Novell Samba configured in it to OES 2018 SP1 or later, the Novell Samba package and configuration will be removed from the server. This is because Novell Samba is deprecated in OES 2018 SP1. During the upgrade process, the Novell Samba Deprecated dialog is displayed.

You can choose to perform one of the following:
-
Remove Samba: Removes the Novell Samba package and continues upgrading your OES server to OES 2018 SP1 or later. If you want to access the data that was earlier accessed from Samba shares, you can install Novell CIFS post upgrade and use it to access the data.
-
Replace Samba with Novell CIFS: Removes the Novell Samba package and installs and configures Novell CIFS during the upgrade process.
-
Abort: Cancels the upgrade process. Click Exit and Reboot to retain the server in the same OES version that was existing before starting the upgrade.
NOTE:
-
If you are upgrading using AutoYaST, the Replace Samba with Novell CIFS option removes the Novell Samba package and installs Novell CIFS but does not configure it. You must configure Novell CIFS post upgrade of the server to use it.
-
If you are upgrading using Channel Upgrade, the Novell Samba Deprecated dialog is not displayed and Novell Samba package is removed if it is detected to be configured on the server that is being upgraded. You must install and configure Novell CIFS post upgrade of the server to use it. For more information on installing and configuring CIFS, see Installing CIFS after the OES Installation in the OES 2018 SP2: OES CIFS for Linux Administration Guide.
Using OES CIFS to Access the Data Post Upgrade to OES 2018 SP1 or later
To use OES CIFS to access the data that was earlier accessed from Samba shares, you must create CIFS shares with the same share name as Samba shares that existed before upgrade. You can find the Samba share names from the file etc/samba/smb.conf.oes2018-upgrade-save.
For information on creating CIFS shares using iManager, see Adding a New CIFS Share in the OES 2018 SP2: OES CIFS for Linux Administration Guide.
NOTE:If you had modified any script file as part of cluster samba configuration in the earlier OES version, post upgrade to OES 2018 SP1 or later, to use Novell CIFS you must do the following:
-
Undo the modifications in the script file.
-
Enable CIFS on the NSS pool in which you create the shares using iManager.
-
Create CIFS shares with the same share name as Samba shares that existed before upgrade.
5.2.4 Understanding the Implications for Other Products Currently Installed on the Server
OES Server Upgrades: Non-OES Packages Are Retained but Might Not Work After Upgrading
During the upgrade process from supported upgrade paths to OES 2018 SP2, packages that are not part of the OES 2018 SP2 distributions are automatically retained unless you select them for deletion.
This includes third-party products you have installed, as well as other Micro Focus products such as GroupWise, ZENworks, and Identity Manager.
There is no guarantee that these products will continue to work after you upgrade. Therefore, it is critical that you check the product documentation for compatibility information before you upgrade servers with any Micro Focus product installed.
|
For Information About This Micro Focus Product |
See This Documentation |
|---|---|
|
GroupWise |
|
|
ZENworks |
|
|
Identity Manager |
|
|
Other products |
If you have installed a third-party product, ensure that it is supported on OES and follow the upgrade instructions that should be included with it.
5.2.5 Upgrading in Text Mode
If you plan to upgrade from OES 2015 SP1 or earlier server to OES 2018 or later in a text mode, then before starting the upgrade process, you must change the default runlevel to 3 in the /etc/inittab file. If you fail to do this, the upgrade process might fail.