16.2 Setting Up a High Availability Lucene Configuration
16.2.1 Changing from a Local Lucene Index Server
To change from a local Lucene Index Server running on the Novell Vibe server, you must install the Lucene Index Server on two or more remote servers, then reconfigure Vibe for a high availability Lucene configuration.
NOTE:Although it is possible to use the Lucene Index Server on the Vibe server as one of the “remote” Lucene nodes, this is not a recommended configuration. Consider it only if you are restricted to two servers for your Vibe site.
-
Set up two or more Lucene nodes:
-
Install the Lucene Index Server on each node, as described in Section 14.1, Installing the Lucene Software.
-
(Optional) Copy accumulated index data from the initial Lucene Index Server to each additional Lucene node.
The default location for the index files varies by platform:
Linux:
/var/opt/novell/teaming/lucene
Windows:
c:\Novell\Teaming\lucene
-
Start the Lucene Index Server on each Lucene node, as described in Section 14.3, Managing a Remote Lucene Index Server.
-
-
Stop Vibe.
If you have installed the Vibe software on multiple servers, as described in Section 15.0, Running Vibe on Multiple Servers, stop Vibe on all servers, or follow the instructions in Section 16.2.4, Changing Your Lucene Configuration without Vibe Site Down Time.
-
Run the Vibe installation program to configure the Vibe server for multiple Lucene nodes:
-
On the Installation Settings page, select , then click .
-
On the Choose Installation Type page, select , then click .
-
Click to proceed through the installation pages where no changes are needed.
-
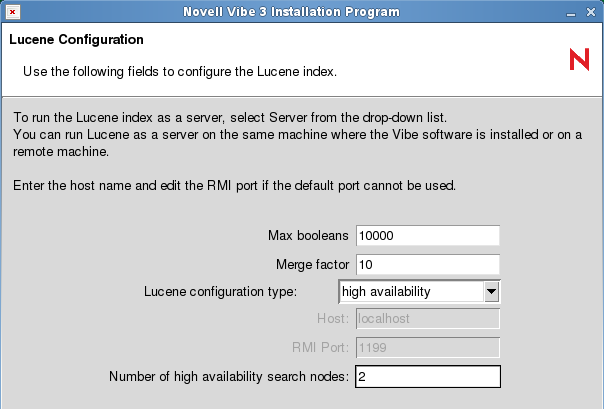
On the Lucene Configuration page, fill in the following fields:
Lucene configuration type: Select
Number of high availability search nodes: Specify the number of Lucene nodes where you have installed and started the Lucene Index Server.
-
Click .
-
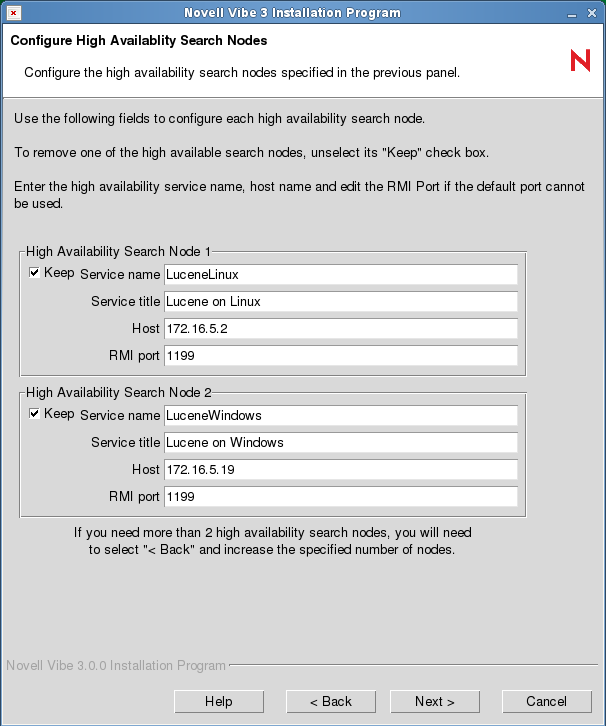
On the Configure High Availability Search Nodes page, specify the configuration information for each Lucene node from the Advanced Vibe Installation Summary Sheet that you filled out in Section 16.1, Planning a High Availability Lucene Configuration, then click .
-
Click until you reach the Ready to Install page, then click .
-
On the Installation Complete page, click .
-
Start Vibe.
-
(Conditional) If you have multiple Vibe servers, repeat Step 3 on each Vibe server.
-
-
Configure the Vibe site for the additional Lucene nodes:
-
Log in to the Vibe site as the Vibe administrator.
-
Click the icon
 in the upper right corner of the page, then click the icon
  .
.
-
Under , click .
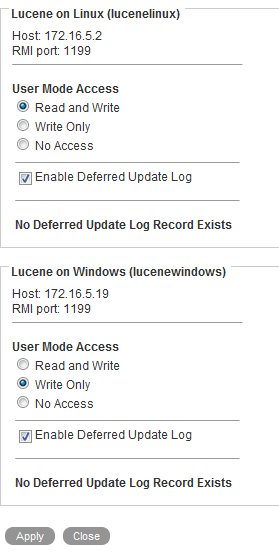
By default, the first Lucene node in the list has Read and Write access, meaning that Vibe updates it as new content is added to the Vibe site. By default, subsequent nodes in the list have Write Only access, meaning that the Vibe software can update content on the server, but users cannot access it. This setting is useful when you need to perform maintenance on a Lucene node, but it is not the setting you want when you set up a new Lucene node.
-
In the box, select for all Lucene nodes, click , then click .
The new setting is put into effect immediately, so that users immediately have access to the additional Lucene nodes.
-
-
Skip to Section 16.3, Testing Your Lucene High Availability Configuration.
16.2.2 Changing from a Single Remote Lucene Index Server
To change from a single remote Lucene Index Server to a high availability configuration, you must install the Lucene Index Server on one or more additional remote servers, then reconfigure Novell Vibe for additional Lucene nodes.
-
Bring down your Vibe site:
-
Stop Vibe.
If you have installed the Vibe software on multiple servers, as described in Section 15.0, Running Vibe on Multiple Servers, stop Vibe on all servers, or follow the instructions in Section 16.2.4, Changing Your Lucene Configuration without Vibe Site Down Time.
-
Make sure that the existing remote Lucene Index Server also stops.
-
-
Set up one or more additional Lucene nodes:
-
Install the Lucene Index Server on each additional remote server, as described in Section 14.1, Installing the Lucene Software.
-
(Optional) Copy accumulated index data from the initial remote Lucene node to each additional Lucene node.
The default location for the index files varies by platform:
Linux:
/var/opt/novell/teaming/lucene
Windows:
c:\Novell\Teaming\lucene
-
Start the Lucene Index Server on each Lucene node, as described in Section 14.3, Managing a Remote Lucene Index Server, but do not bring up your Vibe site.
-
-
Run the Vibe installation program to configure the Vibe server for multiple Lucene nodes:
-
On the Installation Settings page, select , then click .
-
On the Choose Installation Type page, select , then click .
-
Click to proceed through the installation pages where no changes are needed.
-
On the Lucene Configuration page, fill in the following fields:
Lucene configuration type: Change to
Number of high availability search nodes: Specify the number of Lucene nodes where you have installed the Lucene Index Server.

-
Click .
-
On the Configure High Availability Search Nodes page, specify the configuration information for each Lucene node from the Advanced Vibe Installation Summary Sheet that you filled out in Section 16.1, Planning a High Availability Lucene Configuration, then click .

-
Click until you reach the Ready to Install page, then click .
-
On the Installation Complete page, click .
-
Start Vibe.
-
(Conditional) If you have multiple Vibe servers, repeat Step 3 on each Vibe server.
-
-
Configure the Vibe site for the additional Lucene nodes:
-
Log in to the Vibe site as the Vibe administrator.
-
Click the icon
 in the upper right corner of the page, then click the icon
  .
.
-
Under , click .

By default, the first Lucene node in the list has Read and Write access, meaning that Vibe updates it as new content is added to the Vibe site. By default, subsequent nodes in the list have Write Only access, meaning that the Vibe software can update content on the server, but users cannot access it. This setting is useful when you need to perform maintenance on a Lucene node, but it is not the setting you want when you set up a new Lucene node.
-
In the box, select for all Lucene nodes.
-
Click , then click .
The new setting is put into effect immediately, so that users immediately have access to the additional Lucene nodes.
-
-
Skip to Section 16.3, Testing Your Lucene High Availability Configuration.
16.2.3 Expanding an Existing High Availability Lucene Configuration
After you have set up an initial high availability Lucene configuration, you can add additional Lucene nodes at any time.
-
Bring down your Vibe site:
-
Stop Vibe.
If you have installed the Vibe software on multiple servers, as described in Section 15.0, Running Vibe on Multiple Servers, stop Vibe on all servers, or follow the instructions in Section 16.2.4, Changing Your Lucene Configuration without Vibe Site Down Time.
-
Stop all Lucene nodes, as described in Section 14.3, Managing a Remote Lucene Index Server.
-
-
Set up one or more additional Lucene nodes:
-
Install the Lucene Index Server on each additional remote server, as described in Section 14.1, Installing the Lucene Software.
-
(Optional) Copy accumulated index data from an existing Lucene node to each additional Lucene node.
The default location for the index files varies by platform:
Linux:
/var/opt/novell/teaming/lucene
Windows:
c:\Novell\Teaming\lucene
-
Start the Lucene Index Server on each Lucene node, as described in Section 14.3, Managing a Remote Lucene Index Server, but do not bring up your Vibe site.
-
-
Run the Vibe installation program to configure the Vibe server for the additional Lucene nodes:
-
On the Installation Settings page, select , then click .
-
On the Choose Installation Type page, select , then click .
-
Click to proceed through the installation pages where no changes are needed.
-
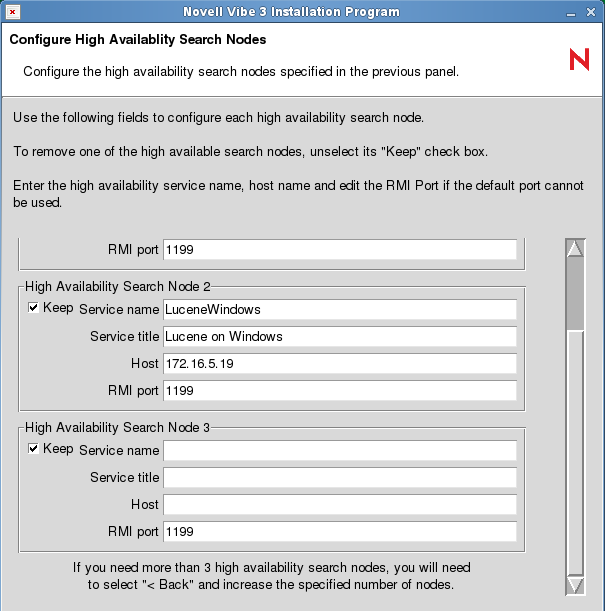
On the Lucene Configuration page, increase the number of nodes in the field, then click .

-
On the Configure High Availability Search Nodes page, specify the configuration information for each additional Lucene node, then click .
-
Click until you reach the Ready to Install page, then click .
-
On the Installation Complete page, click .
-
Start Vibe.
-
(Conditional) If you have multiple Vibe servers, repeat Step 3 on each Vibe server.
-
-
Configure the Vibe site for the additional Lucene nodes:
-
Log in to the Vibe site as the Vibe administrator.
-
Click the icon
 in the upper right corner of the page, then click the icon
  .
.
-
Under , click .

By default, the first Lucene node in the list has Read and Write access, meaning that Vibe updates it as new content is added to the Vibe site. By default, subsequent nodes in the list have Write Only access, meaning that the Vibe software can update content on the server, but users cannot access it. This setting is useful when you need to perform maintenance on a Lucene node, but it is not the setting you want when you set up a new Lucene node.
-
In the box, select for all Lucene nodes.
-
Click , then click .
The new setting is put into effect immediately, so that users immediately have access to the additional Lucene nodes.
-
-
Skip to Section 16.3, Testing Your Lucene High Availability Configuration.
16.2.4 Changing Your Lucene Configuration without Vibe Site Down Time
Vibe site down time can be avoided only if you have installed the Vibe software on multiple servers, as described in Section 15.0, Running Vibe on Multiple Servers.
To change to a high availability Lucene configuration in a multiple Vibe server configuration:
-
Set up two or more Lucene nodes:
-
Install the Lucene Index Server on each node, as described in Section 14.1, Installing the Lucene Software
-
Start the Lucene Index Server on each Lucene node, as described in Section 14.3, Managing a Remote Lucene Index Server.
-
-
Stop Vibe on one server.
The other Vibe servers remain in service for users and continue to communicate with the original Lucene Index Server.
-
Run the Vibe installation program on the Vibe server that you stopped to configure it for multiple Lucene Index Servers:
-
On the Installation Settings page, select , then click .
-
On the Choose Installation Type page, select , then click .
-
Click to proceed through the installation pages where no changes are needed.
-
On the Lucene Configuration page, fill in the following fields.
Lucene configuration type: Select
Number of high availability search nodes: Specify the number of Lucene nodes where you have installed the Lucene Index Server.

-
Click .
-
On the Configure High Availability Search Nodes page, specify the configuration information for each Lucene node from the Advanced Vibe Installation Summary Sheet that you filled out in Section 16.1, Planning a High Availability Lucene Configuration, then click .

-
Click until you reach the Ready to Install page, then click .
-
On the Installation Complete page, click .
-
-
Start the reconfigured Vibe server.
-
Access the reconfigured Vibe server and prevent access to the additional Lucene nodes:
IMPORTANT:All Vibe servers must be reconfigured before any of them access the additional Lucene nodes.
-
Log in to the reconfigured Vibe server as the Vibe administrator, using the server hostname rather than your Vibe site URL.
-
Click the icon
 in the upper right corner of the page, then click the icon
  .
.
-
Under , click .

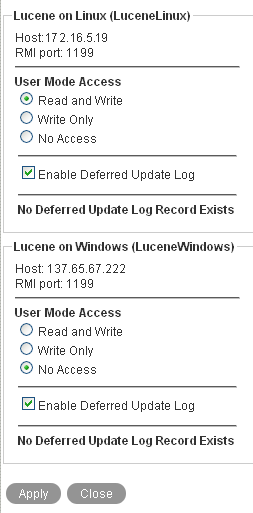
By default, the first Lucene node in the list has access, meaning that Vibe updates it as new content is added to the Vibe site. By default, subsequent nodes in the list have access, meaning that the Vibe software can update content on the server, but users cannot access it. When you set up a high availability Lucene configuration without Vibe site down time, you need to prevent write access during the reconfiguration process.
-
In the box, change to for the additional Lucene nodes.
-
Click , then click .
The new setting is put into effect immediately, so that the reconfigured Vibe server does not communicate with the additional Lucene nodes.
-
-
Reconfigure the rest of the Vibe servers:
-
Stop each Vibe server.
-
Repeat Step 3 to configure each Vibe server for the additional Lucene nodes.
-
Start each reconfigured Vibe server.
-
-
Access the reconfigured Vibe site and allow write access to the additional Lucene nodes:
-
Log in to the reconfigured Vibe as the Vibe administrator.
-
Click the icon
 in the upper right corner of the page, then click the icon
  .
.
-
Under , click .
-
In the box, change to for the additional Lucene nodes.
-
Click , then click .
The new setting is put into effect immediately, so that the reconfigured Vibe servers can now communicate with the additional Lucene nodes, although user access is still disallowed.
-
-
Reindex the Vibe site, so that the additional Lucene nodes are updated with the same index data that the original Lucene Index Server has:
-
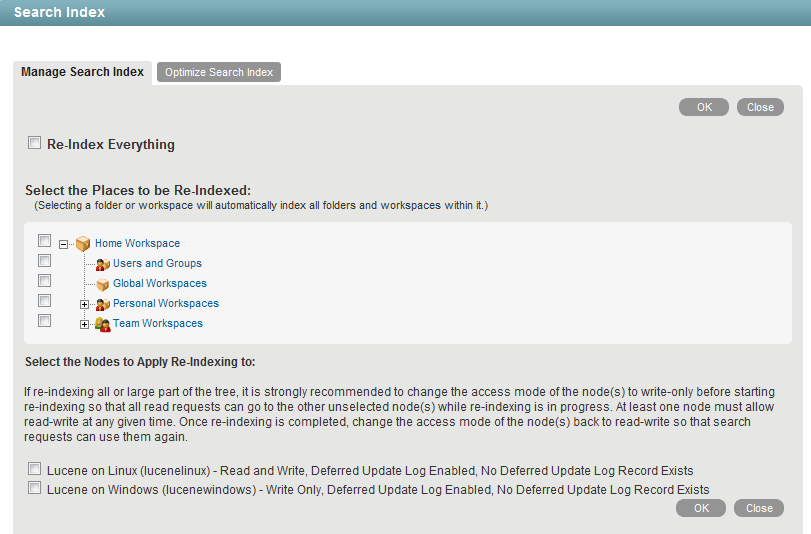
On the Administration page, under , click .
-
On the tab, select , so that the entire Vibe site is reindexed.
-
Select the additional Lucene nodes, but do not select any previously existing nodes.
-
Click to start the indexing.
Depending on the size of your Vibe site, reindexing can be a time-consuming process. However, because one or more previously existing Lucene Index Servers are still servicing the Vibe site, users are not affected by the reindexing process.
-
When the reindexing is completed, click .
-
-
Make the additional Lucene nodes available to Vibe users:
-
On the Administration page, under , click .

-
In the box, change to for the additional Lucene nodes.
-
Click , then click .
The new setting is put into effect immediately, so that Vibe users have additional Lucene Index Servers available as they use the Vibe site.
-