2.5 Restricting Access Rights of Users Outside the Firewall
Vibe enables you to restrict what information users can access when they are outside your corporate firewall.
If your Vibe site contains sensitive data, and users access the site from non-secure locations, you might want to consider restricting users to certain workspaces and folders when they are not accessing Vibe from inside the corporate firewall.
For example, a user accessing the Vibe system from a public kiosk increases the risk of sensitive data being inappropriately exposed.
To restrict access for users who are outside the corporate firewall, you must create a condition that contains one or more IP addresses (or range of IP addresses), associate this condition with an existing role, then assign the role to users and groups in the workspaces, folders, or entries where you want to allow access.
2.5.1 Creating a New Role Condition
-
Log in to the Vibe site as the Vibe administrator.
-
Click the icon
 in the upper right corner of the page, then click the icon
  .
.
The Administration page is displayed.
-
Under , click .
-
Click the tab.
-
Click .

-
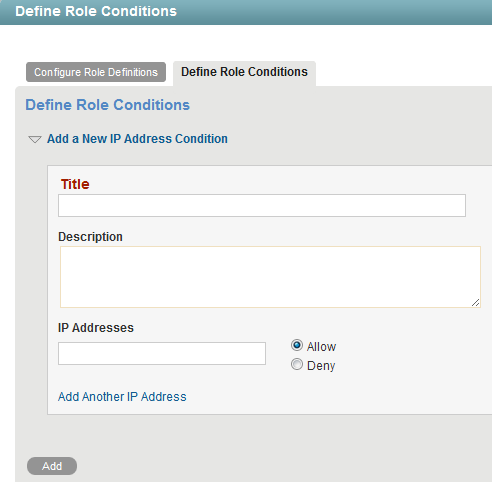
Provide the following information for the new condition:
Title: Specify a title for the condition.
Description: Specify a description for the role condition.
IP Address: Specify the IP address that you want to associate with this condition.
You can mask your IP address by using asterisks. For example, 155.5.*.*
Allow: Select this option to allow access from the specified IP address. There must be at least one field with selected.
Deny: Select this option to deny access from the specified IP address. Select this option only if you have multiple fields, and one of these fields has selected.
If you are masking an IP address, such as 155.5.*.*, you can exclude an IP address within the range that you are masking. For example, in the first field you specify 155.5.*.*, then select . You then add a second field by clicking , then specifying an IP address that is within the range of your masked IP address. In your second field, you specify 155.5.4.*, then select . This denies access to users who are using an IP address within the range 155.5.4.*, but allows access to users using any other IP address within the range 155.5.*.*.
-
(Optional) Click to associate multiple IP addresses with this condition. You can also add multiple IP addresses if you want to deny access to a specific IP address that is included within a range of IP addresses that you are allowing.
-
Click .
-
Continue with Section 2.5.2, Associating the Role Condition with a New or Existing Role.
2.5.2 Associating the Role Condition with a New or Existing Role
You must associate the role condition that you created in Section 2.5.1, Creating a New Role Condition with a new or existing role.
-
Log in to the Vibe site as the Vibe administrator.
-
Click the icon
 in the upper right corner of the page, then click the icon
  .
.
The Administration page is displayed.
-
Under , click .
-
On the tab, click .
or
Click an existing role in the section.
For more information about managing roles, see Section 2.4, Managing Roles to Refine Access Control.
-
In the drop-down list, select the role condition that you want to associate to the role.
-
Click .
-
Continue with Section 2.5.3, Assigning the Role Condition to Users and Groups.
2.5.3 Assigning the Role Condition to Users and Groups
After you have completed Section 2.5.1, Creating a New Role Condition and Section 2.5.2, Associating the Role Condition with a New or Existing Role, you need to assign the role that contains the new role condition to users and groups. You accomplish this in one of two ways, depending on whether you associated the role condition to a new role or an existing role (as described in Section 2.5.2, Associating the Role Condition with a New or Existing Role):
Assigning the New Role to Users and Groups
To assign the role that contains the new role condition to users and groups:
-
Add the role to the Access Control table for the workspaces, folders, or entries where you want to grant users access rights, as described in
Controlling Access to Workspaces and Folders
in the Novell Vibe 3.4 Advanced User Guide. -
Assign the roles to the users and groups who you want to be granted access rights, as described in
Controlling Access to Workspaces and Folders
in the Novell Vibe 3.4 Advanced User Guide.
Assigning an Existing Role to Users and Groups
If you associated the role condition with an existing role, the role is automatically applied to users and groups in workspaces, folder, and entries where this role is already assigned.
2.5.4 Example
The following example shows how to restrict access to users outside the firewall by using role conditions:
-
Set up a proxy server (such as Novell Access Manager) that is external to the firewall.
-
Define a role condition that includes only a range of IP addresses that are internal to the firewall.
-
Associate this role condition to all or some existing Vibe roles.
If you associate this role condition to all roles except the Workspace and Folder Administrator role, only users who are workspace and folder administrators are able to access workspaces and folders from outside the firewall. Users who are not workspace and folder administrators do not have access.