4.1 Linux: Installing and Setting Up a Basic Vibe Site
You should already have reviewed Section 3.0, Planning a Basic Vibe Installation and filled out the Basic Vibe Installation Summary Sheet. The following sections step you through the process of installing and starting Novell Vibe on Linux.
4.1.1 Installing Missing Libraries
Before you install Vibe on SLES 10 SP3, you should check for and install any missing libraries.
-
Change to the following directory:
/opt/novell/teaming/stellent-converter/linux/x86
-
Run the exporter program.
The errors about missing input and output files are to be expected.
-
Look for errors about missing libraries.
-
If there are library errors, install any libraries that are missing.
On 64-bit Linux systems, a common missing library is libstdc++33-32bit.
4.1.2 Performing Pre-Installation Tasks on Linux
-
Make sure that the Linux server where you plan to install Vibe meets the system requirements listed in Section 2.1, Vibe Server Requirements.
-
In a terminal window, become root by entering su - and the root password.
-
Set the Linux open file limit to meet the needs of the Vibe software:
-
Open the /etc/security/limits.conf file in an ASCII text editor.
-
Add the following lines to the bottom of the list, following the format of the example lines:
*    hard    nofile    65535
*    soft    nofile    4096
-
Save the file, then exit the text editor.
-
-
Perform the following conditional tasks if necessary:
Stopping and Disabling an Existing Web Server
If a Web server is currently running on the Vibe server, stop it, and preferably disable it.
For example, to stop the Apache Web server and its associated instance of Tomcat:
-
Enter the following commands to stop Apache and Tomcat:
/etc/init.d/tomcat5 stop
/etc/init.d/apache2 stop
-
Enter the following commands to make sure that Apache and Tomcat do not start again when you reboot the server:
chkconfig --del apache2
chkconfig --del tomcat5
Creating a Vibe User and Group
If the user and group that you want to use for Vibe, as described in Section 3.9.2, Linux User ID for Vibe do not exist yet, create them. It is easier if you create the group first.
-
Create the Linux group that you want to own the Vibe software and data store directories:
-
In YaST, click to display the User and Group Administration page.
-
Click , then click .
-
Specify the group name, then click or .
The group does not need a password.
-
-
Create the Linux user that you want Vibe to run as:
-
Click , then click .
-
On the tab, specify the user’s full name, username, and password, then select .
Like any Linux system user, the Vibe Linux user does not need to manually log in. The Vibe Linux user does not need a password, either, but YaST requires you to provide one.
-
Click the tab.
-
In the drop-down list, select , because this user does not need to manually log in.
-
In the drop-down list, select the Linux group that you created in Step 1.
-
In the list, select the Linux group that you created in Step 1.
-
Click or .
-
-
Exit YaST.
4.1.3 Running the Linux Vibe Installation Program
When you run the Vibe installation program for the first time, you typically want to use the GUI interface. However, if you are installing Vibe on a server where the X Window System is not available, a text-based installation program is also available. After you are familiar with the Vibe installation process, you can use a silent installation to automate the process.
Using the GUI Installation Program
-
In a terminal window, enter su - to become the root user, then enter the root password.
You need root permissions in order to install the Vibe software, but you should not run the Vibe software as root.
-
Change to the directory where you downloaded and extracted the Vibe software.
-
Make sure that you have a license-key.xml file in the same directory with the Vibe installation program.
more license-key.xml
The Vibe installation program does not start without a license file in the same directory, and the license file has a different name when you download it.
For more information about licensing, see Section 6.0, Updating Your Vibe License.
-
Enter the following command to start the Vibe installation program:
./installer-teaming.linux
-
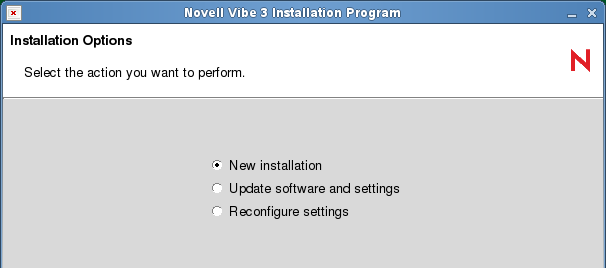
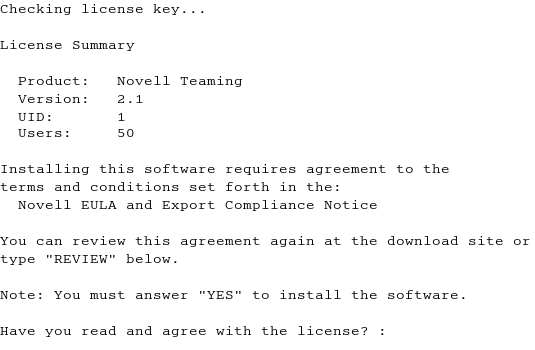
Accept the License Agreement, then click .

-
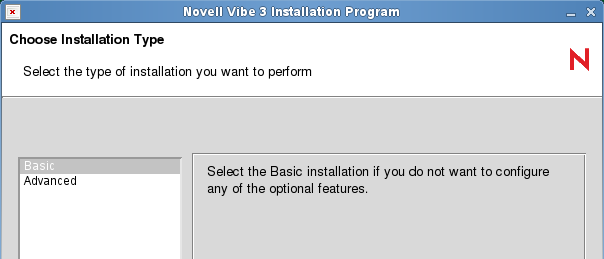
Click to accept the default of .

-
Click to accept the default of .
-
Use the information that you have gathered on the Basic Vibe Installation Summary Sheet to provide the information that the Vibe installation program prompts you for:
- Installation Locations
- Location of TrueType Fonts for Stellent Converters
- Default Locale for Novell Vibe
- User ID for Novell Vibe
- Network Information
- Database Selection
- Database Type
- JDBC URL
- Credentials
- Setup
- Encryption Algorithm
- Java JDK Location
- Outbound E-Mail Configuration
- Protocol
- Host, Port, and Time Zone
- Username, Password, and Authentication
- Allow Sending E-Mail to All Users
- Inbound E-Mail Configuration
The installation program stores the information it gathers in the installer.xml file in the same directory where you started the installation program.
-
After you have provided all the requested information, click to begin the Vibe installation.
-
When the installation is completed, click to exit the Vibe installation program.
Information about the installation process is written to the installer.log file in the same directory where you ran the Installation program. If a problem arises during the installation, the installer.log file provides information that can help you resolve the problem.
-
Continue with Section 4.1.4, Configuring Vibe to Start Automatically on Reboot.
Using the Text-Based Installation Program
If you try to start the GUI Vibe installation program in an environment where the X Windows System is not running, the text-based Vibe Installation program starts instead.

If you want to use the text-based installation program in an environment where it is starting with a GUI by default, use the following command in the directory where the installation program is located:
./installer-teaming.linux --text
IMPORTANT:The text-based Vibe installation program must be run in the same directory where the Vibe license file is located. If the license file is not in the same directory, the text-based installation program cannot find it.
The text-based installation program gathers the same configuration information as the GUI installation program does. This information is stored in the installer.xml file in the directory where you run the installation program.
The installation program does not write the information it gathers into the installer.xml file until you exit the installation program, and you cannot go back when you use the text-based installation program. Therefore, when you use the text-based installation program, you should plan your installation carefully in advance, using the Basic Vibe Installation Summary Sheet or the Advanced Vibe Installation Summary Sheet. If you make a mistake during the installation, continue to the end of the installation process and exit the installation program normally, so that all information is saved. Then run the text-based installation program again. Your previous information is supplied as defaults and you can change the information as needed.
Performing a Silent Installation
If your Vibe system expands beyond one server, you might need to repeatedly install the same Vibe components. A silent installation makes this an easy process. Edit an existing installer.xml file so that it has the hostname of the server where you want to perform the silent installation and copy it to that server. In the directory where the installation program is located. use the appropriate command to run the Vibe installation program, depending on the action that you want the silent installation to perform:
./installer-teaming.linux --silent --install
./installer-teaming.linux --silent --upgrade
./installer-teaming.linux --silent --reconfigure
The Installation program obtains all the information it needs from the installer.xml file and completes the installation without user interaction.
4.1.4 Configuring Vibe to Start Automatically on Reboot
You can configure Vibe to start automatically each time you reboot the Linux server.
-
As the Linux root user, enter the following command:
chkconfig --add teaming
-
To verify that automatic startup is turned on, enter the following command:
chkconfig teaming
4.1.5 Setting Up Port Forwarding
In order to make Vibe available on the default HTTP/HTTPS ports of 80 and 443, you must set up port forwarding in order to forward the browser default ports (80 and 443) to the Vibe server ports (8080 and 8443). In addition, you must set up port forwarding if you want to forward the default SMTP mail host port (25) to the default Vibe internal mail host port (2525).
You can set up port forwarding in one of two ways, depending on whether or not you are using the Vibe server as a firewall.
Using the SuSEfirewall2 File
To enable port forwarding on a SUSE Linux server that uses SuSEfirewall2:
-
As the Linux root user, open the following file:
/etc/sysconfig/SuSEfirewall2
-
Find the following line:
FW_REDIRECT=""
-
Between the quotation marks, copy and insert the following string:
0/0,ip_address,tcp,80,8080 0/0,ip_address,tcp,443,8443
                                        0/0,ip_address,tcp,25,2525
-
Replace ip_address with the IP address of the Vibe server.
-
Save the SuSEfirewall2 file, then exit the text editor.
-
Use the following command to restart the firewall:
/sbin/SuSEfirewall2 start
-
Use the following command to verify that the default browser ports (80 and 443) have been forwarded to the Vibe server ports (8080 and 8443) and that the default SMTP mail host port (25) has been forwarded to the Vibe internal mail host:
iptables-save | grep REDIRECT
Now, users do not need to include a port number in the Vibe site URL.
Using iptables Commands
To use iptables commands to enable port forwarding on any type of Linux server:
-
As the Linux root user, change to the /etc/init.d directory.
-
In a text editor, create a new file for a set of iptables commands, for example:
gedit vibe-iptables
-
Copy and paste the following lines into the vibe-iptables file:
iptables -t nat -A OUTPUT -d localhost -p tcp --dport 80
                                       -j REDIRECT --to-ports 8080

iptables -t nat -A OUTPUT -d hostname -p tcp --dport 80
                                      -j REDIRECT --to-ports 8080

iptables -t nat -A PREROUTING -d hostname -p tcp --dport 80
                                          -j REDIRECT --to-ports 8080

iptables -t nat -A OUTPUT -d localhost -p tcp --dport 443
                                       -j REDIRECT --to-ports 8443

iptables -t nat -A OUTPUT -d hostname -p tcp --dport 443
                                      -j REDIRECT --to-ports 8443

iptables -t nat -A PREROUTING -d hostname -p tcp --dport 443
                                          -j REDIRECT --to-ports 8443

iptables -t nat -A OUTPUT -d localhost -p tcp --dport 25
                                       -j REDIRECT --to-ports 2525

iptables -t nat -A OUTPUT -d hostname -p tcp --dport 25
                                      -j REDIRECT --to-ports 2525

iptables -t nat -A PREROUTING -d hostname -p tcp --dport 25
                                          -j REDIRECT --to-ports 2525
In this example, the lines are wrapped for readability. When you paste them into the text editor, if the lines are still wrapped, remove the hard returns from the middle of the commands, so that you have six iptables commands, each on its own line.
-
Replace hostname with the hostname or IP address of the Vibe server.
-
Save the vibe-iptables file, then exit the text editor.
-
Use the following command to make the file executable:
chmod +x vibe-iptables
-
Use the following command to immediately execute the commands in the vibe-iptables file:
chkconfig vibe-iptables on
-
Use the following command to add vibe-iptables to future server boot initialization:
chkconfig --add vibe-iptables
-
Use the following command to verify that the default browser ports (80 and 443) have been forwarded to the Vibe server ports (8080 and 8443) and that the default SMTP mail host port (25) has been forwarded to the Vibe internal mail host:
iptables-save | grep REDIRECT
Now, users do not need to include a port number in the Vibe site URL.
4.1.6 Starting Vibe on Linux
The Vibe Installation program created a teaming startup script in the /etc/init.d directory.
-
In a terminal window, become root by entering su - and the root password.
-
Enter the following command to start Vibe:
/etc/init.d/teaming start
You must execute the teaming script as root, but the script runs Vibe as the user you selected in Section 3.9.2, Linux User ID for Vibe and specified during installation.
You should see output similar to the following example:
Using CATALINA_BASE:    /opt/teaming/apache-tomcat
Using CATALINA_HOME:    /opt/teaming/apache-tomcat
Using CATALINA_TEMPDIR: /opt/teaming/apache-tomcat/temp
Using JRE_HOME:         /use/java/jdk1.6.0_02/jre
-
To make sure that Vibe is ready for work:
-
Change to the following directory:
/opt/novell/teaming/apache-tomcat/logs
where version is the version number of Tomcat that was installed along with Vibe (for example, 6.0.18)
-
Enter the following command to display the end of the Tomcat log:
tail --f catalina.out
At the end of the log file listing, you should see:
INFO: Server startup in nnnn ms
-
-
Press Ctrl+C when you are finished viewing the the catalina.out file.
4.1.7 Checking the Status of the Vibe Server
You can see if Vibe is running by checking for its process ID (PID).
-
In a terminal window, enter the following command:
ps -eaf | grep teaming
You should see the Vibe PID number, along with a listing of configuration settings.
4.1.8 Restarting Vibe
You need to restart Vibe whenever you use the Vibe installation program to make configuration changes, as described in Section 10.0, Performing an Advanced Vibe Installation.
-
As root in a terminal window, enter the following command:
/etc/init.d/teaming restart
You should see the same output as when you originally started Vibe.
4.1.9 Stopping Vibe
-
As root in a terminal window, enter the following command:
/etc/init.d/teaming stop
You should see the same output as when you started Vibe.
-
To verify that Vibe has stopped, check for its PID number:
ps -eaf | grep teaming
The Vibe PID number, along with a listing of configuration settings, should no longer be displayed.
4.1.10 Uninstalling Vibe
If you move the Vibe site to a different server, you can delete the Vibe files from the original server to reclaim disk space. The default Vibe file locations are:
|
Vibe Software |
/opt/novell/teaming |
|
Vibe File Repository and Lucene Index |
/var/opt/novell/teaming |
|
MySQL Database |
/var/lib/mysql |
For a complete list of your Vibe files, check the installer.xml file in the directory where you originally ran the Vibe installation program.