7.2 Creating an Administrator-Defined Field
Regardless of the type of administrator-defined field you want to create, the steps are the same, whether it is a , or field.
-
In ZENworks Control Center, click , then click the tab.
-
In the Administrator-Defined Fields panel, click the type of field you want to create: or .

The User Fields panel shows existing defined fields, along with the following information:
Name: The name of the field.
Data Type: The data type: character, integer, decimal, or date.
Size: The number of alphanumeric characters. This applies only to character-type fields.
Edit Type: Specifies how the user enters a response. The values are , , and .
Default Value: The value that is specified when the field is created.
Internal Name: The field’s internal ID.
-
Click .

-
Fill in the fields:
Type: Filled in by default depending on the type of field you selected.
Name: Name of the administrator-defined field. This field is required.
Default Value: The default value of the field.
Data Type: , or .
Size: The maximum number of alphanumeric characters allowed in the field. This applies only to character-type fields.
Edit Type: Allows greater flexibility in entering and selecting field values. There are three options:
-
Edit: Allows the user to enter a value or edit the default value.
-
List: Allows the user to select a value from a list of possible choices.
-
Combo: Allows the user to enter a value or select from a list.
Edit Mask: Select a format from the field list to restrict how a value is entered. The choices are phone, time, and currency. This applies only to character-type fields.
-
-
Click .
-
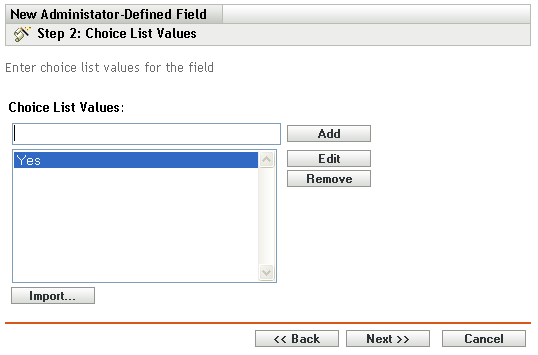
If you chose or as the in Step 4, specify a list of choice values and click .
-
Specify a value in the field.
-
Click . Repeat for additional values.
-
(Optional) Select a value and click to change it.
-
(Optional) Select a value and click to remove it.
-
(Optional) Import a list of values by clicking and specifying a file in the field.
-
-
Click to create the new field.