18.1 Configuring System Update Settings
You should configure System Update before attempting to use it. Configure as many of the following settings as necessary for your system:
18.1.1 Check for Updates Schedule
The default is to not schedule update checking ( is displayed in the field). With this scheduling option selected, the only way you can check for software updates is to do so manually in the Available System Updates panel on the tab.
You can specify how often you want to check for updates. When you do this, information on available updates is automatically downloaded from Novell to the Available System Updates panel on the tab when the schedule fires. This does not download the update content itself. Downloading can be scheduled in the Download Schedule panel (see Download Schedule).
To schedule checking for the ZENworks software updates:
-
In ZENworks Control Center, click in the left pane, then click the tab.
-
Click to expand its options, click to expand its options, then select .
In the Check for Updates panel, there are two scheduling options for updates:
-
No Schedule: The default is to not schedule update checking. With this scheduling option selected, the only way you can check for software updates is to do so manually in the Available System Updates panel on the tab. To specify the option, continue with Step 3.
-
Recurring: Lets you specify how often you want to check for updates. When you set this option, information on available updates is automatically downloaded from Novell to the Available System Updates panel on the tab when the schedule fires. This does not download the update content itself. To set a recurring schedule, skip to Step 4.
-
-
(Conditional) To exclude scheduled checking for software updates (the default), click the down-arrow in the field, select , click to save the schedule change, then skip to Step 6.
With this option selected, you must check for updates manually. For more information, see Manually Downloading Updates.
-
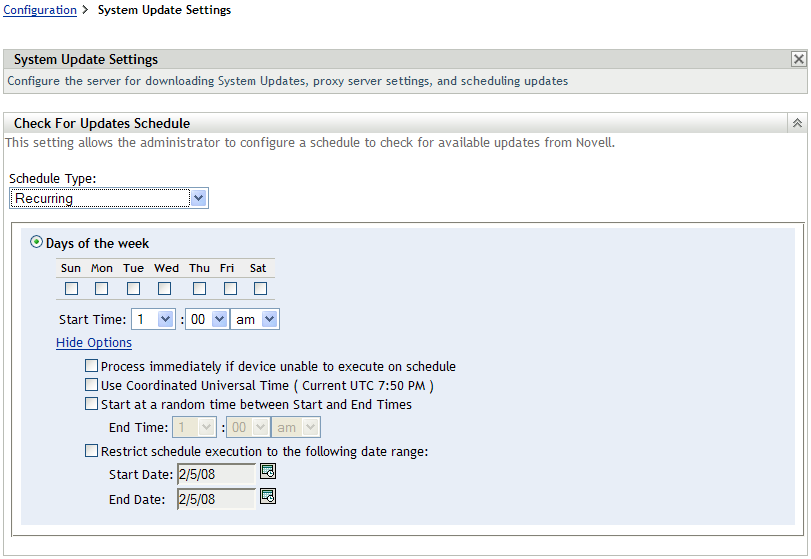
(Conditional) To set a recurring schedule for checking for updates to your ZENworks software, click the down-arrow in the field, then select .
-
Fill in the fields:
-
Select one or more check boxes for the days of the week.
-
To set the time of day for checking to occur, use the box to specify the time.
-
(Optional) For additional scheduling options, click , then select the following options as necessary:
-
Process Immediately if Device Unable to Execute on Schedule: Causes checking for updates to occur as soon as possible if the checking cannot be done according to schedule. For example, if a server is down at the scheduled time, checking for updates occurs immediately after the server comes back online.
-
Use Coordinated Universal Time: Causes the schedule to interpret the times you specify as UTC instead of local time.
-
Start at a Random Time Between Start and End Times: Allows checking for updates to occur at a random time between the time you specify here and the time you specified in Step 5.b. Fill in the fields.
-
Restrict Schedule Execution to the Following Date Range: In addition to the other options, you can specify a date range for when the checking can occur.
-
-
When you have finished configuring the recurring schedule, click to save the schedule change.
-
-
To exit this page, click when you are finished configuring the schedule.
If you did not click to make your changes effective, clicking does so. Clicking also closes the page, but loses your unapplied changes.
18.1.2 Download Schedule
The default is to not schedule downloading of updates ( is displayed in the field). With this scheduling option selected, the only way you can download updates is to do so manually in the Available System Updates panel on the tab.
If you do specify how often you want to download updates, you should set this schedule in conjunction with the schedule to check for updates (see Check for Updates Schedule).
After an update has been checked for and its information displayed in the Available System Updates panel on the tab, you can schedule the download from Novell to automatically occur when the schedule fires.
To schedule ZENworks software updates:
-
In ZENworks Control Center, click in the left pane, then click the tab.
-
Click to expand its options, click to expand its options, then select .
In the Download Schedule panel, there are two scheduling options for downloading updates:
-
No Schedule: The default is to not schedule downloading of updates ( is displayed in the field). With this scheduling option selected, the only way you can download updates is to do so manually in the Available System Updates panel on the tab. To specify the option, continue with Step 3.
-
Recurring: You can specify how often you want to download updates. After an update has been checked for and its information displayed in the Available System Updates panel on the tab, you can schedule the download from Novell to automatically occur when the schedule fires. To set a recurring schedule, skip to Step 4.
-
-
(Conditional) To exclude scheduled downloading of software updates (the default), click the down-arrow in the field, select , click to save the schedule change, then skip to Step 6.
With this option selected, you must download updates manually. For more information, see Section 19.2, Downloading Updates.
-
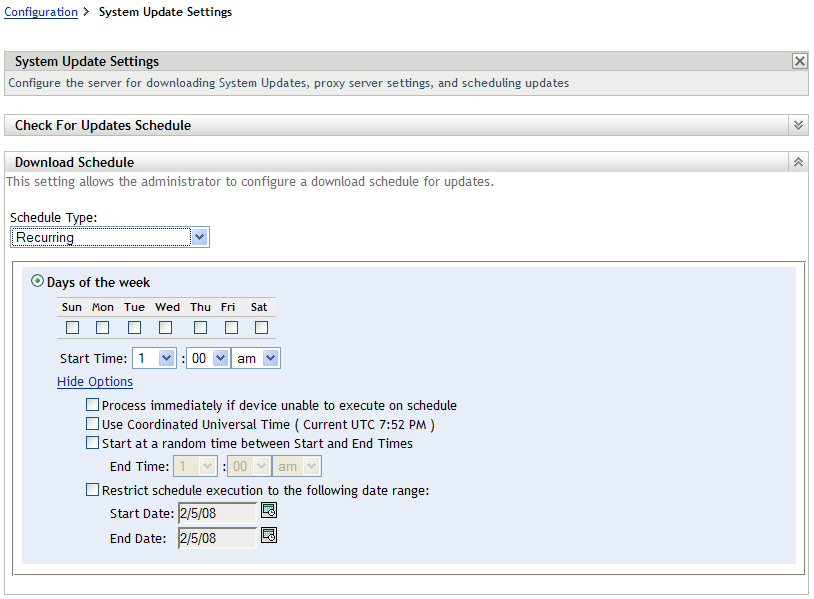
(Conditional) To set a recurring schedule for downloading updates to your ZENworks software, click the down-arrow in the field, then select .
-
Fill in the fields:
-
Select one or more check boxes for the days of the week.
-
To set the time of day for downloading to occur, use the field to specify the time.
-
(Optional) For additional scheduling options, click , then select the following options as necessary:
-
Process Immediately if Device Unable to Execute on Schedule: Causes checking for updates to occur as soon as possible if the checking cannot be done according to schedule. For example, if a server is down at the scheduled time, checking for updates occurs immediately after the server comes back online.
-
Use Coordinated Universal Time: Causes the schedule to interpret the times you specify as UTC instead of local time.
-
Start at a Random Time Between Start and End Times: Allows downloading of updates to occur at a random time between the time you specify here and the time you specified in Step 5.b. Fill in the fields.
-
Restrict Schedule Execution to the Following Date Range: In addition to the other options, you can specify the days when downloading can occur.
-
-
When you have finished configuring the recurring schedule, click to save the schedule change.
-
-
To exit this page, click when you are finished configuring the schedule.
If you did not click to make your changes effective, clicking does so. Clicking also closes the page, but loses your unapplied changes.
18.1.3 E-Mail Notification
In conjunction with using stages, you can set up e-mail notifications to indicate when each stage has completed. When you deploy an update, you can specify to use the e?mail notifications.
-
In ZENworks Control Center, click in the left pane, then click the tab.
-
Click to expand its options, click , then select to display the E?mail Notification panel:
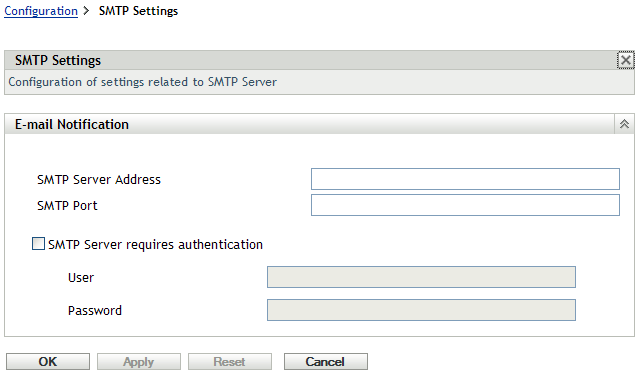
Staging must be used to receive notifications, and the stage behavior must be set to one of the following:
SMTP must be configured in order for the staging e-mail configuration to work.
-
-
(Conditional) If you do not have SMTP configured:
-
To access the SMTP Settings page, click in the left pane, click the arrows in the heading to expand its options, click , then select .
-
In the section, fill in the fields:
SMTP Server Address: Specify the DNS name or IP address of the SMTP server.
SMTP Port: Specify the SMTP server’s communication port.
Use SSL: To use an encrypted SSL channel for sending e-mails. By default this option is disabled.
SMTP Server Requires Authentication: If authentication is required, select this check box, then specify the and information.
-
Click to save the changes.
-
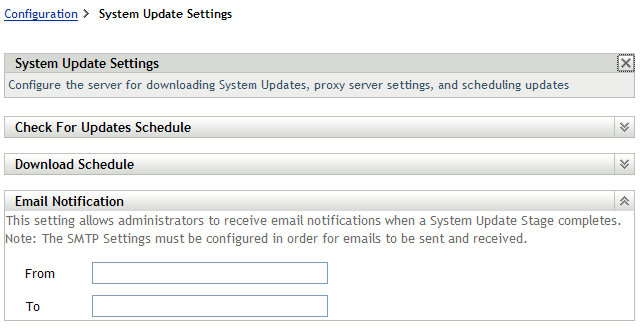
Click to expand its options, click , then select to display the E-mail Notification panel:
-
-
Fill in the fields:
From: Either specify your administrator e?mail address, or type something descriptive, such as System-Update-Stage-Notice. Do not use spaces between words.
To: Specify your administrator’s e-mail address. You can specify multiple e-mail addresses separated by a comma (,).
This is the person you want to be notified when the stage ends.
-
Click to make the changes effective.
-
Either click to close the page, or continue with another configuration task.
If you did not click to make your changes effective, clicking does so. Clicking also closes the page, but loses your unapplied changes.
18.1.4 Proxy Server Settings
This option is useful for restrictive environments where you do not want all of your production servers to have Internet access. This is used in conjunction with the Dedicated Server Settings panel.
To specify a proxy server:
-
In ZENworks Control Center, click in the left pane.
-
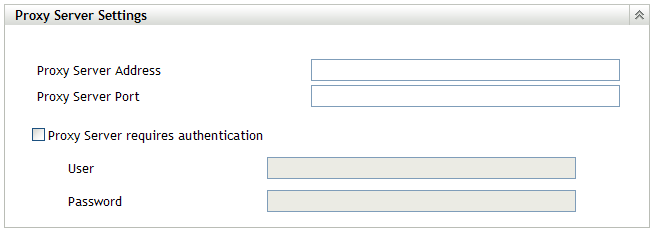
On the tab, expand the section (if necessary), click , then click to display the Proxy Server Settings panel.
-
Fill in the fields:
Proxy Server Address: Specify the DNS name or IP address of the proxy server.
Proxy Server Port: Specify the proxy server’s communication port.
Proxy Server Requires Authentication: When you select this check box, the and fields become editable. If authentication is required, select this check box and specify the username and password for access to the proxy server.
-
Click to make the changes effective.
-
Either click to close the page, or continue with another configuration task.
If you did not click to make your changes effective, clicking does so. Clicking also closes the page, but loses your unapplied changes.
18.1.5 Dedicated Server Settings
By default, any available Primary Server in the Management Zone can be used randomly to download the updates. However, you can specify one ZENworks Server to be dedicated to handling your update downloads. The server that you select should have access to the Internet, directly or through a proxy server.
The following sections contain more information:
Specifying a Dedicated Update Server
-
In ZENworks Control Center, click in the left pane.
-
On the tab, expand the section (if necessary), click , then click to display the Dedicated Server Settings panel:

-
Browse for and select a ZENworks Primary Server.
The server’s identification is displayed in the field.
This ZENworks Server must be a member of the Management Zone.
-
Click to make the changes effective.
-
Either click to close the page, or continue with another configuration task.
If you did not click to make your changes effective, clicking does so. Clicking also closes the page, but loses your unapplied changes.
Clearing a Dedicated Update Server
Clearing a dedicated update server causes your updates to be retrieved randomly from any Primary Server in the Management Zone.
-
In ZENworks Control Center, click in the left pane.
-
On the tab, expand the section (if necessary), click , then click to display the Dedicated Server Settings panel:

-
Click to remove the dedicated server from the field.
-
(Conditional) If you need to revert to the last saved dedicated server setting, click .
This resets the dedicated server to the last saved setting, such as when you last clicked or .
-
Click to make the change effective.
IMPORTANT:Previous settings cannot be restored after you click .
18.1.6 Stage Timeout Settings
Deployment stages are optional; however, stages allow you to deploy an update one step at a time, such as to a test group first, then to your managed devices. If a failure occurs during the update process, the process is halted. E?mail notifications can let you know when each stage has completed.
The global default timeout setting is 3 days. This provides the same timeout length for each stage. For information about setting the timeout for individual stages, see Modifying the Stage Timeout.
Set this value to be long enough to accommodate updating all of the devices you plan to update.
When the timeout value is reached, the stage’s deployment stops and an e-mail message is sent, if e-mail notification is configured. You can cancel the deployment, or you can clear the error to restart the stage and reset the timeout. Or, you can ignore all pending devices to trigger a stage progression (either automatic, or wait for administrator action based on the setting).
You can use E-mail notification to know when a stage has completed.
To configure global stage timeout settings:
-
In ZENworks Control Center, click in the left pane.
-
On the tab, expand the panel (if necessary), click , then click to display the Stage Timeout Settings panel:

-
Select the check box, then specify the days, hours, and minutes desired.
-
Click to make the changes effective.
-
Either click to close the page, or continue with another configuration task.
If you did not click to make your changes effective, clicking does so. Clicking also closes the page, but loses your unapplied changes.
18.1.7 Reboot Behavior
Some updates do not require a device to be rebooted after they have been deployed to a device. However, if a reboot is required to complete the update process, the deployment is not completed until the device is rebooted.
To configure the reboot behavior:
-
In ZENworks Control Center, click in the left pane.
-
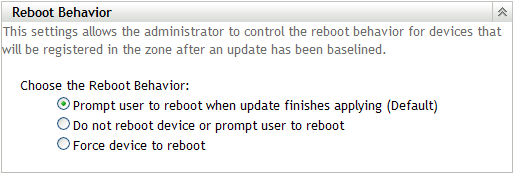
On the tab, expand the panel (if necessary), click , then click to display the Reboot Behavior panel:
-
Select one of the following options:
-
Prompt User to Reboot When Update Finishes Applying (Default): After the update has been applied, a request to reboot is immediately displayed. If the user initially rejects rebooting, the user is periodically requested to reboot the device, until the device is rebooted.
-
Do Not Reboot Device: The device does not reboot; however, the user is periodically requested to reboot the device, until the device is rebooted.
-
Force Device to Reboot: After the update has been applied, the device is automatically rebooted without user intervention if a reboot is required by the update.
-
-
Click to make the changes effective.
-
Either click to close the page, or continue with another configuration task.
If you did not click to make some of your changes effective, clicking does so. Clicking also closes the page, but loses your unapplied changes.